Basic Development Workflow
A grasp of these concepts will help you understand this documentation better:
Introduction
Please note that As-code features are only available by default on Holistics 4.0. If you are on Holistics 3.0 and would like to try them out, please submit a request to us at [email protected]
In Holistics 4.0, the major update is the capability to implement software engineering best practices in the analytics workflow, which also known as As-code.
This documentation aims to guide you through the process of getting started with As-code, using tutorials for both the code-based interface and the GUI.
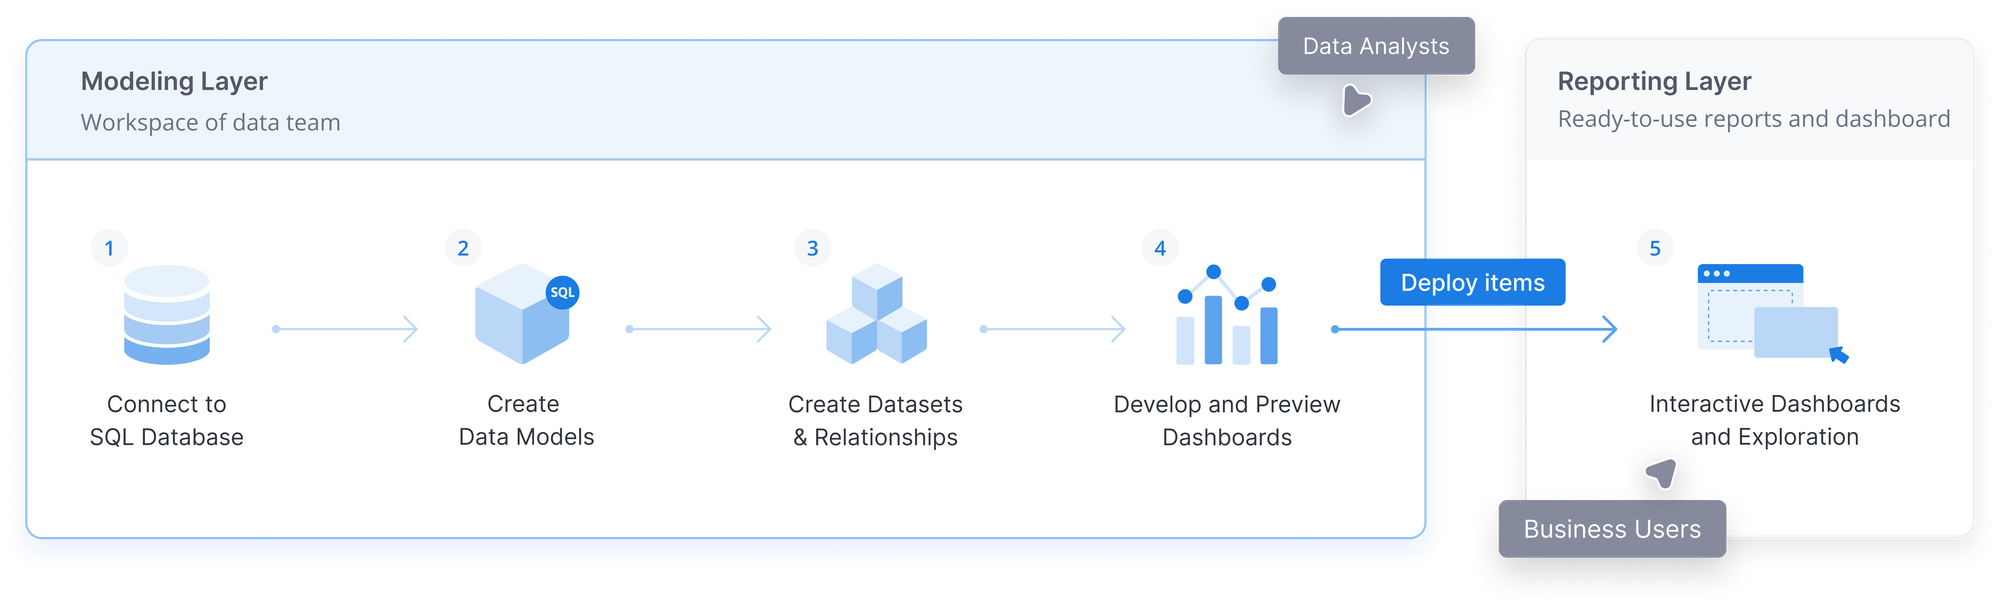
These are the basic steps of the development workflow in Holistics:
- Connect to a Database
- Enable Development Mode
- Develop Data Models
- Develop Datasets
- Validate Reports
- Commit Changes & Deploy
- Data Exploration & Reporting
In this document, we will briefly walk through each step.
1. Connect to a Database
Since Holistics only works with databases, make sure you have connected to at least one database so that you can start building models and datasets on top of your physical tables.
2. Enable Development Mode
After navigating to the Modeling 4.0 page, click the toggle to switch from Production Mode to Development Mode. In the Development Mode, you can freely change your models and datasets without affecting the reports your end-users are viewing.
For more information about the two modes, please refer to Mode & Deployment docs.
3. Develop Data Models
For more information, please refer to Model Syntax doc
There are two types of data model in Holistics 4.0: Table Model and Query Model.
Table Model
A Table Model is used to make a table in your database available in Holistics's modeling layer. There are two ways to create a Table Model:
- With code
- With GUI
Step 1: Add a model object in the model file and name it:
Model users { }
Step 2: Inside the curly brackets { }, add model's metadata:
type: 'table'
label: 'Users'
description: ''
data_source_name: 'demodb'
owner: '[email protected]'
table_name: '"ecommerce"."users"'
Step 3: Specify which dimensions and measures you want to include in the model.
dimension id {
  label: 'Id'
  type: 'number'
}
dimension sign_up_date {
  label: 'Sign Up Date'
  type: 'date'
}
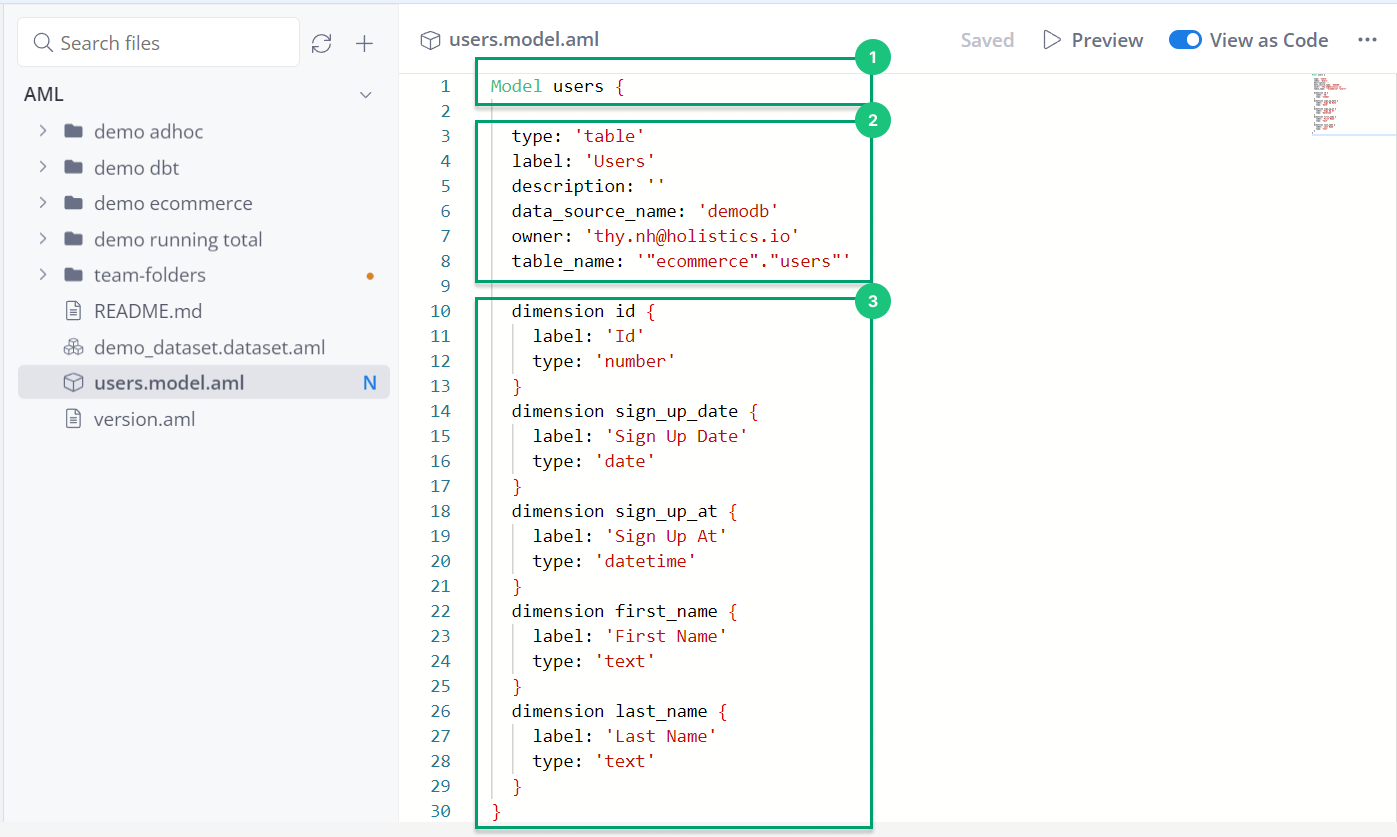
Full example:
Model users {
  type: 'table'
  label: 'Users'
  description: ''
  data_source_name: 'demodb'
  owner: '[email protected]'
  table_name: '"ecommerce"."users"'

  dimension id {
    label: 'Id'
    type: 'number'
  }
  dimension sign_up_date {
    label: 'Sign Up Date'
    type: 'date'
  }
  dimension sign_up_at {
    label: 'Sign Up At'
    type: 'datetime'
  }
  dimension first_name {
    label: 'First Name'
    type: 'text'
  }
  dimension last_name {
    label: 'Last Name'
    type: 'text'
  }
}
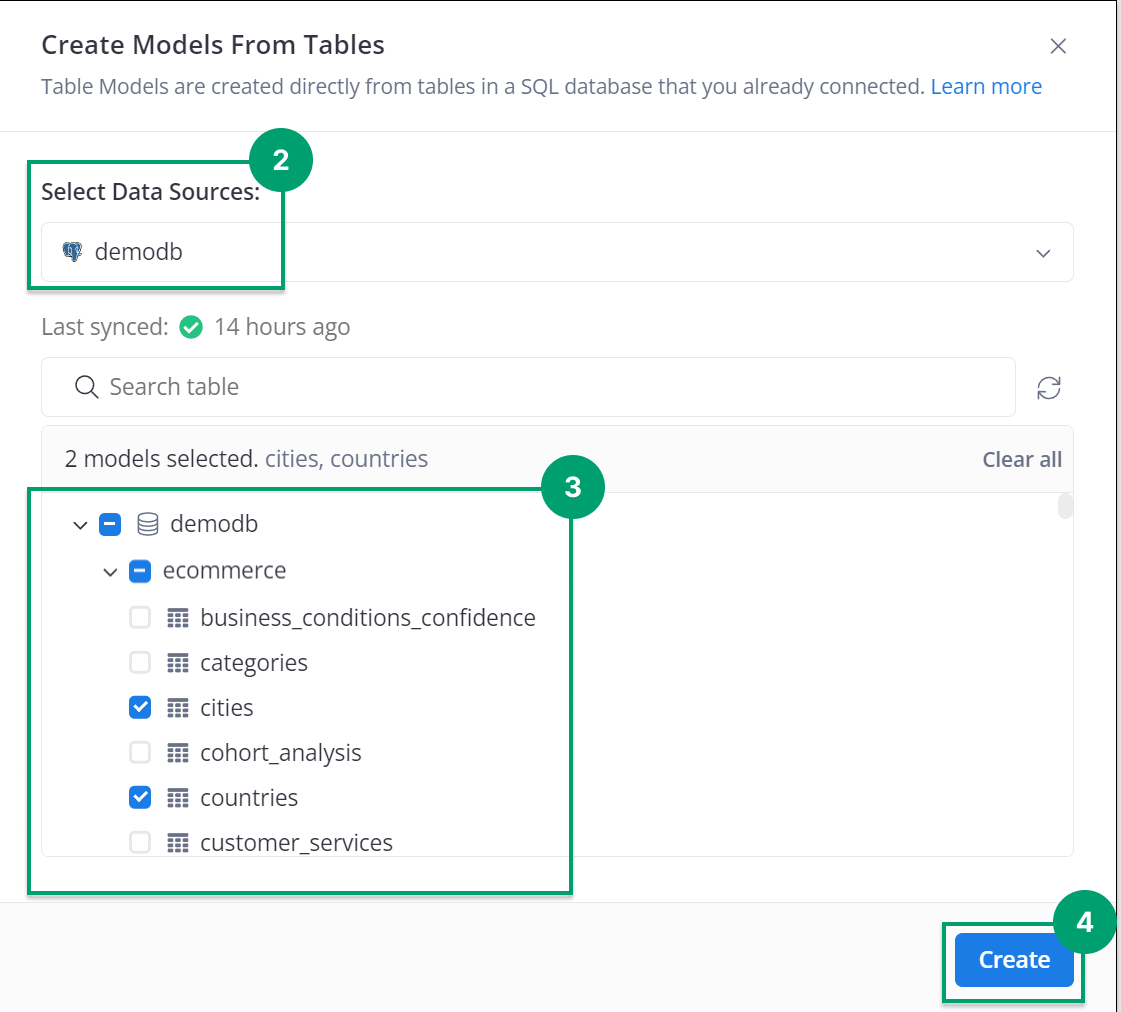
Step 1: Click the “Add (+)” button to add Table Model. Alternatively, you can select the “Add” button located under the folder where you want to organize your Data Models
Step 2: Choose a Data Source that contains the model you want to use.
Step 3: From the list of available models within the dataset, select the model that you would like to use
Step 4: Finally, select CREATE
Query Model
A Query Model is used to centralize SQL logic and data transformations into a reusable model, enabling the reusability of business logic across reports and analyses. This helps reduce duplicate SQL queries and improve query performance.
- With code
- With GUI
Step 1: (Only if you are using AML 1.0) Import all the files that store the models you want to include in your model's query. This step is no longer necessary in AML 2.0.
import 'path/to/model_a_file' {model_a}
import 'path/to/model_a_file' {model_a}
Step 2: Add a model object in the model file and name it:
Model location{ }
Step 3: Define model's metadata inside the curly brackets { } of model object:
type: 'query'
label: 'Location'
description: ''
data_source_name: 'demodb'
owner: '[email protected]'
Step 4: Add the names of the models that will be used in the query:
models: [
  ecommerce_cities,
  ecommerce_countries
]
Step 5: Define the query of the model
//These queries select data from two tables, "ecommerce_cities" and "ecommerce_countries",
//and combine them to show the name of each city and its corresponding country.
query: @sql
      SELECT {{ #ci.name }} as city_name,
             {{ #co.name }} as country_name
      FROM {{ #ecommerce_cities as ci }}
      LEFT JOIN {{ #ecommerce_countries as co }}
      ON {{ #co.code }} = {{ #ci.country_code }}
:::
Step 6: Specify which dimensions and measures you want to include in the model:
dimension city_name {
  label: 'City Name'
  type: 'text'
}
dimension country_name {
  label: 'Country Name'
  type: 'text'
}

Full example:
//Skip the import step if you are using AML 2.0
import '../path/to/cities.model.aml' {cities}
import '../path/to/countries.model.aml' {countries}

Model location {
  type: 'query'
  label: 'Location'
  description: ''
  data_source_name: 'demodb'
  owner: '[email protected]'

  models: [
    ecommerce_cities,
    ecommerce_countries
  ]
  query: @sql
          SELECT {{ #ci.name }} as city_name,
              {{ #co.name }} as country_name
          FROM {{ #ecommerce_cities as ci }}
          LEFT JOIN {{ #ecommerce_countries as co }} ON {{ #co.code }} = {{ #ci.country_code }}
  ;;
  dimension city_name {
    label: 'City Name'
    type: 'text'
  }
  dimension country_name {
    label: 'Country Name'
    type: 'text'
  }
}
Step 1: Click the “Add (+)” button to add Query Model. Alternatively, you can select “Add” button located under the folder where you want to organize your Data Models
Step 2: Choose a Data Source that contains the model you want to use (We choose “demodb” in this walk-through)
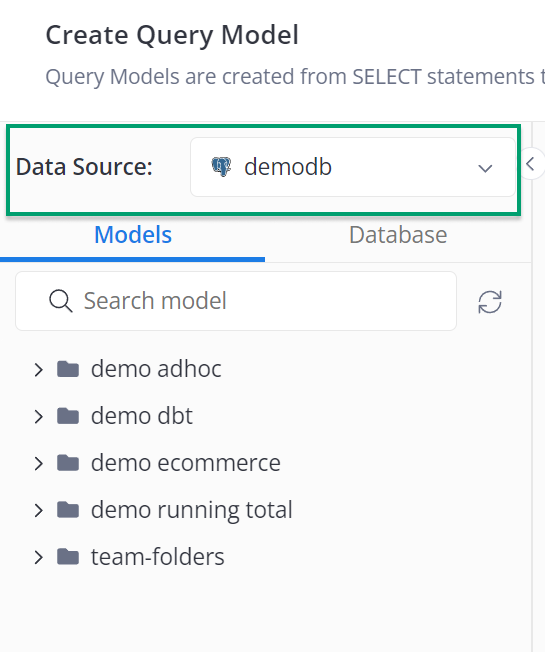
Step 3: Fill out the Model name and define the query of the model
Full example:
//These queries select data from two tables, "ecommerce_cities" and "ecommerce_countries",
//and combine them to show the name of each city and its corresponding country.
SELECT {{ #ci.name }} as city_name,
      {{ #co.name }} as country_name
FROM {{ #ecommerce_cities as ci }}
LEFT JOIN {{ #ecommerce_countries as co }} ON {{ #co.code }} = {{ #ci.country_code }}
4. Develop Datasets
- With code
- With GUI
For more information, please refer to Dataset Syntax doc
A dataset object is defined in a dataset file. You can create a dataset file by adding a new file with the extension .dataset.aml (its full form is dataset_name.dataset.aml).
A dataset component includes its metadata, models used in the dataset, and the relationship among these models.
Step 1: Import all the files that store the models you want to include in the dataset.
Skip this step if you are using AML 2.0
import 'path/to/model_a' {model_a}`
Step 2: Add dataset object in the dataset file and name it
Dataset dataset_name { }
Then inside the curly brackets { } of dataset object
Step 3: Define Dataset metadata
label: "General Dataset"
description: "Short Descritpion"
data_source_name: 'your_data_source'
Step 4: Include all the models in the dataset
models: [model_a, model_b, model_c]
Step 5: Define the relationship among those models added in step 4.
relationships: [
  // define many-to-one relationship
  relationship(model_a.field_name > model_c.field_name, true),

  //define one-to-one relationship
  relationship(model_a.field_name - model_c.field_name, true)
]

Example:
//Skip the import step if you use AML 2.0
import '../path/to/users.model.aml' { users }
import '../path/to/cities.model.aml' {cities}
import '../path/to/countries.model.aml' {countries}

Dataset demo_dataset {
  label: 'Demo Dataset'
  description: ''
  data_source_name: 'demodb'

  models: [
    ecommerce_users,
    ecommerce_countries,
    ecommerce_cities,
  ]
  relationships: [
    relationship(users.city_id > cities.id, true),
    relationship(cities.country_code - countries.code, true)
 ]
}
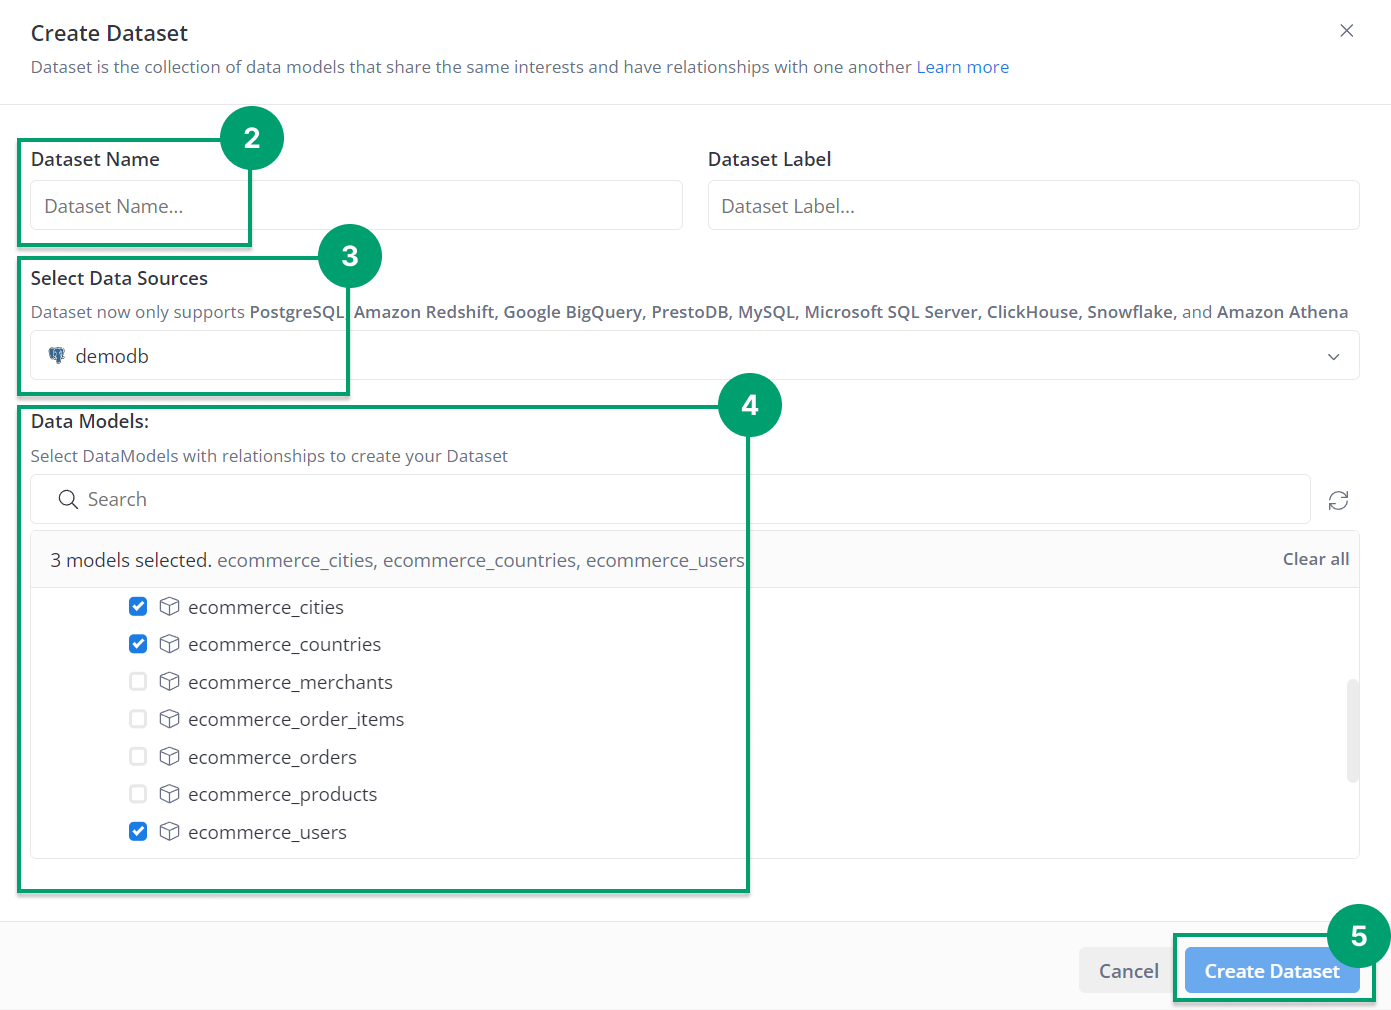
Step 1: Click the “Add (+)” button to add Dataset. Alternatively, you can select “+” button located under the folder where you want to organize your Data Models
Step 2: Fill out Dataset Name field
Step 3: Choose a Data Source that contains the model you want to use.
Step 4: From the list of available models within the dataset, select the model that you would like to use
Step 5: Finally, select Create Dataset
Once you have created a dataset, you can also create relationships between data models to allow more flexible data exploration.
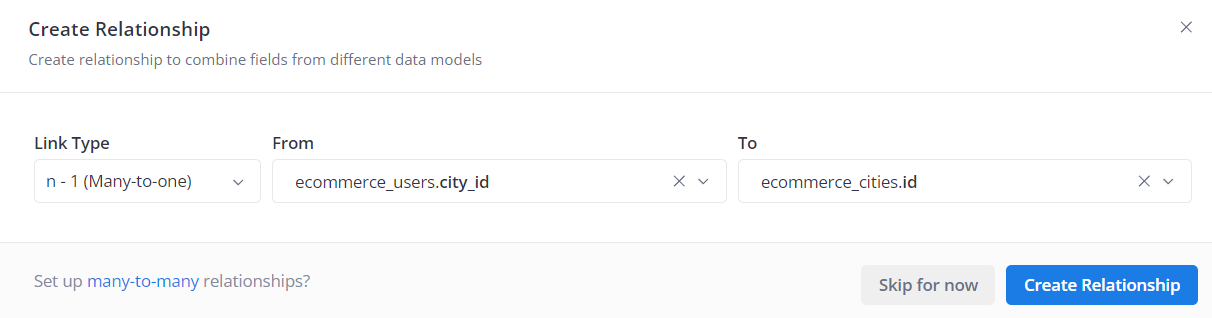 :::info At the moment, we do not have the option to set-up multiple relationships at once. :::
5. Validate your reports
During your modeling process, if you have modified an existing model or dataset, your downstream reports may be affected. To check if the changes break any existing reports, you can use the Reporting Validation feature. The validation step will also detect if any of your current reports are already broken, so that you can trace the cause and fix them.
For more information about this feature, please refer to the Reporting Validation docs.
6. Commit changes and Deploy to Production
If you have not connected to an external Git repository, you can skip the Commit and Push step. You only need to Save changes and then select Deploy to Production. To learn more about external Git provider integration, please refer to the Github/Gitlab Integration doc.
Commit and Push
While developing your AML files, your changes will be automatically saved. If you have connected to an external Git repository, these changes need to be committed to your AML code base to be deployed.

After you have validated your models and dataset, click Commit changes & Push, change the commit message and description if necessary, and then Commit and push.
Deploy to Production
Finally, to have your prepared data available for exploration and insights in Reporting tab, simply click Deploy to Production.
7. Data Exploration & Reporting
After your code has been successfully deployed, the new datasets will appear in the Reporting tab. You can now begin exploring and analyzing your data.

To learn about what you can do further with your dataset and how to create reports:, please refer to: