Manual reverse SSH tunnel
Introduction
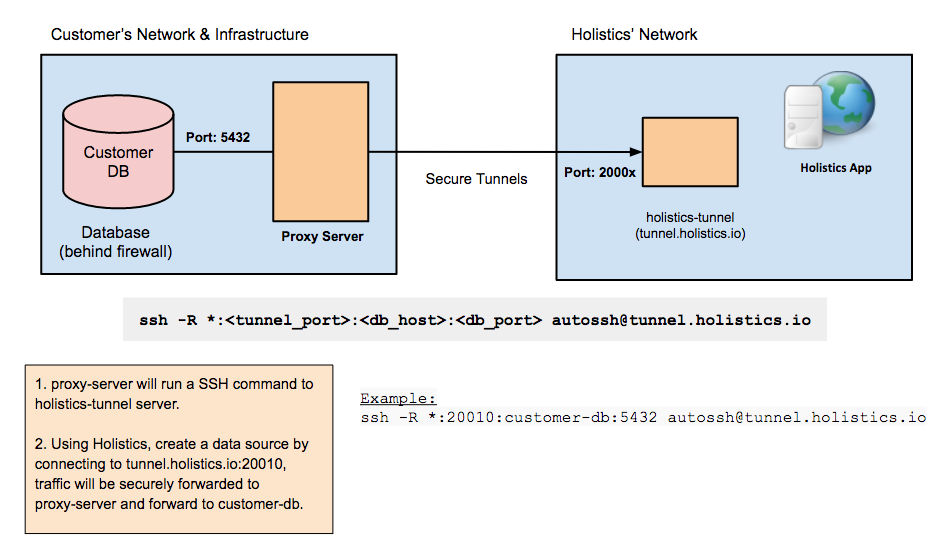
Use the manual setup when the automated script does not fit your operating system, service-management requirements, or internal change-control process. In this approach, Holistics authorizes your public key and assigns tunnel ports, while you manage the SSH command, process supervision, and data source configuration.
If you are still choosing an approach, start with the reverse SSH tunnel overview. You only need either automatic setup or manual setup for a data source, not both.
Set up in a Linux environment
This setup uses autossh to create the reverse SSH tunnel. autossh manages the SSH connection and restarts it when it dies or drops, which makes the tunnel more persistent.
1. Generate an SSH key pair
Generate a new SSH key pair:
ssh-keygen -t rsa -b 4096
When asked for a passphrase, press Enter. A pair of files will be created at the path you entered.
If you already have a key pair, make sure your private key is only readable by your user account:
chmod 400 <path_to_your_private_key_file>
2. Send Holistics your public key
Send your public key, such as ~/.ssh/id_rsa.pub, to [email protected]. In the email, include the reason you want to set up the tunnel manually instead of using the automated script.
Holistics will confirm after your public key has been authorized and send you the secured ports available for your tunnel. Wait for this confirmation before continuing, otherwise the commands below will fail.
3. Set up the tunnel
Install autossh:
sudo apt-get update
sudo apt-get install autossh
We will run autossh in a screen session. You can also run it as a background daemon, but that is more difficult to manage.
Install screen:
sudo apt-get install screen
Create a screen session:
screen -S holistics
Inside the screen session, run:
autossh -M 0 -N -o "ServerAliveInterval 60" -o "ServerAliveCountMax 3" \
-R *:[tunnel_port]:[yourdb.server.com]:[db_port] \
[email protected] -p 50022 \
-i <path_to_your_private_key_file>
Before you run the command, change the second line to match the connection string to your database server:
-R *:[tunnel_port]:[aws.ip.to.redshift.com]:[redshift_port]
For example:
autossh -M 0 -N -o "ServerAliveInterval 60" -o "ServerAliveCountMax 3" \
  -R *:20032:db.somehost.com:5432 \
  [email protected] -p 50022 \
  -i ~/.ssh/id_rsa
In this example:
- Your database host is
db.somehost.com. - Your database port is
5432, which is the default PostgreSQL port. - Your tunnel port is
20032. This must be one of the authorized ports you received from Holistics.
To detach from the screen session, press Ctrl-a d. To enter the screen session again, run:
screen -x holistics
4. Add a new data source
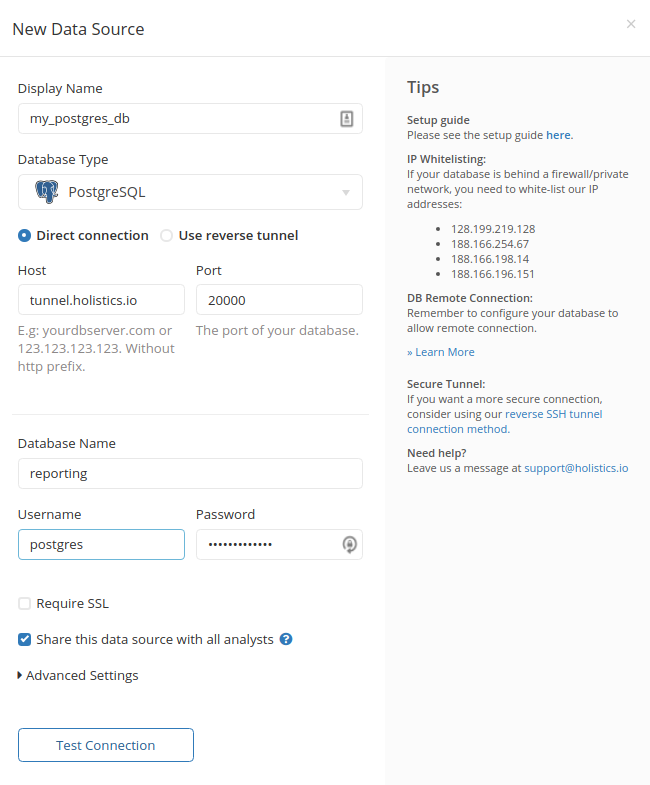
Open Holistics and add a data source using the database credentials you have.
Enter the following host and port:
- Host:
tunnel.holistics.io - Port:
[tunnel_port]
Select Direct connection because this manual setup does not use the Holistics automation script.
After saving the data source, keep the tunnel process running for Holistics to maintain the database connection.
Set up in a Windows environment
Use this setup when you need to create the tunnel from a Windows machine.
- Download Bitvise SSH Client from https://www.bitvise.com/download-area.
- Open Bitvise SSH Client.
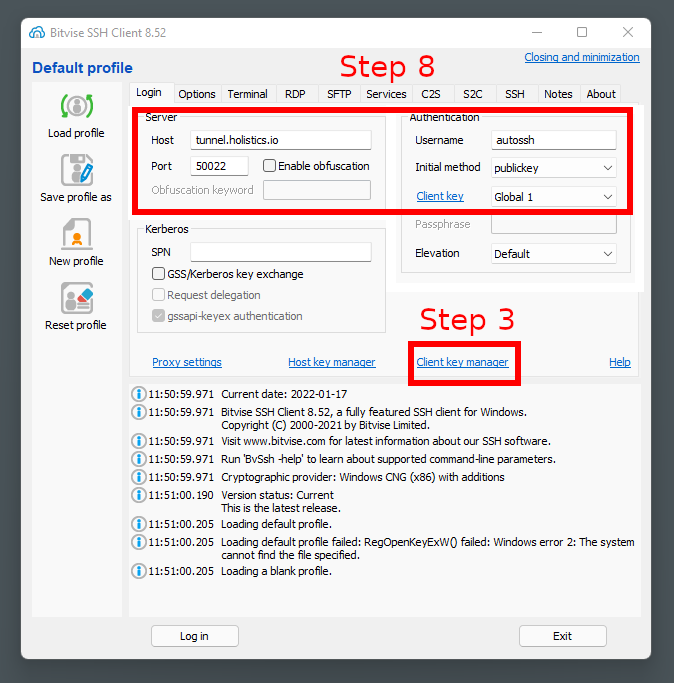
- Click Client key manager.
- Click Generate New.
- Enter passphrases and generate a new key pair.
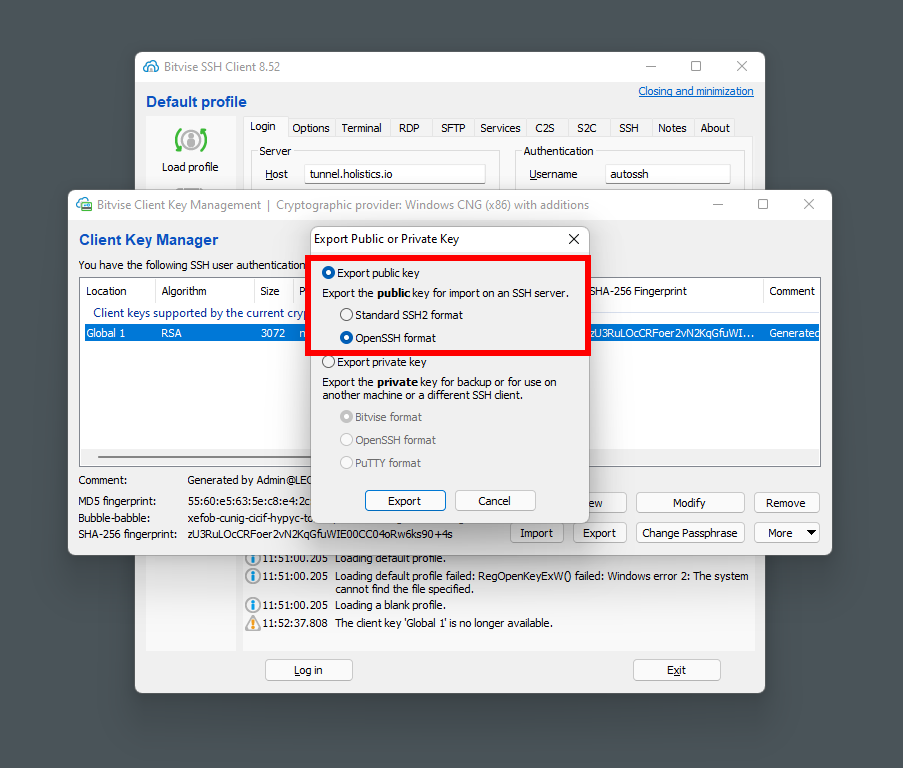
- Export the public key in OpenSSH format.
-
Send the public key to Holistics Support at [email protected], then wait to receive the port range.
-
Fill in the Server and Authentication sections as shown in the screenshot above. For Server, use the correct tunnel server for your Holistics region.
-
In the Options tab, disable everything in the On Login section.
-
Go to the S2C tab and add a new rule:
- Listen Interface:
127.0.0.1 - List. Port: one of the ports received in step 7. Later, you should input this port in the Holistics data source form.
- Destination Host: host of SQL Server.
- Dest. Port: listening port of SQL Server. The default is
1433.
- Listen Interface:
-
Save the profile.
-
Log in.
-
Add a new data source using the tunnel connection you have just set up.
Set up SQL Server security for user login
If you are connecting to SQL Server, make sure SQL Server authentication is enabled.
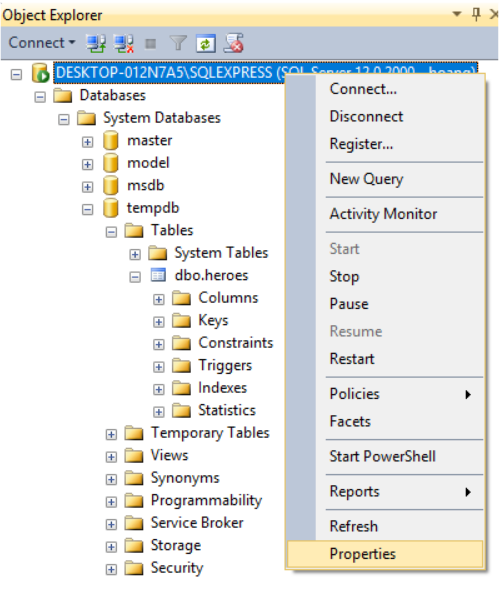
In SQL Server Management Studio, log in to your server, then right-click the server and go to Properties > Security.
In Server Authentication, choose SQL Server and Windows Authentication Mode, then click OK.
Troubleshooting
Manual tunnels are managed outside the Holistics automation script, so you should check the tunnel process and the database path from your proxy server.
I cannot connect to tunnel.holistics.io:[my_tunnel_port] directly
Tunnel ports are restricted to Holistics servers only, so you cannot connect to tunnel.holistics.io:[my_tunnel_port] directly from your side.
Instead, you can:
- Test the full connection using the Holistics data source form.
- Check the SSH tunnel process.
- Check the connection from your proxy or bastion server to your database.
For Linux manual tunnels, you can also reference the automatic tunnel troubleshooting guide, but ignore the check for the h_autossh service because manual tunnels do not use that service.