Local development with AI agents
Introduction
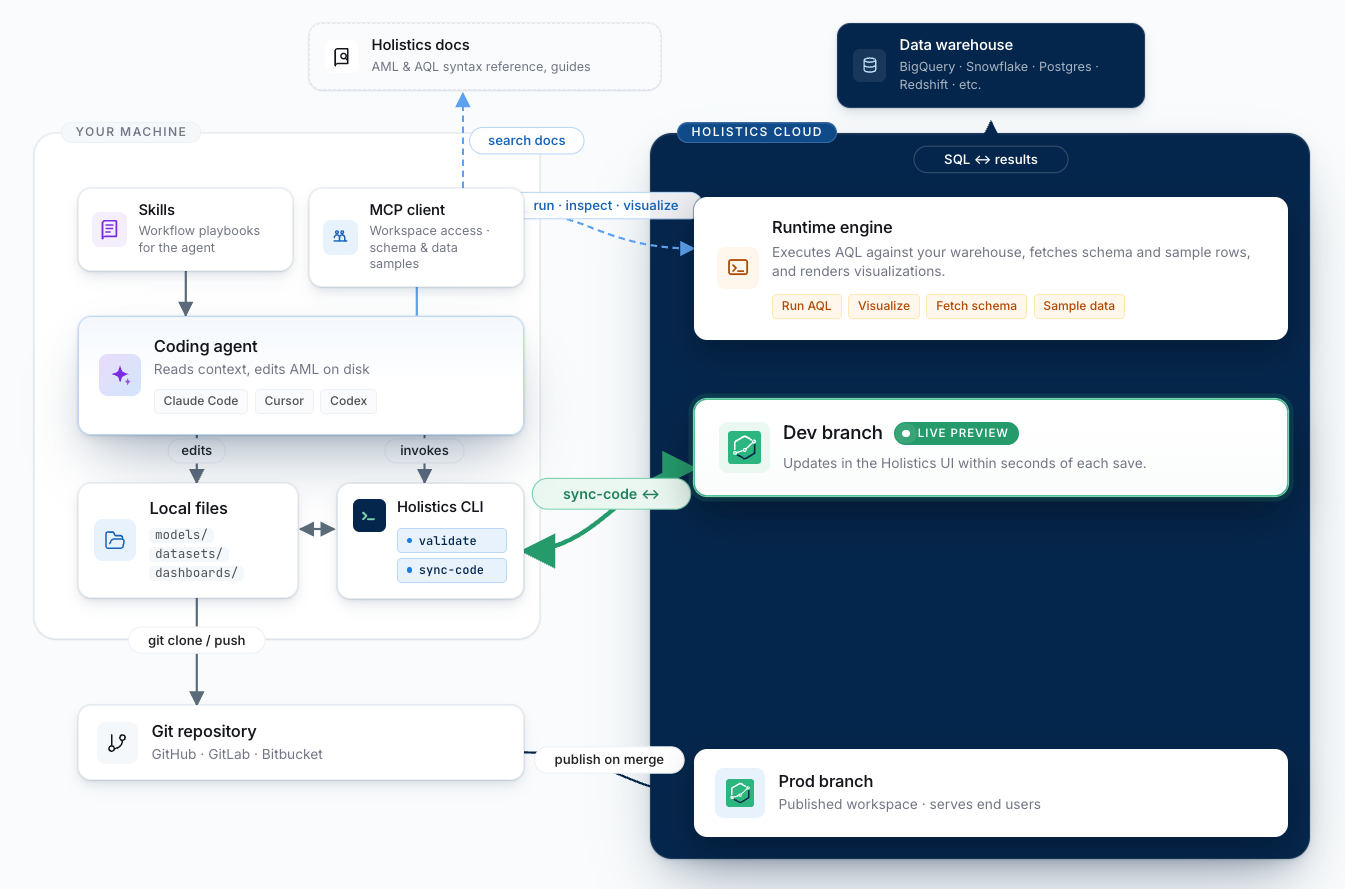
Holistics supports using a coding agent (Claude Code, Cursor, GitHub Copilot, Codex) for BI development. You edit AML locally in your IDE, the Holistics CLI keeps those files in continuous sync with a cloud dev branch, and the MCP server gives the agent access to your workspace to run queries, get sample data, or inspect data warehouse schemas.
Three moving parts:
- Holistics CLI: bidirectional sync between your local files and a Holistics dev branch
- MCP server: live workspace access for the agent (explore models, run AQL, inspect schemas)
- Holistics skills: reusable AML/AQL workflows the agent can invoke — the
holistics-developmentskill also automates CLI authentication, MCP connection, and sync setup
The CLI sync workflow stands on its own. Follow steps 1–2 below to set up your project, then see the Holistics CLI guide to authenticate and run holistics sync-code.
Prerequisites
Before you begin, make sure you have:
- A Holistics project connected to an external Git repository (GitHub, GitLab, Bitbucket, etc.)
- A coding agent (Claude Code, Cursor, GitHub Copilot, Codex). Optional if you only want IDE + sync.
How it fits together
Setup
1. Enable Git Workflow and connect repository
In Holistics, enable Git Workflow for your project and connect it to an external Git repository (GitHub, GitLab, or Bitbucket).
This is a one-time setup per project.
See Connect to an external Git repository for the full guide.
2. Set up your local project
Clone the repository, create a branch, and open it in your IDE:
git clone [email protected]:your-org/your-holistics-repository.git
cd your-holistics-repository
git checkout -b feature/add-new-dashboard
A typical project structure looks like:
your-holistics-repository/
├── models/
│   ├── orders.model.aml
│   └── users.model.aml
├── datasets/
│   └── ecommerce.dataset.aml
└── dashboards/
    └── sales_overview.page.aml
3. Install Holistics skills
Open the project in Claude Code, then install the holistics/skills plugin from the marketplace:
/plugin marketplace add holistics/skills
Then install via /plugin > Marketplaces > holistics-skills > Browse plugins > holistics-development.
For other AI agents, import the skill files directly from the repository.
4. Run /setup-amql-development
Trigger the skill in Claude:
/setup-amql-development
The skill walks you through and automatically handles:
- Installing and authenticating the Holistics CLI
- Connecting the MCP server to your agent
- Starting a continuous
holistics sync-codesession
Follow the prompts from the skill. When it completes, the skill connects your agent to your workspace and starts the sync.
Daily workflow
With the pieces above wired up, the loop looks like:
   ╭─────────────────╮     describe change      ╭──────────────────╮
   │       You       │ ───────────────────────▶ │   Coding Agent   │
   ╰────────▲────────╯                          ╰─────────┬────────╯
            │                                             │
   preview  │                                             │ explore + query
   + tweak  │                                             │ (CLI + Skill)
            │                                             ▼
   ╭────────┴────────╮                          ╭──────────────────╮
   │  Holistics UI   │                          │  Local AML files │
   │   (dev branch)  │                          │     (in IDE)     │
   ╰────────▲────────╯                          ╰─────────┬────────╯
            │                                             │
            │           holistics sync-code               │
            ╰─────────────────◀───────────────────────────╯
                       bidirectional sync
- Describe the change you want to your agent: a new model, a new metric, a dashboard tweak.
- The agent explores your workspace through MCP, edits AML files locally, and follows the patterns from the installed skills.
sync-codepushes each save to your Holistics dev branch within seconds.- Preview in the Holistics UI. Any tweaks you make there sync back to your local files.
- Iterate with the agent until the change is ready.
Ship to production
Commit and push
When your change is ready for review, commit and push your branch:
git add .
git commit -m "Add new sales dashboard"
git push -u origin feature/add-new-dashboard
Then open a pull request through:
- Your Git tooling (
gh pr create, GitLab CLI, etc.) - Your Git host's web UI (GitHub, GitLab, etc.)
- The Holistics web UI
Code review and merge
Have your team review the changes. Once approved, merge to your master branch.
Publish
Publish either:
- Manually through the Holistics UI
- Set up a GitHub Action to auto-publish on merge using the Publish API
- Call the Publish API locally
Tooling
Validation
You can validate your AML at any time, either locally with the CLI or in CI/CD with the Validation API:
-
CLI validation for local validation:
holistics aml validate -
Validation API for project-level validation in CI/CD pipelines:
curl -X POST https://<holistics domain>/api/v2/aml_studio/projects/submit_validate \-H "X-Holistics-Key: $HOLISTICS_API_KEY" \-d '{"branch": "feature/add-new-dashboard""commit-oid": "abc123def456",}'
Both approaches integrate cleanly into CI/CD workflows. For example, you can set up a GitHub Action to run holistics aml validate on every push to ensure code quality before merging.
Publish
Trigger a publish from a script or CI/CD using the submit_publish endpoint. The endpoint returns a job ID that you can poll via /jobs/<id>/result for completion.
curl -X POST \
  -H "X-Holistics-Key: $HOLISTICS_API_KEY" \
  -H "Content-Type: application/json" \
  "https://<your-holistics-domain>/api/v2/aml_studio/projects/submit_publish"
Expected response:
{
  "job": {
    "id": "abc123",
    "status": "running"
  }
}
Pair this with the Validation API on PRs and an auto-publish action on merge for end-to-end CI/CD. See Auto-publish on merge for a full GitHub Action example.
VS Code extension
The Holistics VS Code extension adds IntelliSense, hover docs, go-to-definition, and real-time diagnostics for AML. Useful for human-authored edits, and agents running inside VS Code or Cursor pick up the same hover info and definitions as extra context.
Lineage
holistics aml lineage will let you dump your project's lineage graph as JSON for refactor planning and integrations with external metadata tools. Stay tuned.
Troubleshooting
Changes not appearing in Holistics
- Confirm
holistics sync-code .is still running in your terminal (it stops onCtrl+Cor when the terminal closes) - Make sure you're previewing the same branch the sync is configured for
- If
sync-codeis not running, you can fall back togit commit && git pushand switch branches in the Holistics UI to preview
Validation errors
- Run
holistics aml validatelocally before pushing - Check the AML reference for syntax details
Merge conflicts
- If both local and UI changes were made on the same branch, resolve conflicts locally with
git pull --rebasebefore pushing