Transform your data
A grasp of these concepts will help you understand this documentation better:
Sometimes your raw data is not in a format suitable for exploration and reporting. In such cases, you can do some light data preparation using Holsitics's Query Model.
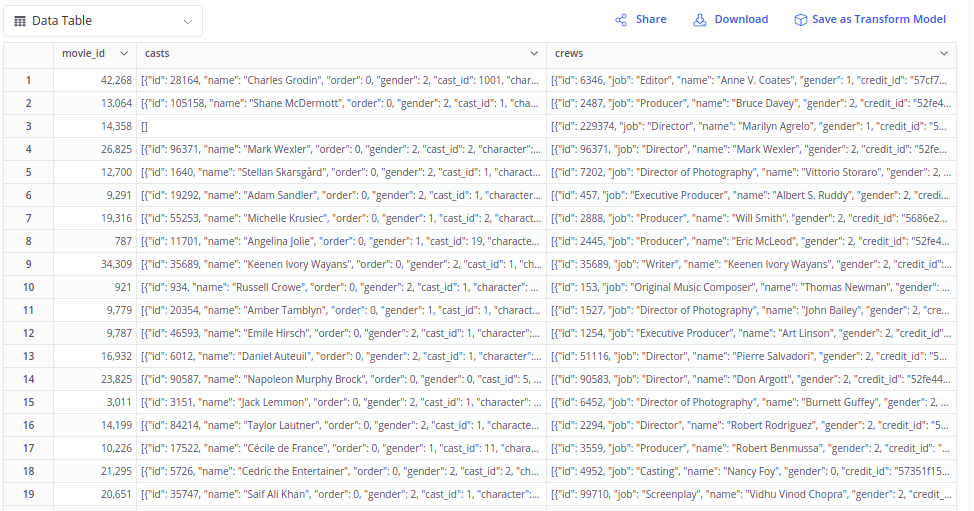
For example, in our Movies dataset, the credits table contains information about all credited members of the cast and crew in a movie in JSON arrays:

To make this data ready for exploration, we will need to normalized the nested arrays into separate models, and then add them to the dataset.
-
On the Data Modeling page, navigate to the folder where you already put other movies models. Click on Create Data Model -> Query Model

-
The Create Query Model will appear. Here you will enter the SQL code to transform your data. For full syntax reference, please check Syntax for Querying Models
select
  {{#credits.movie_id}}
  , (cast_members ->> 'id')::integer as id
  , (cast_members ->> 'cast_id')::integer as cast_id
  , cast_members ->> 'name' as name
  , case (cast_members ->> 'gender')::integer
      when 1 then 'female'
      when 2 then 'male'
      when 0 then 'unknown'
    end as gender
  , cast_members ->> 'character' as character
  , cast_members ->> 'credit_id' as credit_id
  , cast_members ->> 'profile_path' as profile_path
from {{#movies_credits credits}}
, jsonb_array_elements({{#credits.casts}}) as cast_members
Input
movies_cast_membersas the model name. Click Run to run the SQL and preview your data. -
When you have validated that the data is in your desired form, click Save to finish.

The new model will appear in the folder tree with a blue dot:

-
Similarly, create a
movies_crew_membersusing the following SQL:select
{{#credits.movie_id}}
, (crew_members ->> 'id')::integer as id
, crew_members ->> 'job' as job
, crew_members ->> 'name' as name
, case (crew_members ->> 'gender')::integer
when 1 then 'female'
when 2 then 'male'
when 0 then 'unknown'
end as gender
, crew_members ->> 'credit_id' as credit_id
, crew_members ->> 'department' as department
, crew_members ->> 'profile_path' as profile_path
from {{#movies_credits credits}}
, jsonb_array_elements({{#credits.crews}}) as crew_members
-
Navigate to the newly created models, and add relationships with the
movies_metadatamodel
-
Go the the Movies Analysis dataset you have created in the previous steps, and add the two new models in:

Click Next step, and you will see the two new relationships in the list:

Click Save to finish.
-
Let's test the new set with some basic questions. For example, who is the actor/actress with the highest credited movies count?
Drag in the Name, Field and Movie Id field from the
movies_cast_membersmodel. Change aggregation of Movie Id to Count (Distinct), then click Get Result.
Looks like Bess Flower is the one. According to the data, she has 240 movies credited, which is way higher than the count of other more well-known movie stars. A quick Google search reveals that she is actually considered "The Queen of the Hollywood Extras."

-
If you take a look at the generated query in the Executed Query tab, you will see that the full SQL we wrote in the
movies_cast_membersmodel was inserted here as a CTE:
In other words, every you explore this new model, the whole SQL will be executed. Our underlying
creditstable is relatively small so this is still OK, but in cases when the table is large, you will want to materialize (persist) the transformation result to a physical table to improve query performance.Go back to the
movies_cast_membersmodel, you will see the Storage settings section. This is where you set up the persistence.
Click on the toggle, and the Storage setings modal will appear. Here you can specify details like, destination schema, destination table name, schedules, and storage mode. For the full details, please refer to the Storage Settings docs.
-
Click on Save and Run. This will run the SQL and write the result into a table in the database.


-
Go back to the dataset exploration screen, and click Get Result again. Check the Executed Query tab, and you will see that now the query is selecting from a table instead of a CTE:

And that's it! You have gone through the basic steps to work with Query Models in Holistics. With this new ability, you can answer even more complex analytics questions provided that you are well-versed in SQL.