Auto-provisioning Holistics users with SCIM
Introduction
SCIM automatically syncs users and groups from your identity provider (Okta, Microsoft Entra ID, etc.) to Holistics. Manage access in one place: add or remove users in your IdP, and Holistics stays in sync.
Before you begin
- SAML SSO configured: Your organization must have SAML Single Sign-On set up before enabling SCIM.
- Admin access: You must be Admin in both Holistics and your identity provider.
- Seat availability: Ensure you have enough seats in your Holistics plan. When syncing, existing users (same email) get linked without using extra seats, but new users consume seats. Provisioning fails if it exceeds your seat limit.
How SCIM works
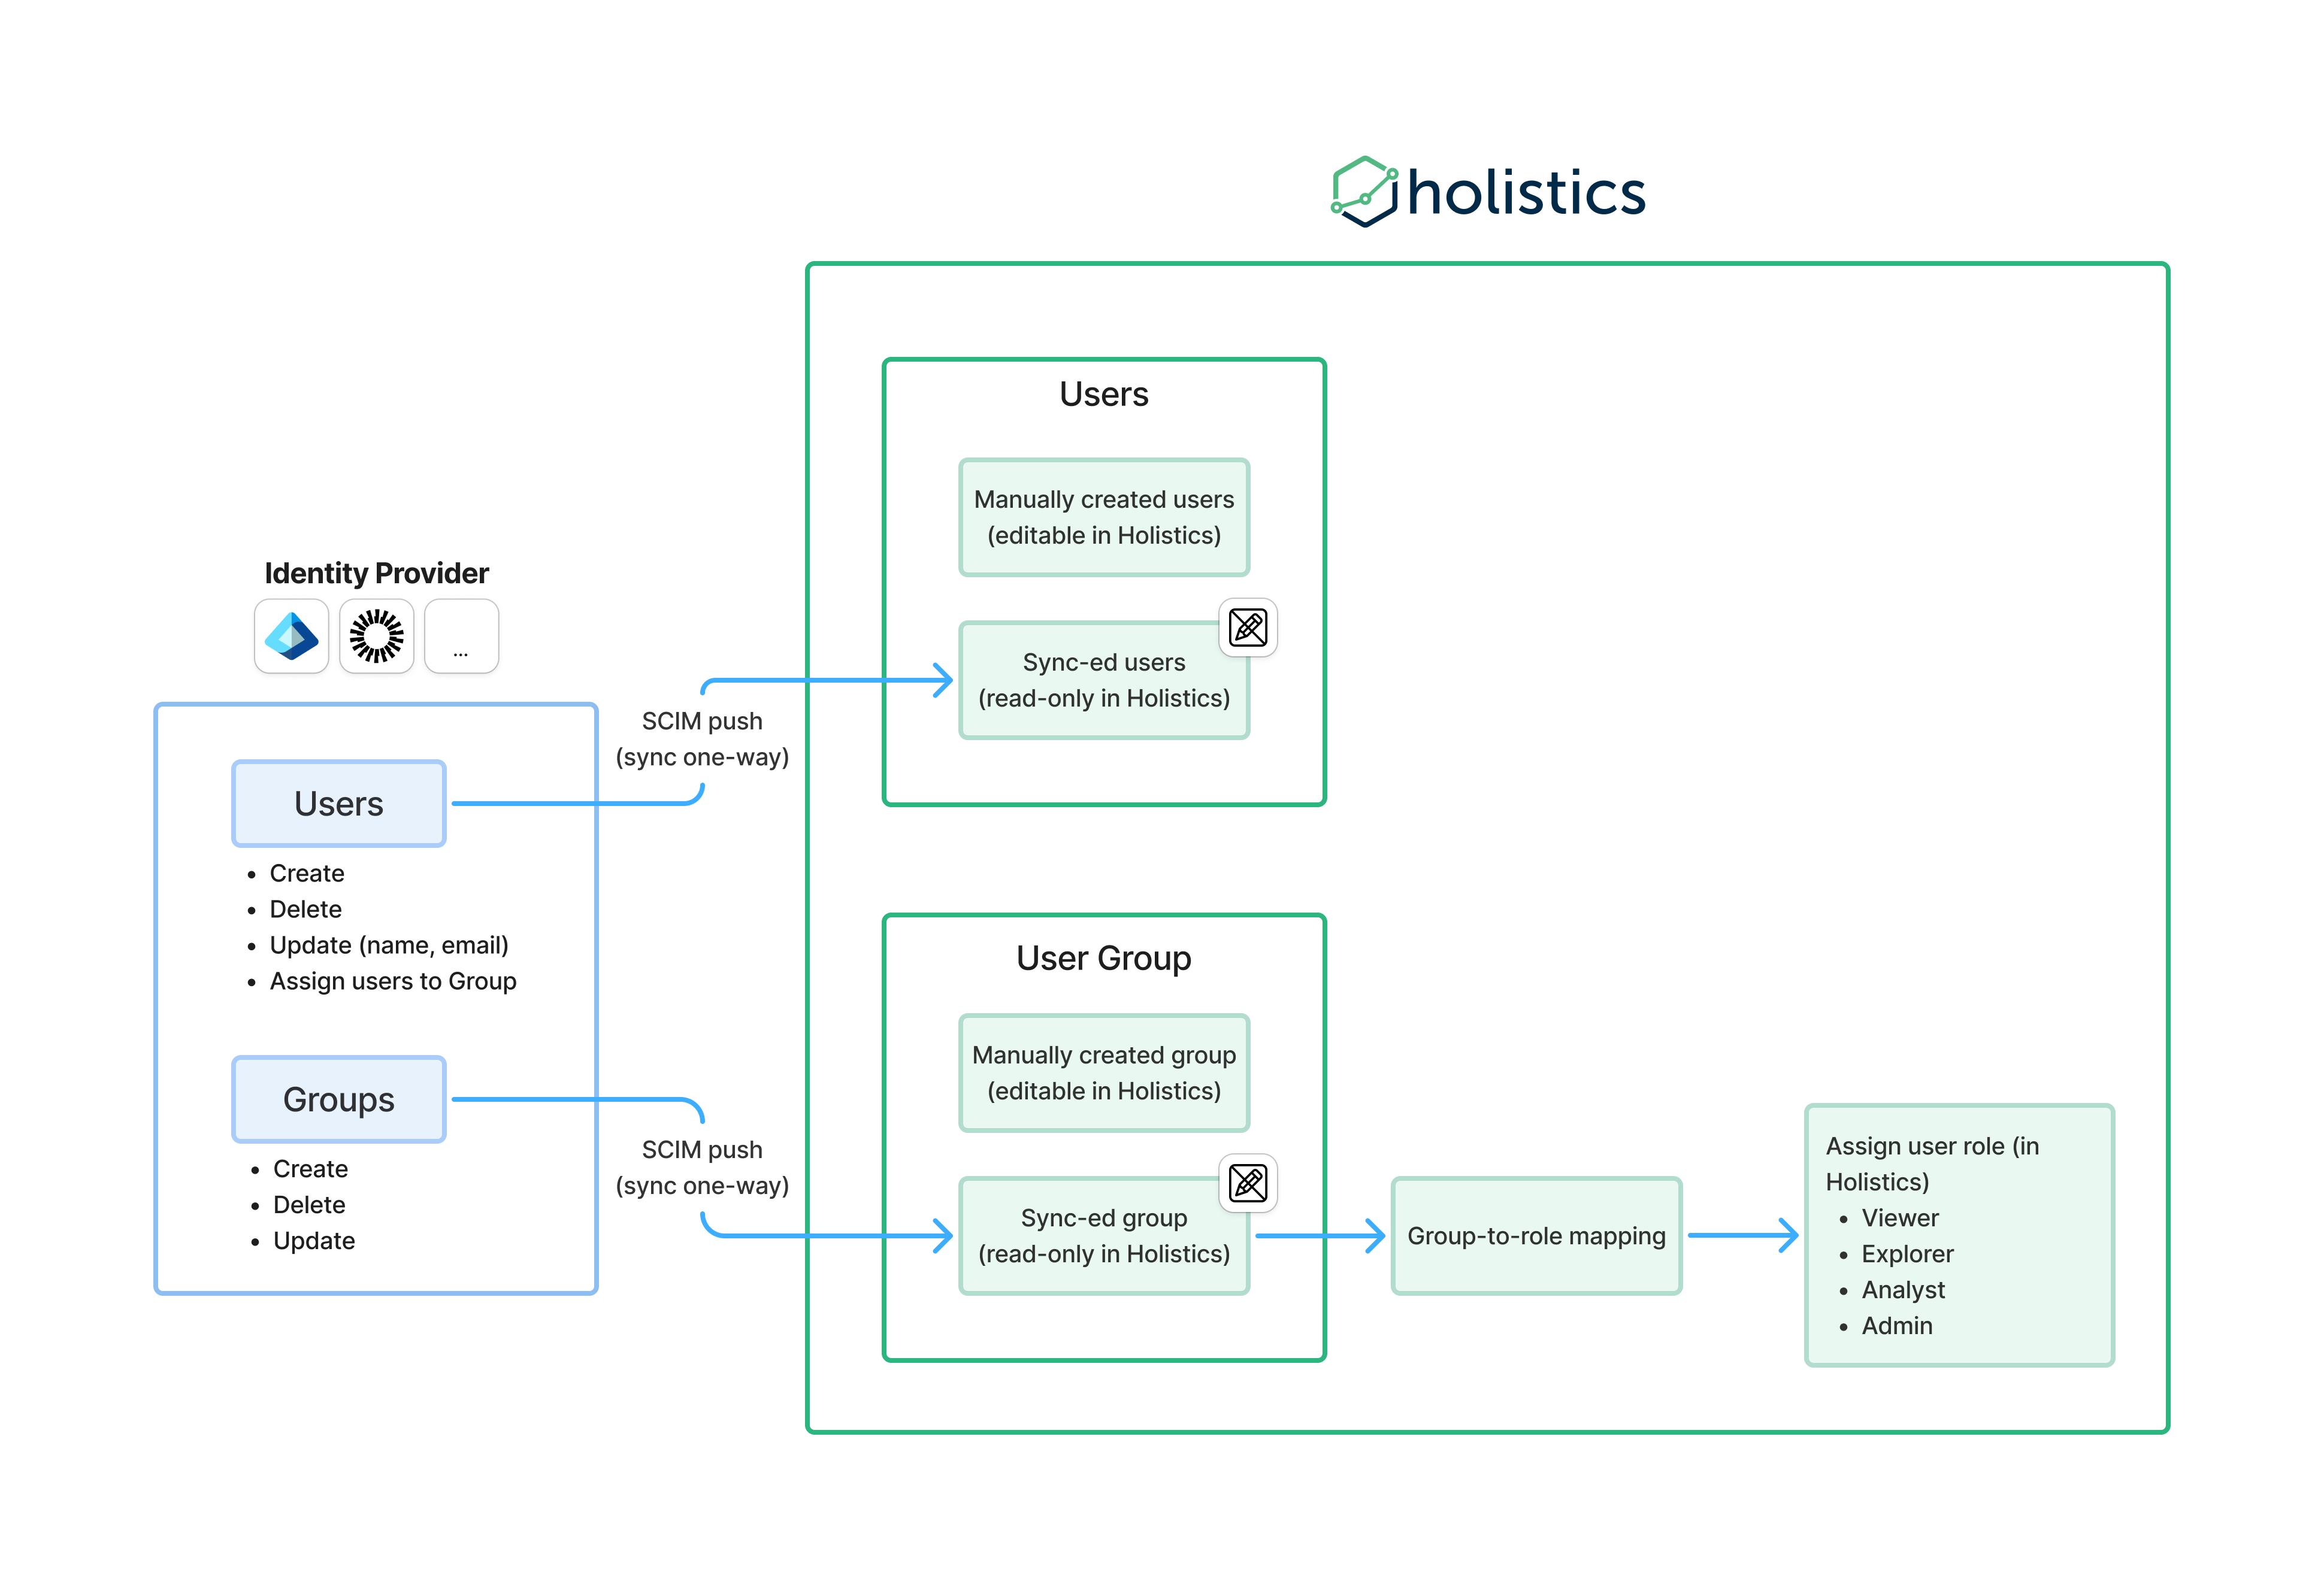
SCIM provisioning in Holistics is one-way only, changes flow from your identity provider to Holistics, not the other way around. Once enabled, all user and group changes should be made in your identity provider.
What gets synced
| Feature | Supported | Example |
|---|---|---|
| Push new users | ✓ | You assign a new user to the Holistics app in your identity provider |
| Update user profiles | ✓ | You update a user's name or email in your identity provider |
| Deactivate users | ✓ | You remove a user from the Holistics app in your identity provider |
| Push groups | ✓ | You add a new group in your identity provider and push it to Holistics |
| Sync group membership | ✓ | You add or remove users in a group in your identity provider |
Two types of users
Once SCIM is enabled, you'll have two types of users in Holistics:
-
Synced users are automatically created and managed through your identity provider. They cannot be edited directly in Holistics. Any changes (name, email, status) must be made in your IdP. By default, synced users are assigned the Viewer role.
-
Manually-created users are users you create directly in Holistics. You can still add users manually if needed. If a user with the same email is later synced from your identity provider, they become a synced user.
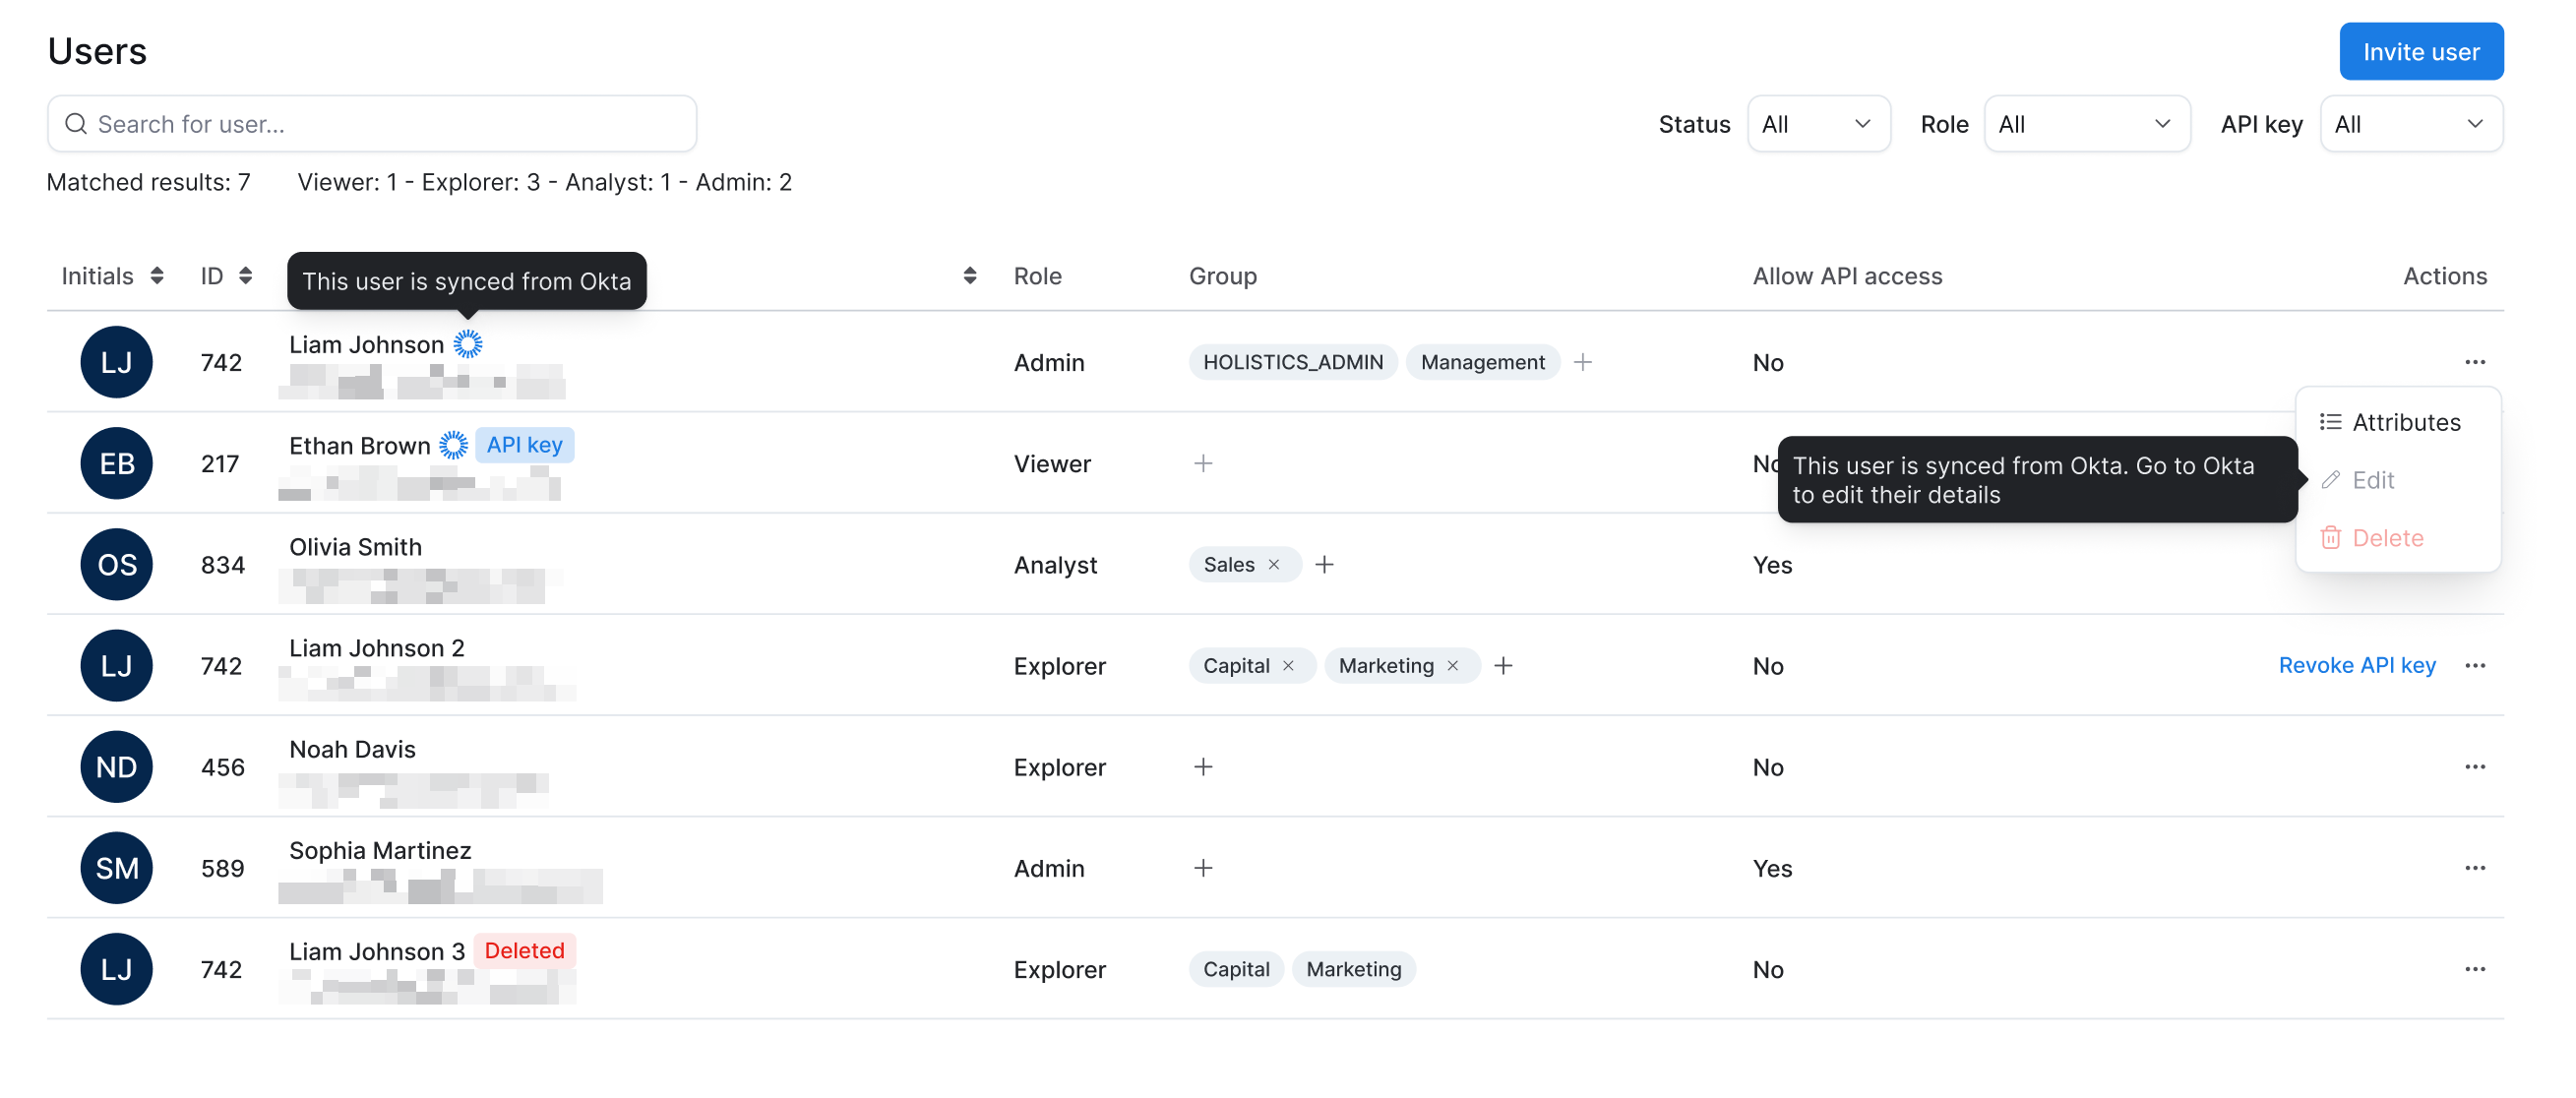
You can identify the user type by checking the Source column in the User Management page.
Two types of groups
Similarly, groups can be synced or manual:
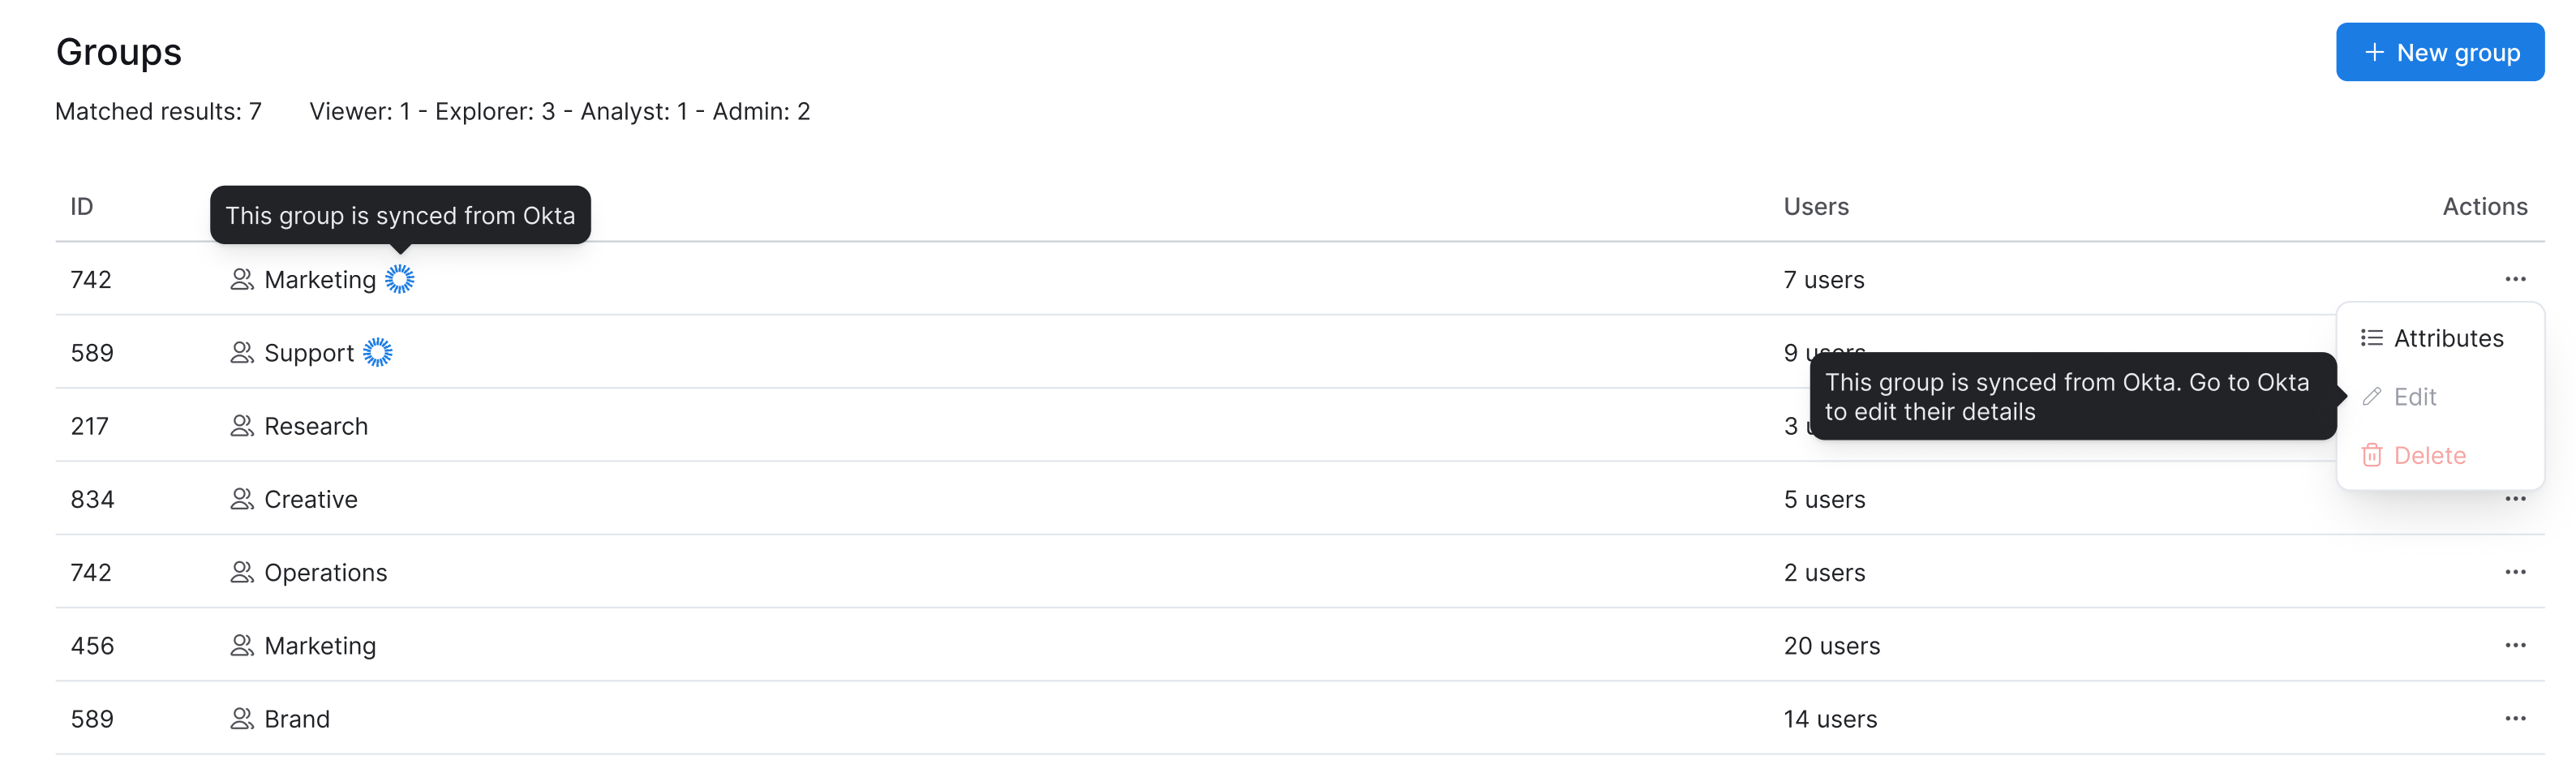
- Synced groups come from your identity provider and cannot be edited in Holistics.
- Manual groups are created directly in Holistics and remain fully editable.
Set up SCIM in Holistics
Follow these steps to enable SCIM provisioning for your organization.
Step 1: enable SCIM provisioning
- Navigate to Settings > Single sign-on.
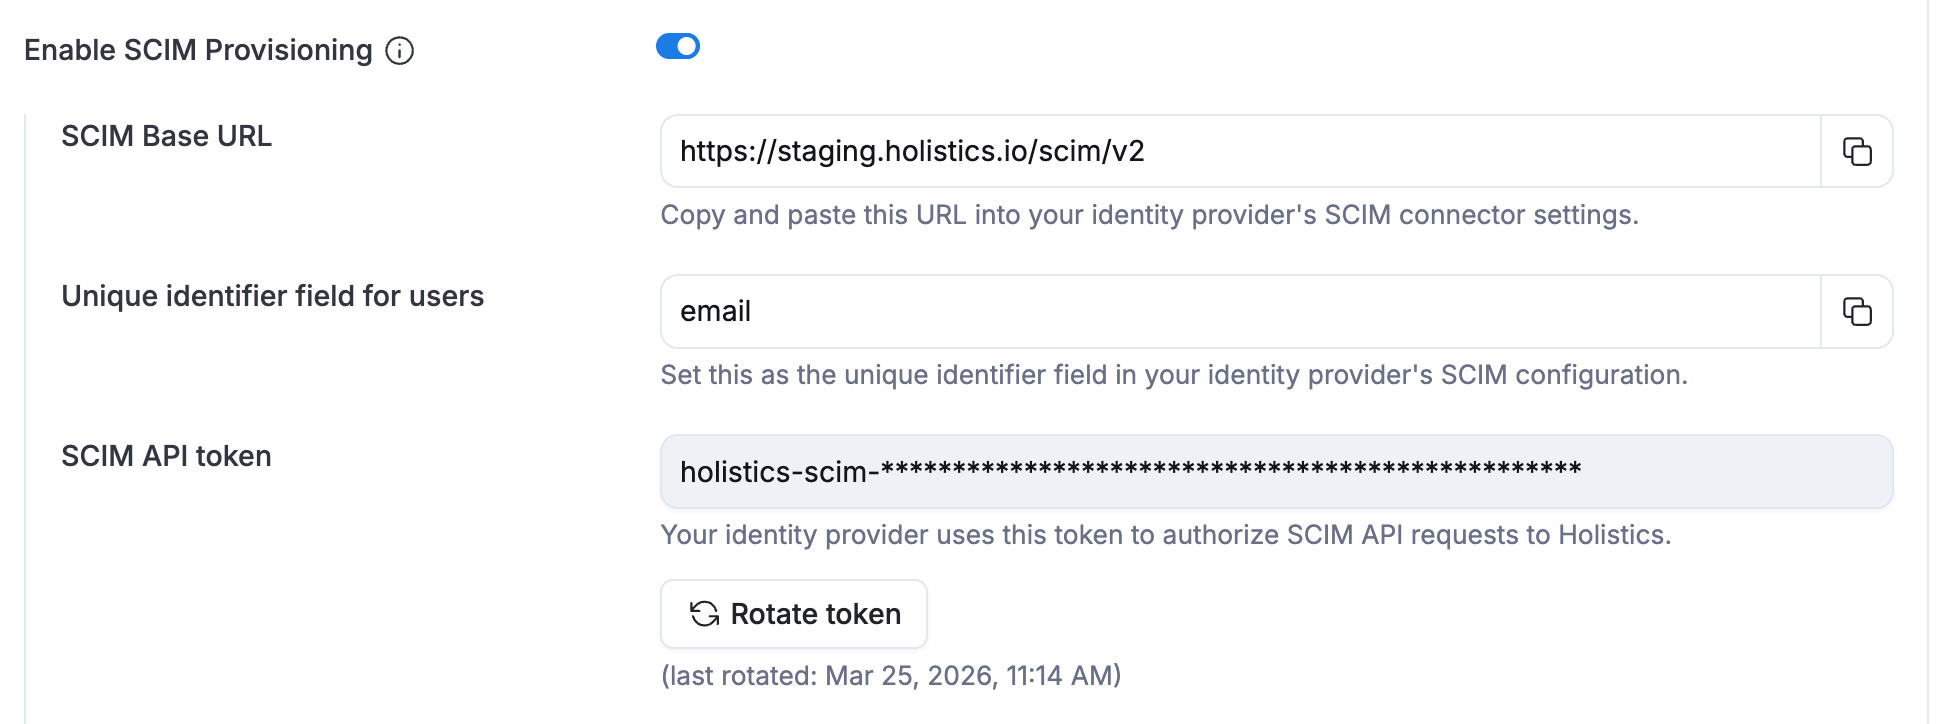
- Toggle Enable SCIM Provisioning to on.
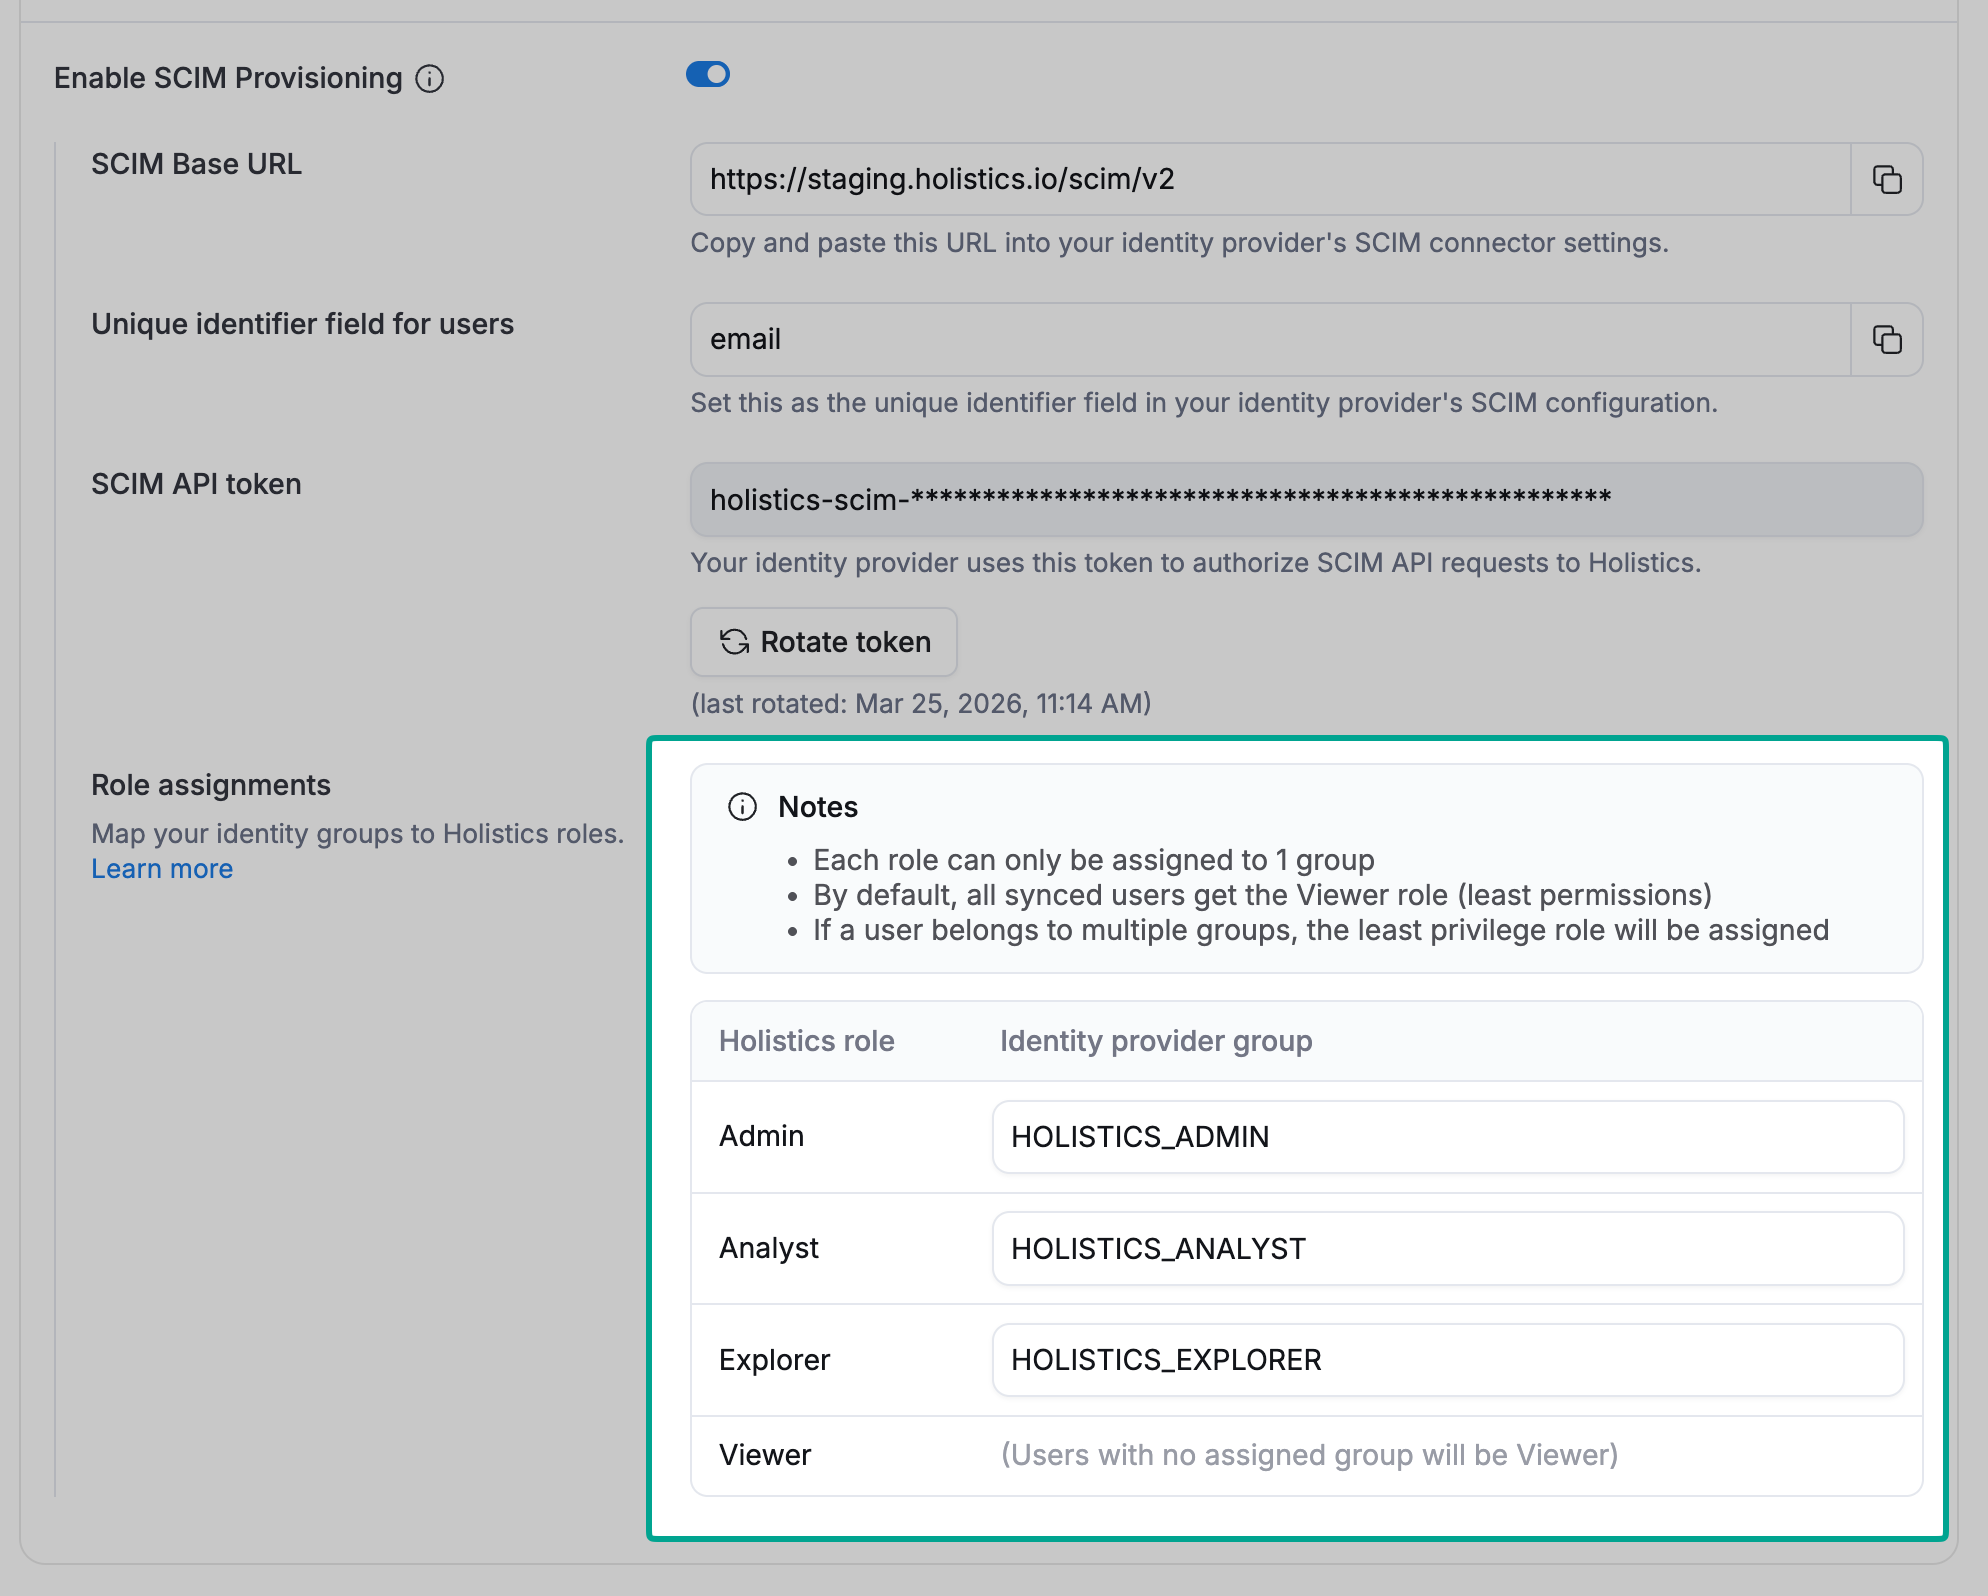
- Once enabled, you'll see:
- SCIM Base URL: The endpoint for your identity provider
- SCIM API Token: Required by your identity provider to authenticate SCIM requests
- Group to role mapping: Configure role assignments for synced users
Step 2: configure group-to-role mapping
Configure group-to-role mapping before syncing users from your identity provider. Otherwise, all synced users (including current admins) will default to the Viewer role, which could lock you out.
By default, all synced users get the Viewer role (least permissions). To assign different roles based on group membership, map your IdP groups to Holistics roles in the Group to role mapping section.
For example:
HOLISTICS_ADMIN→ Admin roleHOLISTICS_ANALYST→ Analyst roleHOLISTICS_EXPLORER→ Explorer role
Available roles (from least to most privileged): Viewer < Explorer < Analyst < Admin
If a user belongs to multiple mapped groups, they receive the least privileged role. For example, a user in both HOLISTICS_ADMIN and HOLISTICS_ANALYST groups will be assigned the Analyst role.
Step 3: configure your identity provider
Now configure SCIM provisioning in your identity provider using the SCIM Base URL and SCIM API Token from Holistics. Follow the guide for your identity provider:
Start with a small pilot group, confirm provisioning behaves as expected, then expand to your whole organization.
Validating on a few users first lets you confirm that user creation, profile updates, deactivation, and group membership all sync correctly. It also caps the blast radius of any misconfiguration: SCIM syncs automatically and continuously, so changes propagate quickly once you enable it.
Okta: Set up SCIM with Okta
Microsoft Entra ID (Azure AD):
- In the Azure portal, go to your Holistics enterprise application.
- Navigate to Provisioning and set the mode to Automatic.
- Enter the SCIM Base URL as the Tenant URL and the SCIM API Token as the Secret Token.
- Test the connection and save.
- Configure attribute mappings.
- Under Settings > Scope, choose Sync only assigned users and groups, then assign a small pilot group to the Holistics enterprise application.
- Enable provisioning. Once the pilot group syncs successfully, expand the assignment to the rest of your organization.
For other identity providers, refer to your provider's SCIM documentation using the SCIM Base URL and SCIM API Token from Holistics.
Transitioning existing organizations
If you already have users and groups in Holistics, here's what happens when you enable SCIM:
Existing users
- They won't be deleted.
- If a user from your IdP has the same email as an existing Holistics user, they become linked.
- Linked users can no longer be edited directly in Holistics.
- Their role will be determined by group-to-role mapping rules. If no mapping applies, they default to Viewer.
Existing users with Admin or Analyst roles will be downgraded to Viewer if you don't set up group-to-role mapping first. Make sure to configure your mappings before enabling SCIM.
Existing groups
- They won't be deleted.
- If a group from your IdP has the same name as an existing Holistics group, they become linked.
- Linked groups become read-only in Holistics.
Disable SCIM provisioning
If you need to stop using SCIM:
- Go to Admin Settings > SSO & SCIM Integration.
- Toggle Enable SCIM integration to off.
- Previously synced users and groups will remain in Holistics but become editable again.
Disabling SCIM doesn't delete any users or groups. It only stops the automatic sync from your identity provider.
Audit logs
You can check the SCIM audit logs page to view provisioning history and troubleshoot any sync issues.
FAQs
Can i still add users directly in Holistics after enabling SCIM?
Yes, you can still create manual users. However, we recommend managing all users through your identity provider for consistency.
What happens if i delete a user in my identity provider?
When you remove or deactivate a user in your identity provider, they will be deactivated (not deleted) in Holistics. They won't be able to log in, but their data and activity history are preserved.
Can i use SCIM without SAML SSO?
No, SAML SSO must be configured before enabling SCIM. This ensures users authenticate through your identity provider rather than with separate Holistics passwords.
How often does my identity provider sync with Holistics?
Sync frequency depends on your identity provider's configuration. Most providers (like Okta and Entra ID) push changes to Holistics in near real-time, but some may batch updates on a schedule. Check your identity provider's documentation for details.
What happens when i hit my seat limit and the IdP pushes a new user?
The provisioning request will fail, and the new user will not be created in Holistics. Your identity provider will receive an error response. You'll need to either increase your seat limit or remove existing users before provisioning new ones.
Limitations
- User attributes cannot be synced via SCIM. User attributes must be manually created and managed in Holistics for all users, whether synced or manually created.
- Roles cannot be provisioned directly via SCIM, only through group-to-role mapping.