Embed Portal
This feature is available on select plans. If your team does not have access to this feature, please contact us.
Introduction
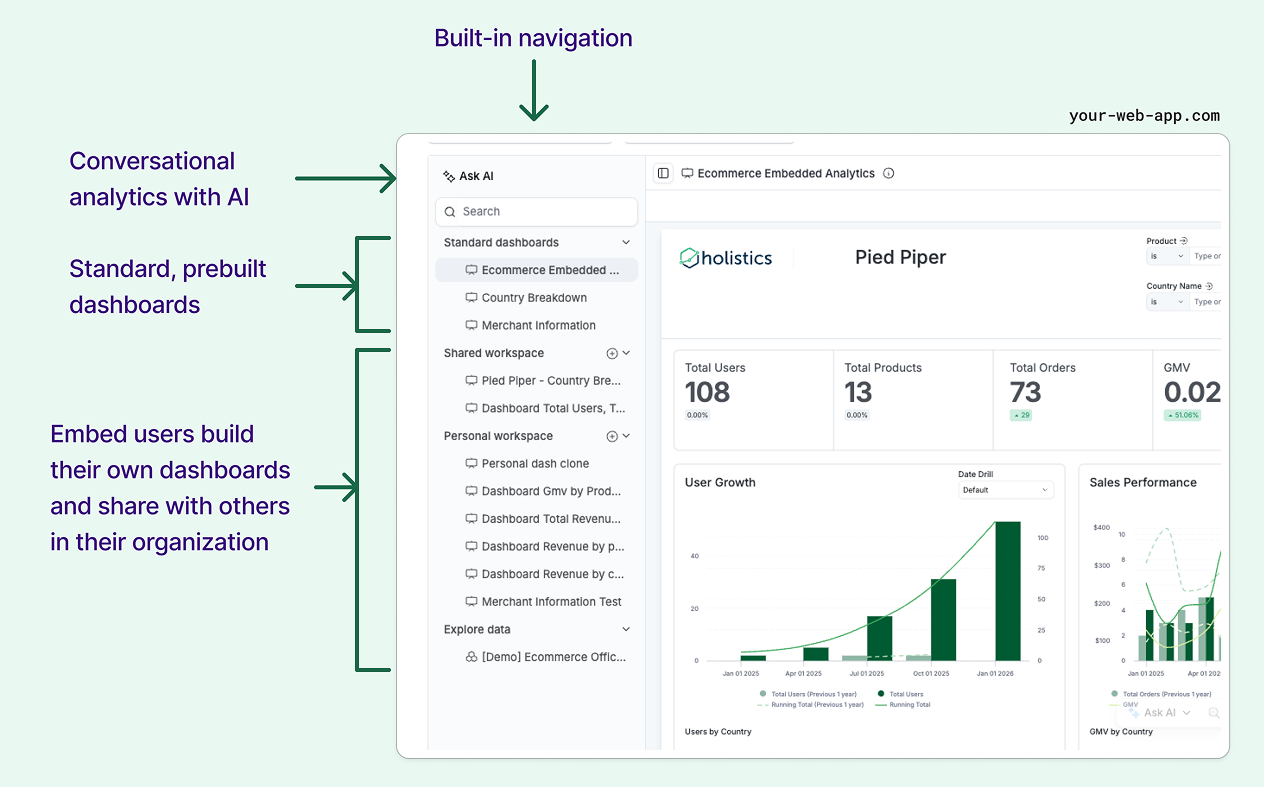
Embed Portal allows developers to embed a mini BI application within their application. Developers can distribute multiple dashboards to embed users, as well as allow embed users to self-serve and customize their own dashboards.
Benefits:
- Easy Content Management: Add or remove embedded dashboards and datasets through a simple interface. Your analysts can manage embedded content directly without involving your engineering team.
- Self-Service Analytics: Let your users explore data, interact with charts, and build their own custom dashboards right within your application.
- Multi-Tenant Collaboration: Set up separate organizations with secure data boundaries, where each organization only sees their own data. Within each organization, users can share dashboards and collaborate with customizable permissions for different user roles.
- Subscription-Based Access: Control what analytics features each user sees based on their subscription level or user tier. Give premium users access to advanced features while keeping basic features for standard users.
- Developer-Friendly Setup: Configure everything through code, test integrations in a sandbox environment, and use preview environments to streamline your development process.
How it works
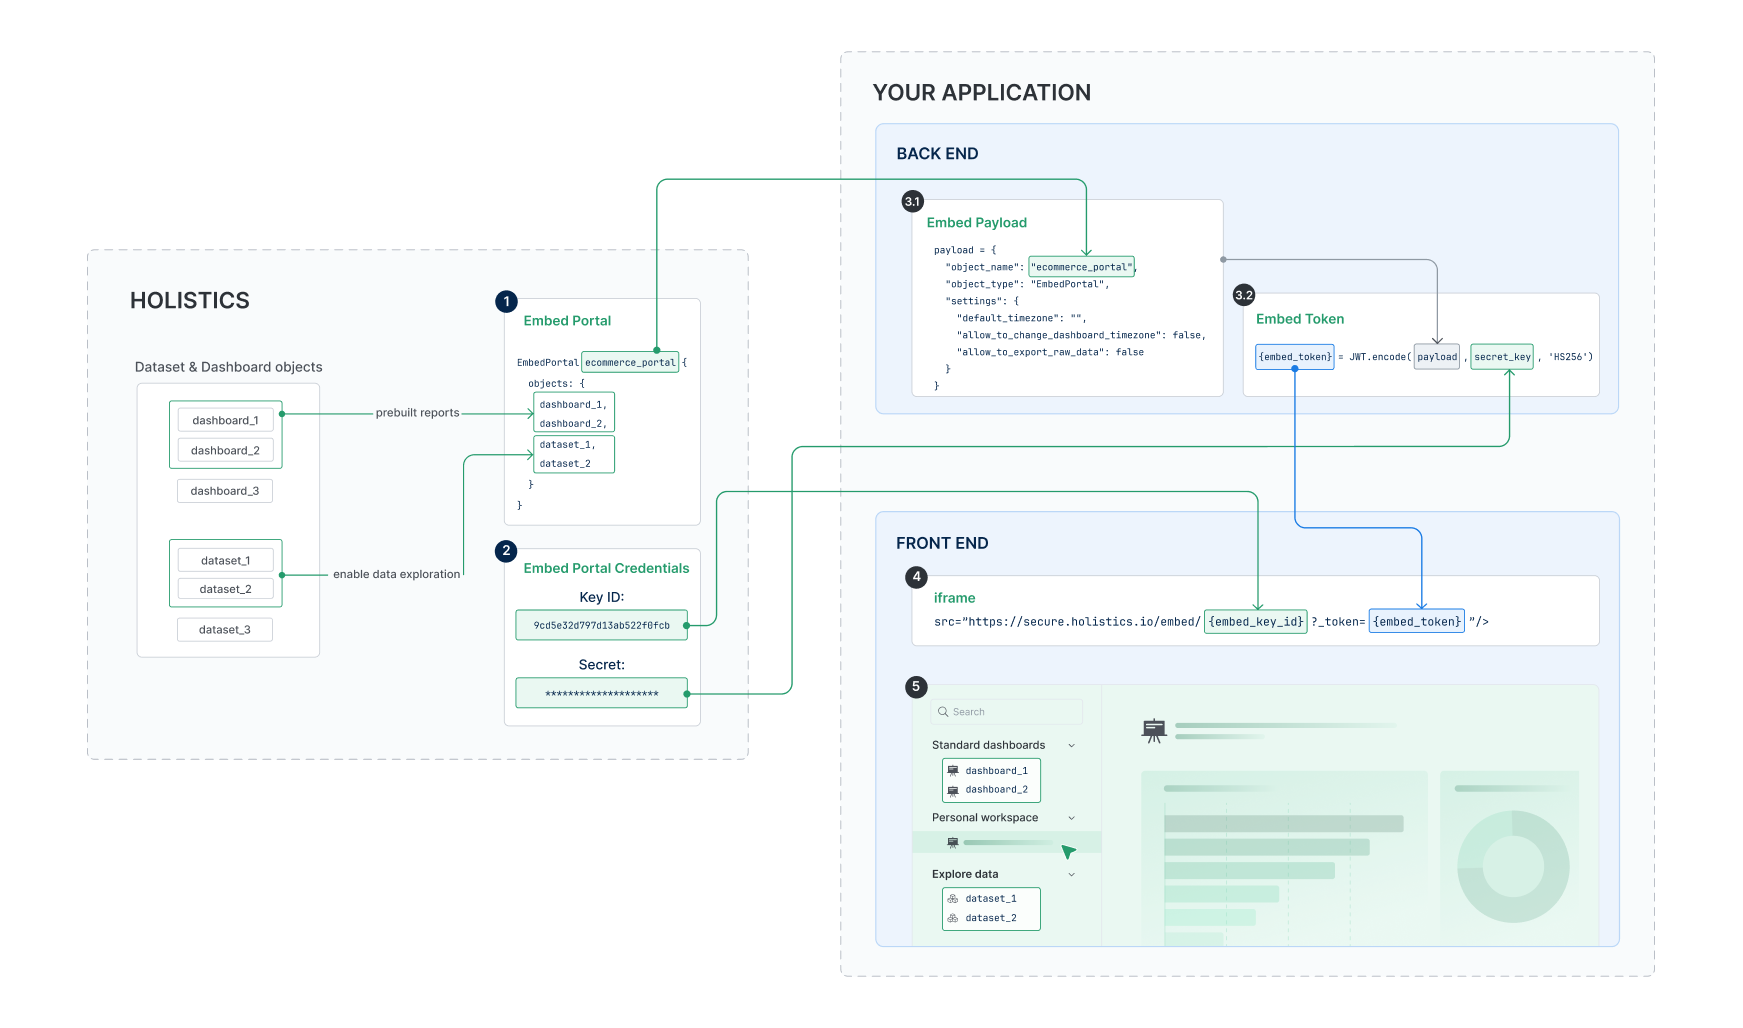
- Define: Developers define an embed portal that contains multiple data assets (dashboards and datasets) along with settings and permission rules in code.
- Publish & Integrate: After publishing, integrate the portal into your web application using a single embed secret key and iframe.
- Access Control: Row-level permissions defined in datasets apply automatically to all embedded content, with user attributes in the payload determining what data is visible.
- User Organization: Embedded users and organizations are identified via
embed_user_idandembed_org_idparameters, enabling personal workspaces and shared organizational environments. - Self-service Analytics: Embedded users can explore data, create dashboards, and collaborate based on their permissions (all within your application).
Prerequisites
Before using Embed Portal, make sure you have:
- Enabled Advanced features in your account. See Enable Embedded Analytics for instructions.
- Enabled git flow for your workspace.
- If you connect Holistics to your own repository, make sure there are no protected branch restrictions.
Getting started
Creating an Embed Portal involves four main steps:
Setup in Holistics
1. Define your portal in a .embed.aml file
2. Generate embed credentials
Integrate into your application
3. Backend Token Generation
4. Frontend Iframe Presentation
Step 1: Define your portal
Create your portal file
- Create a new file in your Development tab with the naming convention:
*.embed.aml - Add dashboards and datasets that you want to embed into the Embed Portal
EmbedPortal sales_portal { // object with a unique name
  objects: [ // array containing the dashboard and dataset names.
    sales_overview,    // dashboard
    revenue_trends,    // dashboard
    sales_data,        // dataset
    // Since objects are unique across your Holistics instance, you can simply list the object names
    // Holistics automatically detects whether each object is a dashboard or dataset.

  ],
}
Choosing what to embed
-
Dashboards: Deliver instant, actionable insights through pre-built reports (no configuration required).
-
Datasets: Enable powerful data exploration (let users slice and dice data to create custom visualizations on demand).
Preview in development
You can preview your embed portal before publishing to production by navigating to the Preview tab. It helps you validate changes, catch errors, and test configurations in development.
Publish to production
Once you're satisfied with the preview, publish your portal to make it available for embedding.
For more information, please refer to publishing to production.
Step 2: Generate embed credentials
- Navigate to Tools → Embedded Analytics
- Find your published portal in the list
- Click Enable to activate embed credentials
- Note your Key ID and Secret - you'll need these for integration
You only need to generate embed credentials once; the same credentials can be used for all your embedded portals.
Step 3: Backend token generation
To embed your portal into your application, you need to generate secure tokens on your backend.
In your application backend, generate embed tokens using this structure:
// Basic embed payload
const embed_payload = {
  object_name: 'customer_analytics',
  object_type: 'EmbedPortal',
  settings: {
    default_timezone: "UTC",
    allow_raw_data_export: false,
  }
};

// Generate token (implementation depends on your backend)
const token = jwt.sign(embed_payload, embed_secret, { algorithm: 'HS256' });
Step 4: Frontend integration
Basic iframe implementation
Generate this URL in your backend. Use the app domain for your Holistics data center.
App domain
<iframe src="https://secure.holistics.io/embed/{embed_key_id}?_token={generated_token}" width="100%" height="600" frameborder="0"></iframe>
<iframe src="https://us.holistics.io/embed/{embed_key_id}?_token={generated_token}" width="100%" height="600" frameborder="0"></iframe>
<iframe src="https://eu.holistics.io/embed/{embed_key_id}?_token={generated_token}" width="100%" height="600" frameborder="0"></iframe>
Optional: Call API to generate embedded URL (or embedded token)
// Frontend JavaScript example
async function loadPortal(userId, orgId) {
	// Call your backend to generate token
	const response = await fetch('/api/embed-token', {
		method: 'POST',
		headers: { 'Content-Type': 'application/json' },
		body: JSON.stringify({
      portal: 'customer_analytics',
    })
  });
  const { embedUrl } = await response.json();
  // Update iframe source
  document.getElementById('portal-iframe').src = embedUrl;
}
Next steps
Once you have your basic embed working, explore these capabilities:
- Parameters Reference - Complete reference for all payload and URL parameters
- Row-level Permission - Control which data each user can access
- Identity & Workspace Settings - Set up user identities and workspaces
- Self-Serve Exploration - Enable data exploration and drill-through