Query Model Persistence
A grasp of these concepts will help you understand this documentation better:
Introduction
Query Model Persistence feature allows you to write the result of your Query Model to your database to either make it available for querying with an external tool, or to improve performance when exploring data in Holistics.
Ensure the database user connected to Holistics has WRITE/CREATE permissions on the target schema defined in your persistence block.
Without this, the build job will fail, and Holistics will revert to executing the live SQL query.
High-level workflow
In general, here are the steps to enable Persistence for your Query Model:
- Add
persistenceconfig to your model - Create a persistence schedule using the
schedules.amlfile - Deploy your AML project to production for the persistence to take effect.
There are also optional steps like:
How it works: At the intervals specified in the schedules.aml file, Holistics will execute the query model and write the result set to your database, while taking into account the configurations in the persistence config.
We will go into details in the sections below.
1. Add persistence config
The persistence config is added to the model definition as follows:
Model orders {
  type: 'query'
  label: "Orders"
  data_source_name: 'demodata'
  owner: '[email protected]'

  models: [orders]
  query: @sql
    SELECT {{ #orders.* }} FROM {{ #orders }}
    WHERE {{ #orders.status }} = 'cancelled'
  ;;

  // Add persistence config here
  persistence: FullPersistence {
    schema: 'persisted'
    view_name: 'cancelled_orders'
  }

  dimension id {
    label: 'Id'
    type: 'number'
  }

  // dimension ...
}
Currently there are two types of persistence: FullPersistence and IncrementalPersistencd. We will go into more details in the Types of Persistence section.
2. Create persistence schedule
To set schedules to run persistences, you will need to create a schedules.aml file in the root of your AML project.
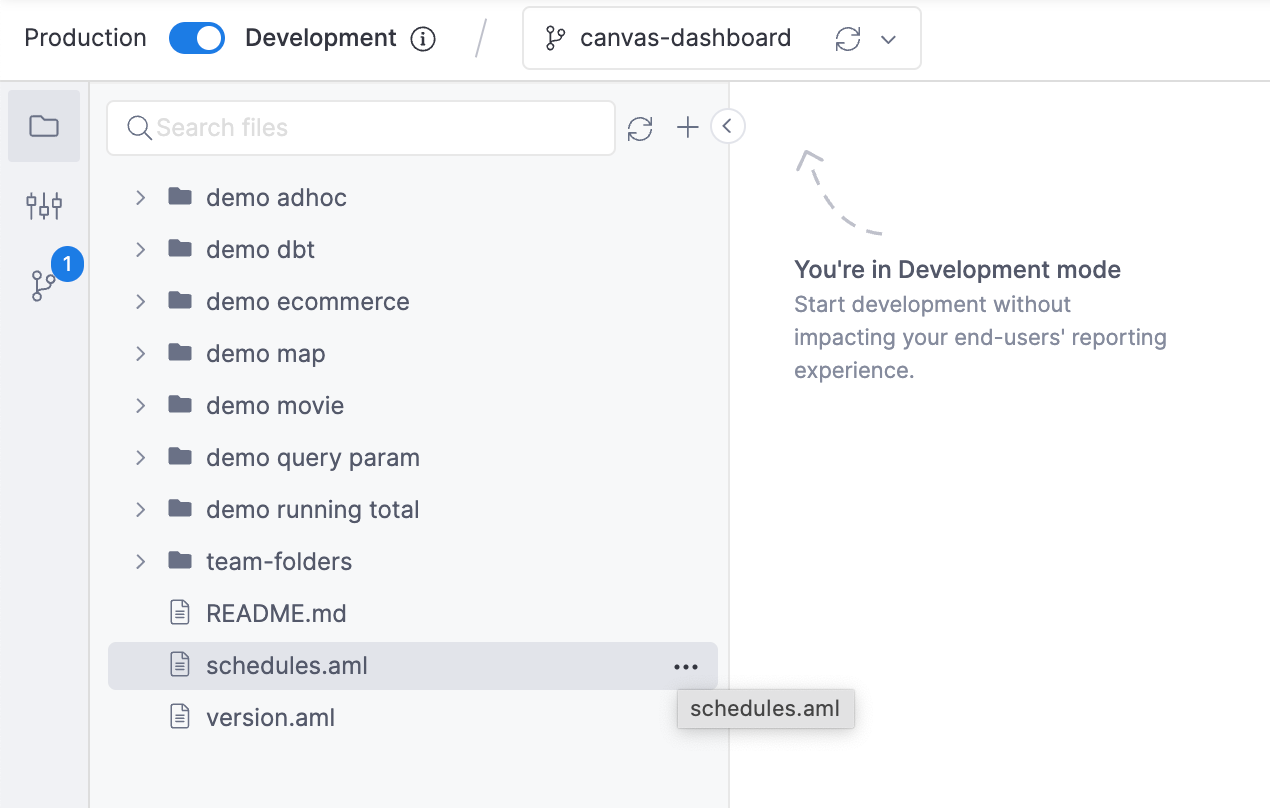
Schedule definition syntax is as follows:
const schedules = [
  // Schedule orders model to run every 10 minutes
  Schedule { models: [orders], cron: '0,10,20,30,40,50 * * * *' }

  // We can define another schedule using a different interval
  Schedule { models: [cancelled_orders], cron: '0 * * * *' }

  // We can also set multiple models to use the same schedule
  Schedule { models: [delivered_orders, cancelled_orders], cron: '0 * * * *' }
]
Here are a few links to help you get used to cron schedule expression:
- https://crontab.guru: translate cron expression to natural language
- https://crontab.guru/examples.htm: examples of frequently used expressions
3. Deploy to production
After creating or modifying persistence config and schedules, you will need to commit the changes and deploy to production for the new persistence to take effect.
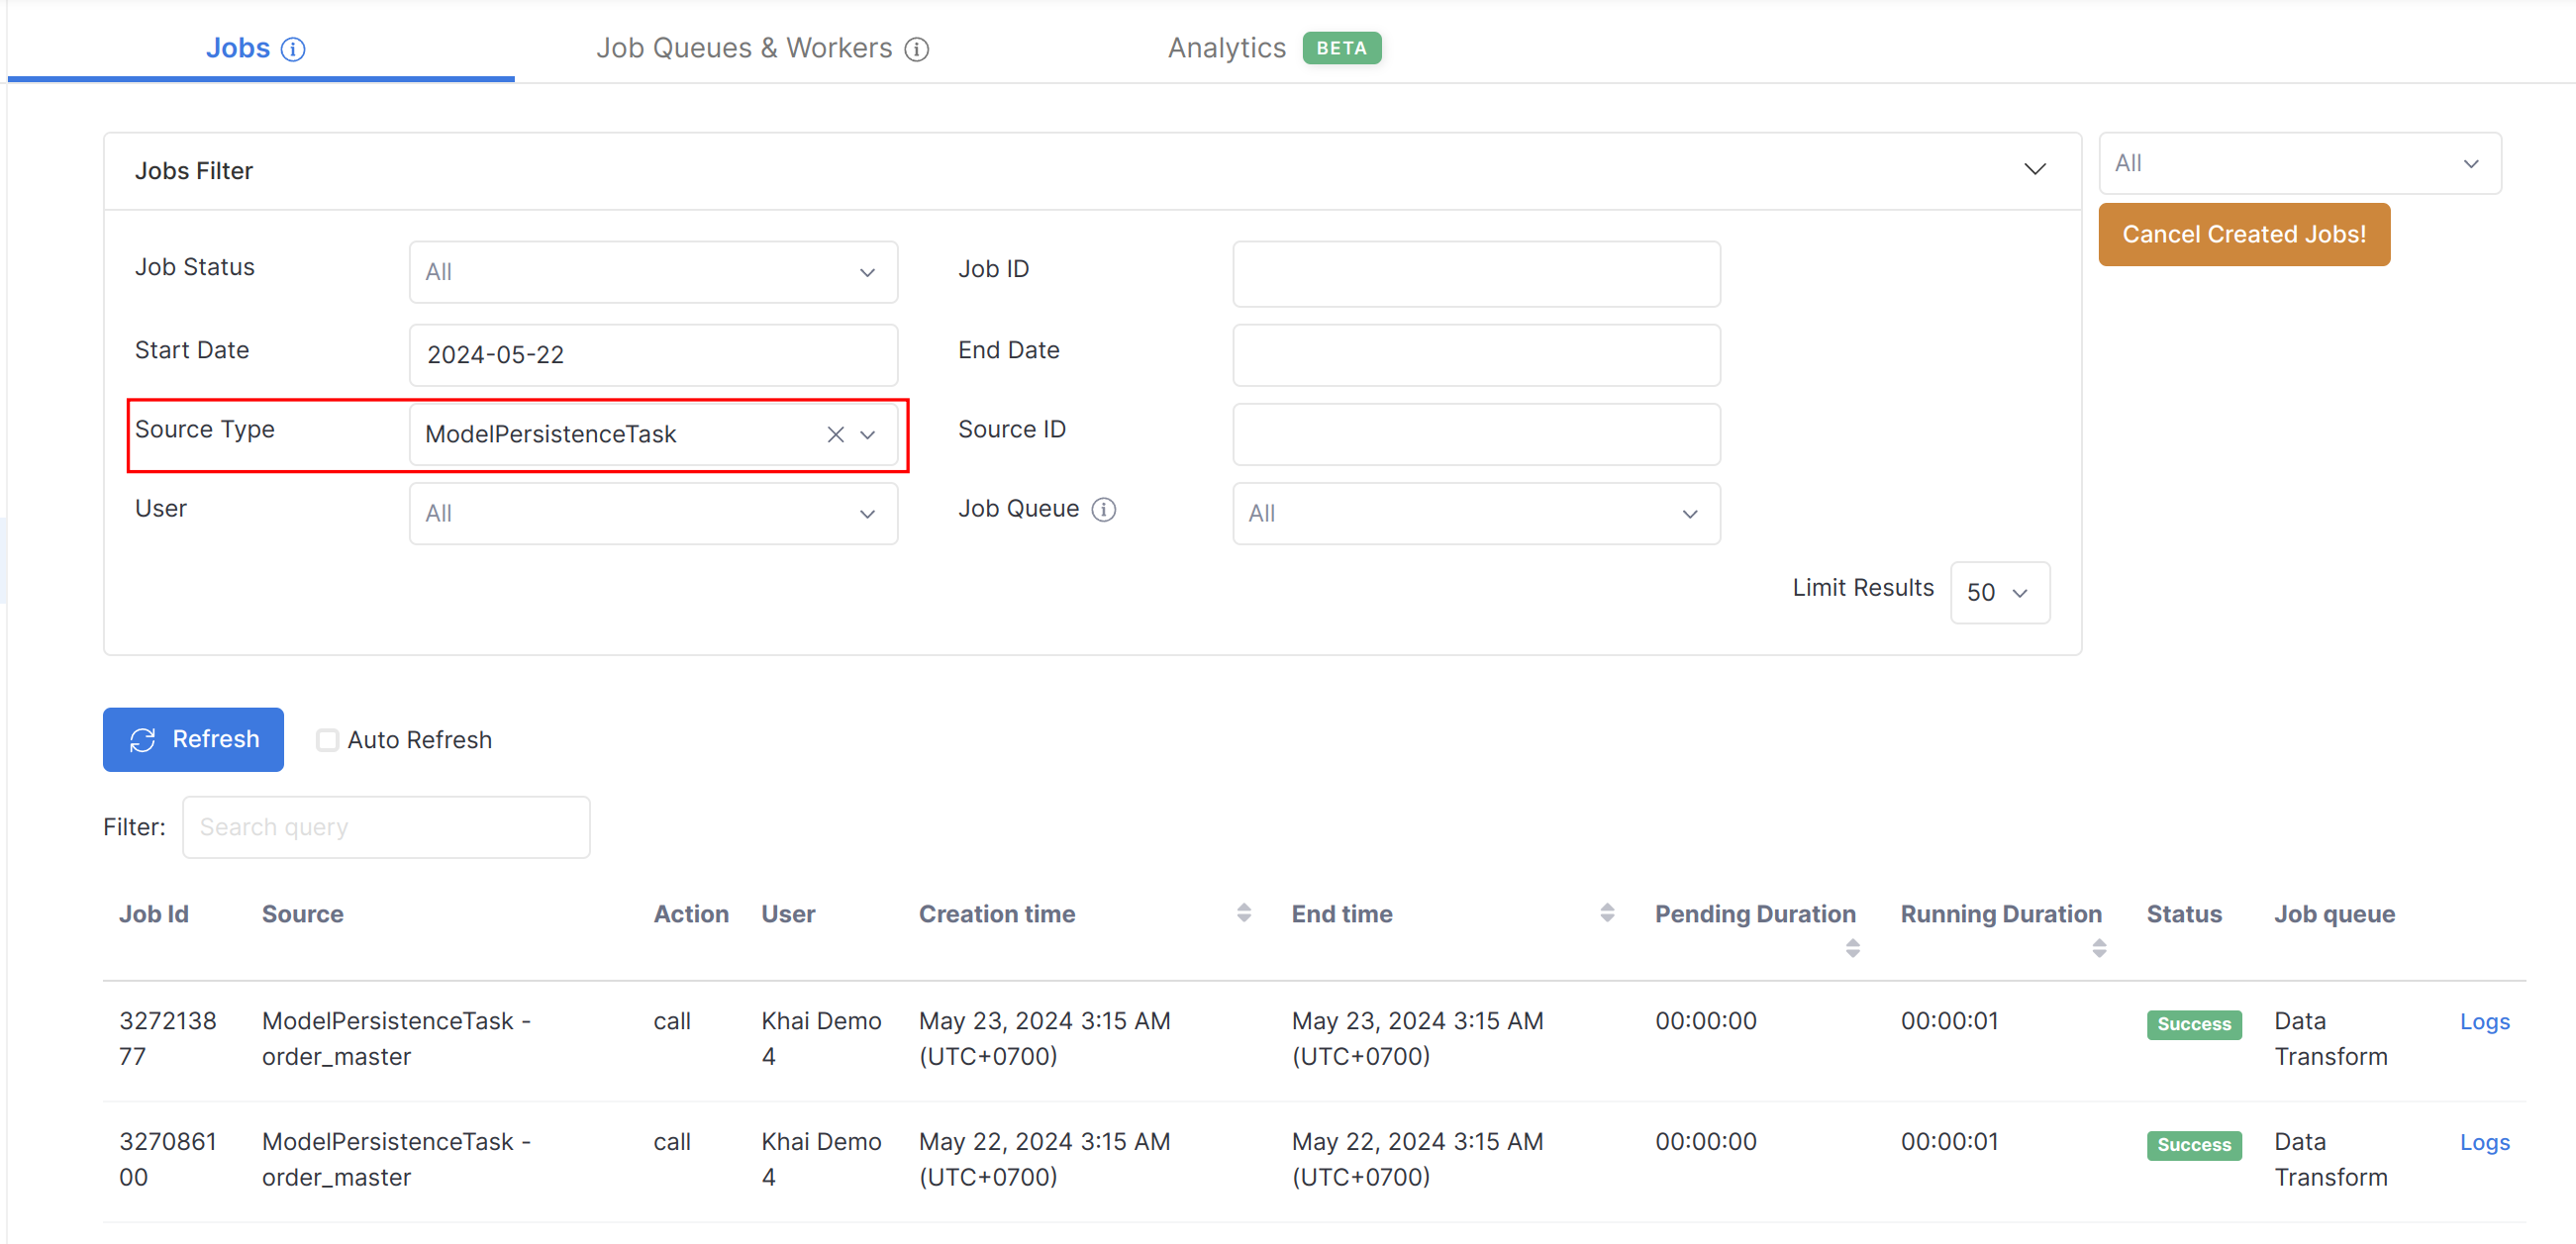
Monitoring Persistence Jobs
- Go to Job Monitoring
- Select relevant Job Status
- Set Source Type to
ModelPersistenceTask - Click Refresh
Types of persistence config
In general, a basic persistence config has the following form:
persistence: PersistenceType {
  schema: 'schema_name'
  view_name: 'view_name'

  // Other parameters
  ...
}
Explanation:
schema: Schema name that the persisted table will be written intoview_name(optional): If specified, Holistics will create a view with a consistent name in your database schema, allowing you to reliably query it outside of Holistics.
By default, each execution of a persistence job generates new names for persisted tables, as these tables function as a caching layer to boost query performance and are not intended for direct reuse.
If you want to reuse tables created through Holistics Persistence, we recommend specifying the view_name and using that view instead of the persisted table
We will go into more details with each persistence type.
Please check out the AML Persistence document for full syntax reference.
Full Persistence
Full Persistence rebuilds the whole table each time it is triggered.
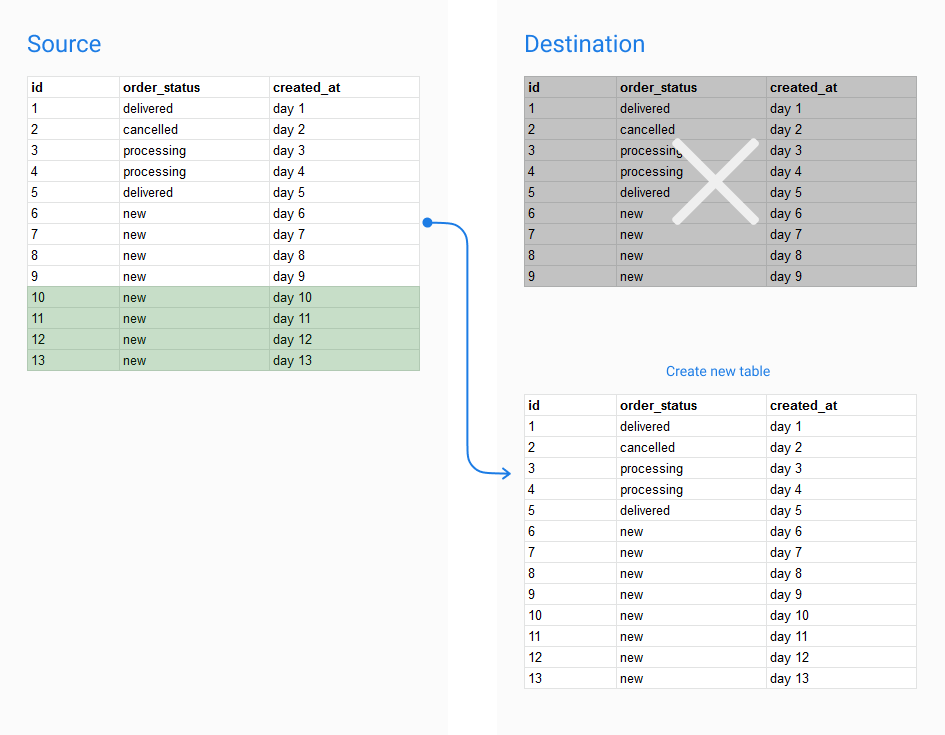
The Full Persistence config is specified as follows:
Model cancelled_orders {
  type: 'query'
  label: 'Cancelled Orders'
  data_source_name: 'demodb'
  owner: '[email protected]'

  models: [orders]
  query: @sql
    SELECT {{ #orders.* }} FROM {{ #orders }}
    WHERE {{ #orders.status }} = 'cancelled'
  ;;

  persistence: FullPersistence {
    schema: 'persisted'
    view_name: 'cancelled_orders'
  }

  dimension id {...}

  ...

}
Incremental Persistence
With Incremental Persistence, Holistics will execute the query, compare the current result set with the existing table, then append new records to the table instead of rebuilding it completely.
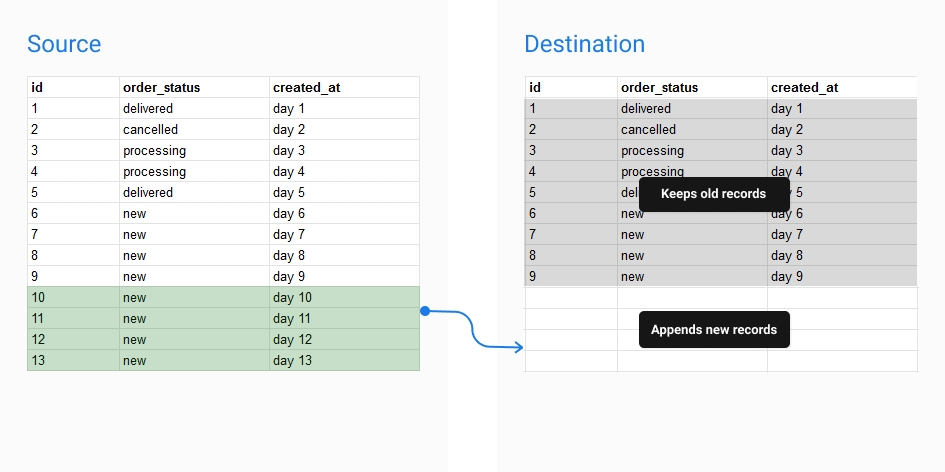
The Full Persistence config is specified as follows:
Model cancelled_orders {
  type: 'query'
  label: 'Cancelled Orders'
  data_source_name: 'demodb'
  owner: '[email protected]'

  models: [orders]
  query: @sql
    SELECT {{ #orders.* }} FROM {{ #orders }}
    WHERE {{ #orders.status }} = 'cancelled'
  ;;

  persistence: IncrementalPersistence {
    schema: 'persisted'
    view_name: 'cancelled_orders'
    incremental_column: 'updated_at'
    primary_key: 'id'
  }

  dimension id {...}

  ...

}
There are two new parameters:
incremental_column: Values of this column will be used to check for new recordsprimary_key(optional): Only use this option when your past records change. Holistics will refer to this column to replaced changed records in the current persisted table.
How Incremental Persistence works
Step 1: Query new data
When the incremental persistence is triggered, the actual generated query will be:
SELECT * FROM ( /* full model query */ )
WHERE [[ incremental_column > {{ max_value }} ]]
Explanation:
WHERE [[ incremental_column > {{ max_value }} ]]is the condition which Holistics insert to the query to only select newly created records.max_valueis found from theincremental_column.
This query returns new data that will be persisted into the destination table later.
Currently, this filtering condition cannot be customized. In the future, we might allow users to customize their own incremental filtering conditions.
Step 2: Delete updated rows in destination table
If primary_key is specified, Holistics will delete the existing rows in destination table that have the same primary_key values with the rows returned by step 1.
Step 3: Insert new data into destination table
Lastly, Holistics will insert new data (returned by step 1) into the destination table.
Flow-based (Cascading) Persistence
How it works
With Flow-based (Cascading) Persistence, if the parents of your current models are also persisted, they can also be triggered automatically (without the need to specify a separate schedule for them).
Let say you have the following model setup with dependencies:
- Model Setup
- Dependency Visualization
Model model_a {
  type: 'query'
  query: @sql SELECT ... ;;
  persistence: FullPersistence {...}
}

Model model_b {
  type: 'query'
  models: [model_a]
  query: @sql SELECT {{ #a.field_name }} FROM {{ #model_a a }} ;;
  persistence: FullPersistence {...}
}

Model model_c {
  type: 'query'
  models: [model_a]
  query: @sql SELECT {{ #a.field_name }} FROM {{ #model_a a }} ;;
  persistence: FullPersistence {...}
}

Model model_d {
  type: 'query'
  models: [model_b, model_c]

  query: @sql SELECT {{ #b.field_name }}, {{ #c.field_name }}
    FROM {{ #model_b b }}
    LEFT JOIN {{ #model_c c }} on {{ #b.join_key }} = {{ #c.join_key }}
  ;;
  persistence: FullPersistence {...}
}
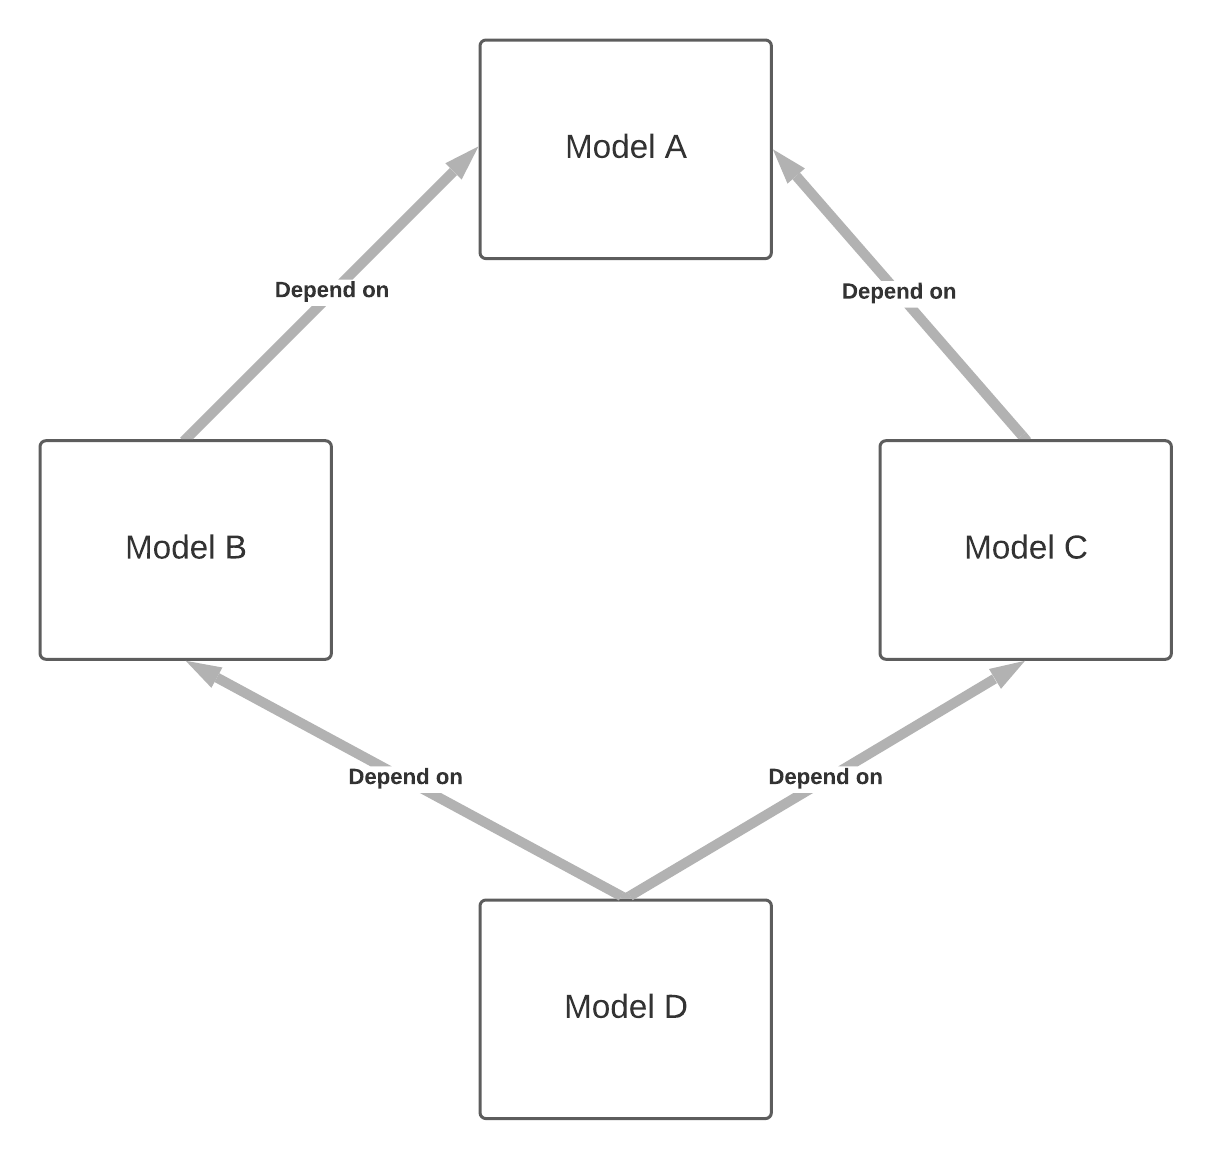
To trigger the persistence of all models in the dependency chain, you only need to set the schedule for the final model:
// schedules.aml
const schedules = [
  Schedule { models: [model_d], cron: '0,10,20,30,40,50 * * * *' }
]
- Each persistence will follow the persistence config of that model.
- if
on_cascadebehavior is not specified, therebuildoption will be used.
We will go into more details on the build options in the following section.
on_cascade options
To specify the behavior of a model persistence when being triggered by a downstream model, we add the on_cascade parameter in the persistence config:
persistence: FullPersistence {
  schema: 'persisted'
  view_name: 'cancelled_orders'

  on_cascade: 'rebuild'
  // on_cascade: 'reuse'
}
There are two options:
rebuild(default): the persisted table of the model will be rebuilt completely when its persistence is triggered by a downstream modelreuse: the persisted table will be reused
When to use each option:
rebuildoption should be used if data of a parent model change, and you want to reflect the change in the child models.reuseoption should be used if:- The model’s data is static
- You want to control the exact timing of the persistence process. E.g: enable reuse and add a schedule to refresh at 6AM everyday ⇒ it will only be rebuilt once everyday at that time, regardless of other cascading.
If a parent model has a schedule in schedules.aml file, a normal persistence job will be triggered beside the cascading trigger coming from the child model. This job will follow the model's persistence config (FullPersistence or IncrementalPersistence and disregard the on_cascade options.)
Example on build behaviors
Let's say we have the following setup:
model_buseson_cascade: 'reuse'option.model_a, model_c, model_duseon_cascade: 'rebuild'option.
- Model Setup
- Dependency Visualization
Model model_a {
  type: 'query'

  persistence: FullPersistence {
    schema: 'persisted'
    on_cascade: 'rebuild'
  }
}

Model model_b {
  type: 'query'
  models: [model_a]

  persistence: FullPersistence {
    schema: 'persisted'
    on_cascade: 'reuse'
  }
}

Model model_c {
  type: 'query'
  models: [model_a]

  persistence: FullPersistence {
    schema: 'persisted'
    on_cascade: 'rebuild'
  }
}

Model model_d {
  type: 'query'
  models: [model_b, model_c]

  persistence: FullPersistence {
    schema: 'persisted'
    on_cascade: 'rebuild'
  }
}
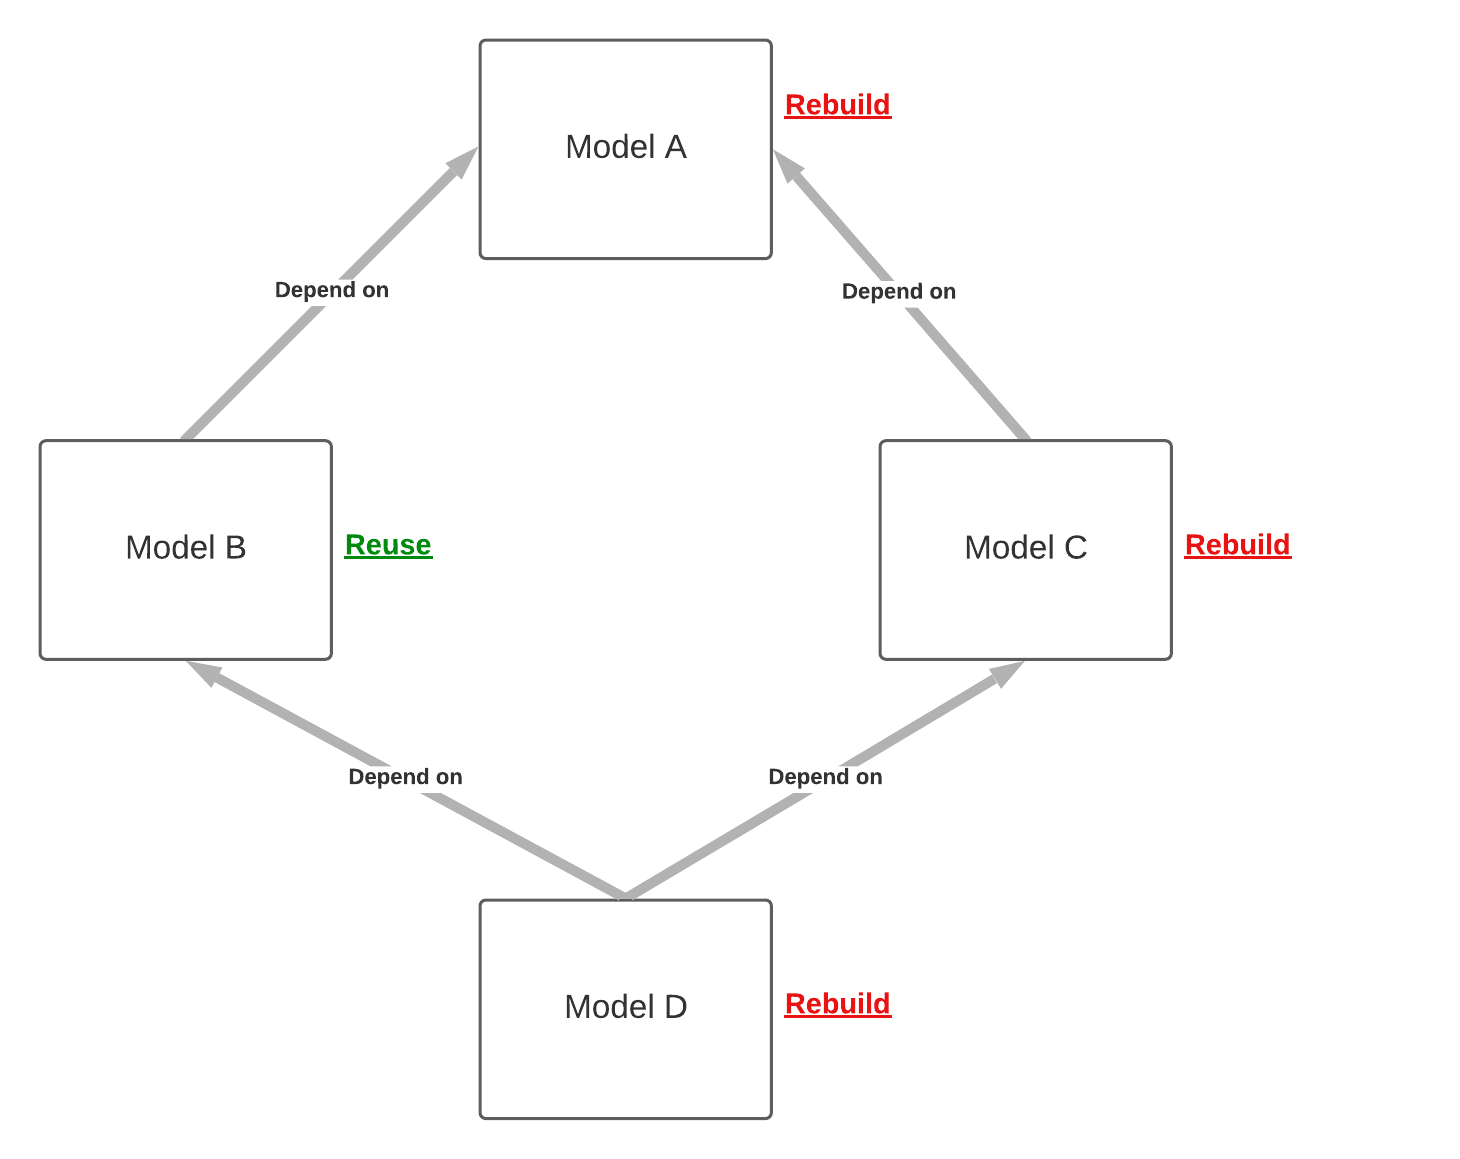
We also have the following schedules:
// schedules.aml

const schedules = [
  // Schedule 1: trigger model_d
  Schedule { models: [model_d], cron: ... }

  // Schedule 2: trigger model_b
  Schedule { models: [model_b], cron: ... }

  // Schedule 3: trigger model_a
  Schedule { models: [model_a], cron: ... }
]
The behavior of the persistence will be as follows:
- With Schedule 1, persistence of
model_dis triggered,model_aandmodel_care rebuilt.model_bis reused. - With Schedule 2, persistence of
model_bis triggered usingFullPersistence(on_cascadeoption is ignored). Persistence ofmodel_ais triggered (on_cascade: 'rebuilt'is respected). - With Schedule 3, persistence of
model_ais triggered, andmodel_ais rebuilt.
Persistence Table Optimizations
Model Persistence write the result set of your SQL into a physical tables in your Data Warehouse. This means you can apply table optimization features provided by your Data Warehouse to further improve the query performance on the persisted tables.
For example, a Data Warehouse may provide these features:
- Indexing (Postgresql, ClickHouse, MySql, SqlServer, etc.)
- Clustering (Snowflake, BigQuery, etc.)
- Partitioning (BigQuery, Postgresql, etc.)
- SORTKEY, DISTKEY (Redshift)
- Table Engines (ClickHouse, MySql, etc.)
- etc.
Such features can be applied using Custom Persistence DDL.
Custom Persistence DDL
Usage
By declaring the custom_ddl (Custom Data Definition Language) in a persistence config, you can customize the way the persistence table is created in your Data Warehouse.
For example, given this query model:
Model orders_fact {
  type: 'query'
  query: @sql
    select
      {{#o.id}} as order_id
      , {{#o.user_id}}
      , {{#o.status }}
      , {{#o.created_at}} as order_created_at
      , {{#o.delivery_attempts}}
      , {{#o.discount}}
      , {{#oi.quantity}}
      , {{#p.id}} as product_id
      , {{#p.price}}
      , {{#p.merchant_id}}
    from {{ #ecommerce_order_items AS oi }}
    left join {{ #ecommerce_orders AS o }} on {{#oi.order_id}} = {{#o.id}}
    left join {{ #ecommerce_products AS p }} on {{#oi.product_id}} = {{#p.id}}
  ;;
  // other Model configs...
}
We can declare a custom_ddl like this to add indexes to the persisted table:
Model orders_fact {
  type: 'query'
  query: @sql
    /* see sql above */
  ;;

  persistence: FullPersistence {
    schema: 'persisted'

    // BEGIN custom_ddl declaration
    custom_ddl: @sql
      /* Run parsed_query and persist it into persisted_table */
      CREATE TABLE {{ persisted_table }}
      AS {{ parsed_query }};

      /* Add indexes to the persisted_table */
      CREATE INDEX {{ index_name }} ON {{ persisted_table }} (order_created_at);
      CREATE INDEX {{ index_name }} ON {{ persisted_table }} ((order_created_at::date));
      CREATE INDEX {{ index_name }} ON {{ persisted_table }} (user_id);
      CREATE INDEX {{ index_name }} ON {{ persisted_table }} (status);
      CREATE INDEX {{ index_name }} ON {{ persisted_table }} (product_id);
      CREATE INDEX {{ index_name }} ON {{ persisted_table }} (merchant_id);
      CREATE INDEX {{ index_name }} ON {{ persisted_table }} (order_id, product_id);
    ;;
    // END custom_ddl declaration
  }
Let's break down the custom_ddl AML parameter:
-
It is a SQL DDL string and hence should be declared using
@sqlsyntax.- The exact syntax/dialect corresponds to the Data Warehouse of the Model. For example, if your Model's source is Postgresql, you need to use Postgresql DDL dialect.
-
It provides these template variables:
Variable Description parsed_queryThe final query/SQL generated from the Model. persisted_tableName of the physical table where the Model will be persisted into.
Your DDL must use this table name so that Holistics can query it properly.index_nameA uniquely generated index name. It will be unique for every instance of usage.
This helps you conveniently create many indexes without having to worry about index name collision.
For the above example custom_ddl, Holistics will run this query when executing the Model Persistence:
/* Run parsed_query and persist it into persisted_table */
CREATE TABLE "persisted"."order_master__H518f24_T1923344"
AS select
  "o"."id" as order_id
  , "o"."user_id"
  , "o"."status"
  , "o"."created_at" as order_created_at
  , "o"."delivery_attempts"
  , "o"."discount"
  , "oi"."quantity"
  , "oi"."product_id"
  , "p"."price"
  , "p"."merchant_id"
  , "oi"."order_id" as test_broken
from (
  SELECT
    "ecommerce_order_items"."quantity" AS "quantity",
    "ecommerce_order_items"."product_id" AS "product_id",
    "ecommerce_order_items"."order_id" AS "order_id"
  FROM
    "ecommerce"."order_items" "ecommerce_order_items"
) AS "oi"
left join (
  SELECT
    "ecommerce_orders"."id" AS "id",
    "ecommerce_orders"."user_id" AS "user_id",
    "ecommerce_orders"."status" AS "status",
    "ecommerce_orders"."created_at" AS "created_at",
    "ecommerce_orders"."delivery_attempts" AS "delivery_attempts",
    "ecommerce_orders"."discount" AS "discount"
  FROM
    "ecommerce"."orders" "ecommerce_orders"
) AS "o" on "oi"."order_id" = "o"."id"
left join (
  SELECT
    "ecommerce_products"."price" AS "price",
    "ecommerce_products"."merchant_id" AS "merchant_id",
    "ecommerce_products"."id" AS "id"
  FROM
    "ecommerce"."products" "ecommerce_products"
) AS "p" on "oi"."product_id" = "p"."id";

/* Add indexes to the persisted_table */
CREATE INDEX idx_7bfbea69fc9f7ad857259e007c5ebba7 ON "persisted"."order_master__H518f24_T1923344" (order_created_at);
CREATE INDEX idx_65bca19291cce8af52e3c56326a6d673 ON "persisted"."order_master__H518f24_T1923344" ((order_created_at::date));
CREATE INDEX idx_c1cb8848fe960f11867dca397eeec9d5 ON "persisted"."order_master__H518f24_T1923344" (user_id);
CREATE INDEX idx_2043e1826d0198f8eb310900e11a20ae ON "persisted"."order_master__H518f24_T1923344" (status);
CREATE INDEX idx_684ba1e7d8dbaa8ec7c1b4279e22be64 ON "persisted"."order_master__H518f24_T1923344" (product_id);
CREATE INDEX idx_7a74a60d164ccc9a2ed726c63c90d2ec ON "persisted"."order_master__H518f24_T1923344" (merchant_id);
CREATE INDEX idx_cfe6ad4d54928ec97888505ccc0bf6db ON "persisted"."order_master__H518f24_T1923344" (order_id, product_id);
Using templates
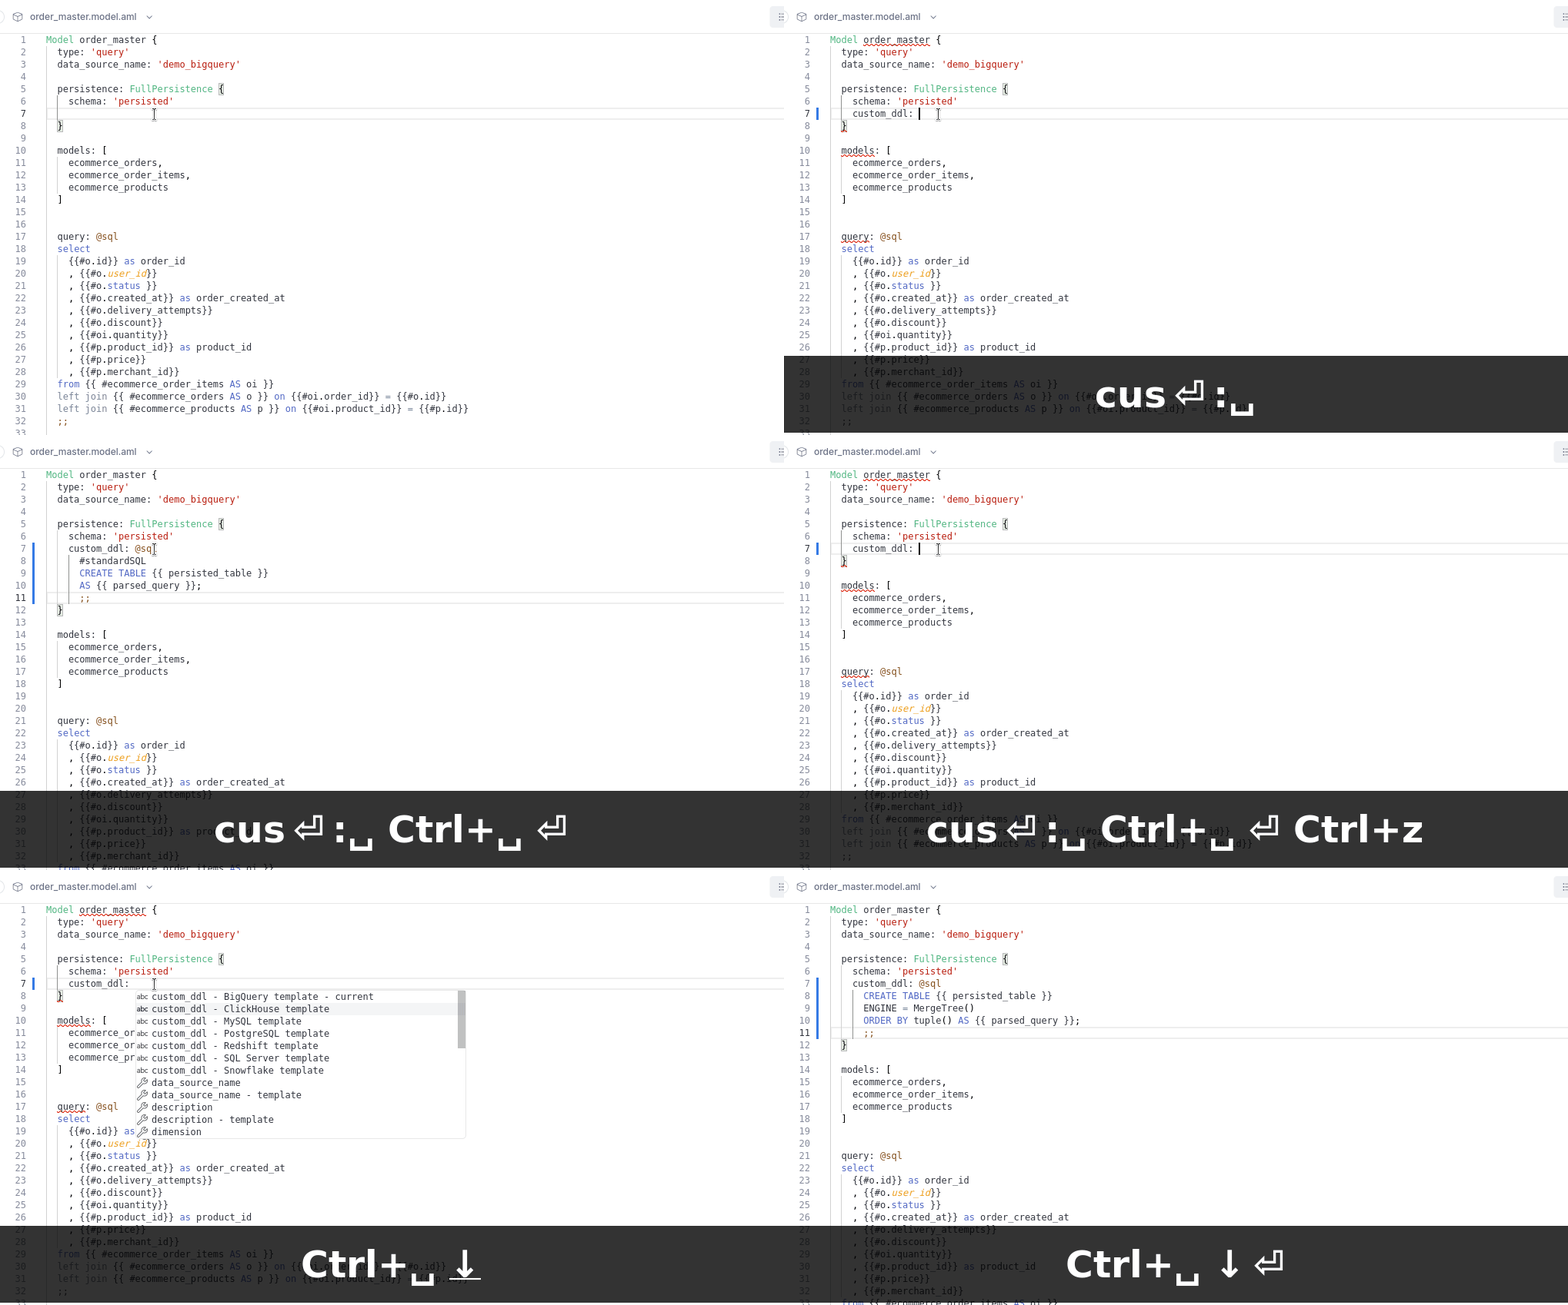
In Holistics AML editor, after typing custom_ddl: (with the colon), use Ctrl + Space to list and use the built-in custom_ddl templates.
Supported Data Warehouses
Currently, Custom Persistence DDL supports these Data Warehouses:
- BigQuery
- ClickHouse
- MySql
- Postgresql
- Redshift
- Snowflake
- SqlServer
Incremental Persistence Caveat
custom_ddl is only applied when creating the persistence table.
Thus, for Incremental Persistences, it will only be executed once in the first run of the Incremental Persistence.
As a result, updating the custom_ddl of an (already-persisted) Incremental Persistence won't have any effect.
To effectively change how the table of an Incremental Persistence is created, the existing persisted table must be dropped first. In future releases of Holistics, we will try to make it more convenient to reset the table creation of Incremental Persistences.
Other notes
Delay in persistence job execution
The persistence may not run at the exact time intervals that you set due to:
- Flow-based (cascading) persistence.
- Not having enough workers for persistence jobs. Persistence jobs are assigned to the Data Transform queue.
Smallest possible run frequency
The smallest possible run frequency is 5 (five) minutes. This is because we scan cron every five minutes. Even if you schedule a persistence to run every one minute, it will still run at every five minutes.
Trigger-based execution is currently not supported
A common scenario where users want to trigger persistence process is when the result of the model's SQL returns a new value comparing to the existing values. However, this feature is not supported yet in holistics.
When will the persisted table be invalidated?
The Persisted table will be automatically invalidated and removed in the following scenarios:
- When persistence config and related schedule is removed from production. The persisted tables will be retained for 24 hours before being removed.
- When the current model or upstream dependencies changed. This includes a change to query, incremental column, primary_key, model name, etc.