Cross-filtering
A grasp of these concepts will help you understand this documentation better:
What is cross-filtering?
Cross-filtering makes it easier for viewers to interact with the dashboard's data and see how reports interact with one another.
For example, you can click on the slice Philippines in Revenue Distribution by Country to see only the GMV, user count, and conversion funnel of buyers from that country.
How to use cross-filtering
Configure cross-filtering
Cross-filtering is enabled by default for Canvas dashboards.
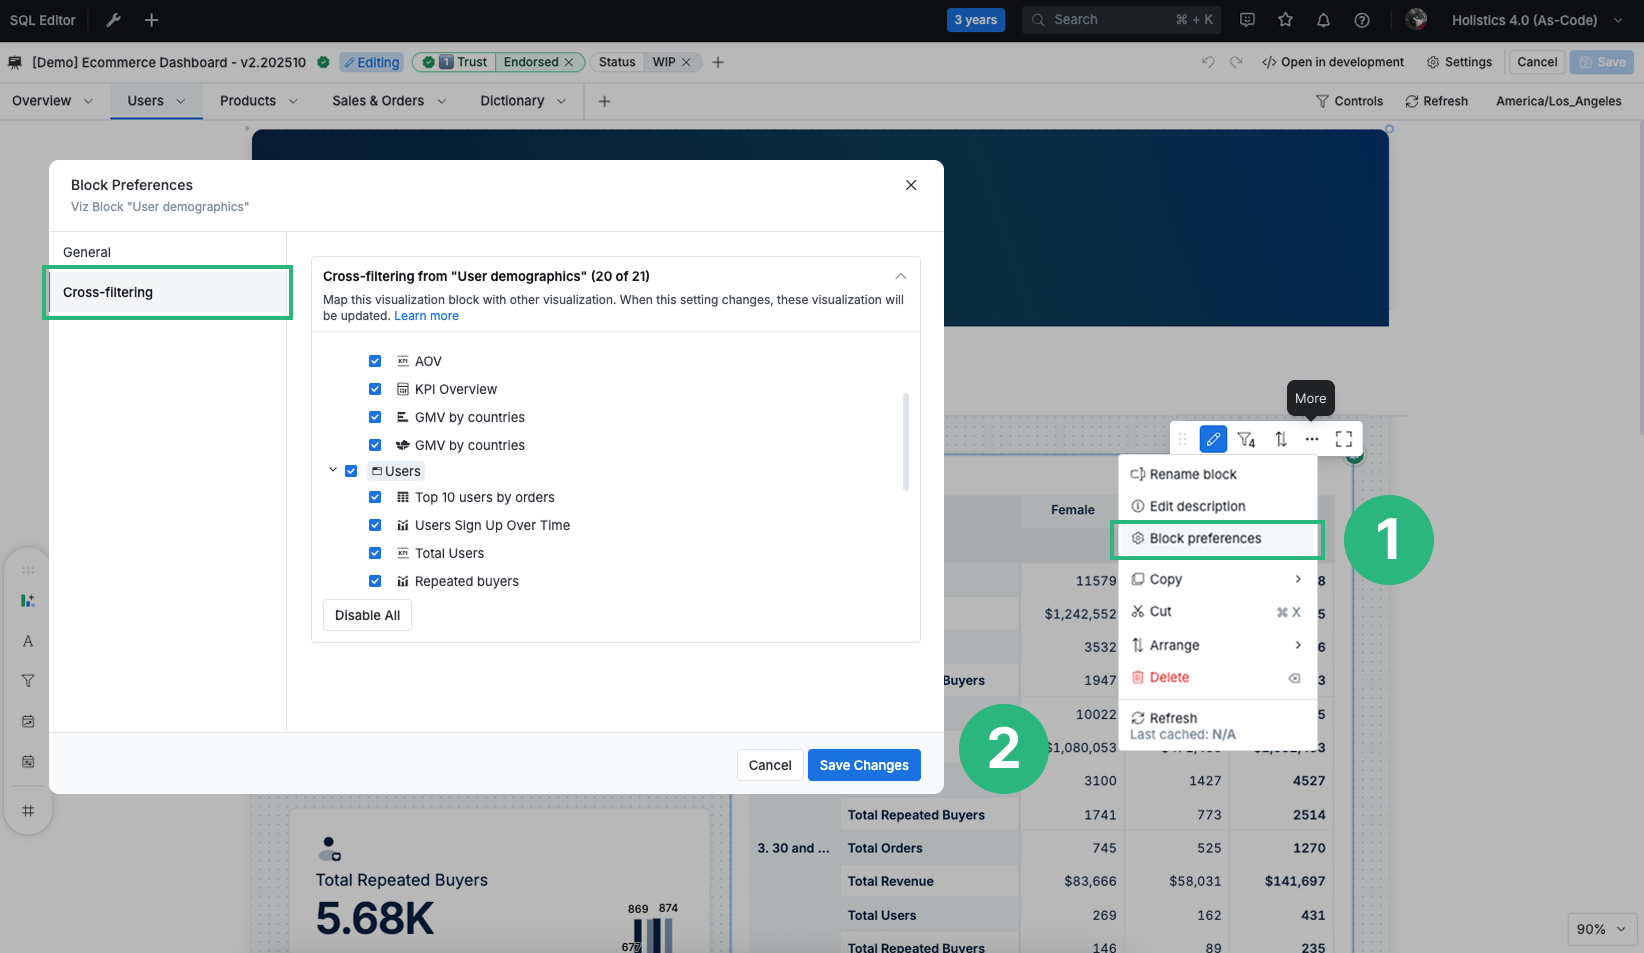
You can disable any visualization blocks that you don’t want to participate in cross-filtering by going to Block Preferences → Cross-filtering and turning off the option.

Apply cross-filtering
To start cross-filtering, click on any data point in any chart. A series of events will happen:
-
Blue filters will show up on the filter panel which indicates that all the values related to the clicked data point are being applied to all reports in that dashboard.

-
The reports are filtered by the blue filters. You might see a visual change in the charts.
-
A blue funnel icon will appear to the right of the report name, which indicates that the blue filters are applying to that report.

Remove cross-filtering
If you want to remove the current cross-filtering filters, there are 3 ways:
- Click on that same data point once more, and wait for the dashboard to return to its original state.
- Click on another data point. The previous blue filters will be replaced by a new set of blue filters.
- Click on the "x" icon next to each blue filter to remove them individually.
How does cross-filtering work?
High-level
In Holistics, when you cross-filter a widget, that widget will become the dashboard filter that takes the values of the record that you have clicked on. The filter's values will be applied to other reports (generated from the same dataset) in the same dashboard.
Details
Holistics will use the values of all dimensions in the record that you click on and apply them to other widgets in the same dashboard.
If two widgets are generated from data models that have a relationship, the data from the source widget (the one that contains the data point you click on) will be applied to the destination widget (the one that does not contain the data point you click on).
However, if two widgets generated from data models that do not have any relationship with each other, the destination widget can't be cross-filtered.
Examples
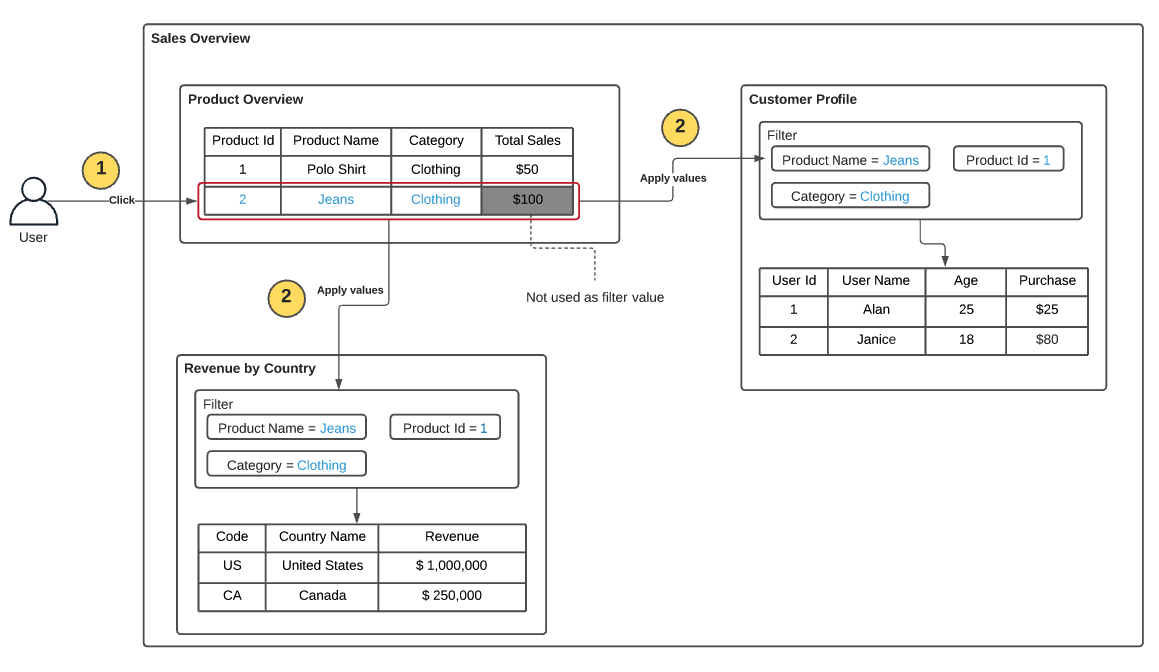
Let's say you have a Sales Overview dashboard, which contains 3 reports: Product overview, Customer Profile, and Revenue by Country
When you click on Jeans in Product overview (1), all the dimensions related to Jeans (Category = Clothing, Product Id = 2) will be used as filter values for Customer Profile and Revenue by Country (2)
As a result, you will see
- The people who purchased Jeans this year (in the
Customer profilereport) and - Jeans' revenue by country (in
Revenue by Country)
Note: Total Sales of Jeans is a measure, so it is not used as the filter value.

Supported visualization types
The following visualization types are supported for cross-filtering:
- Table
- Pivot Table
- Line chart family: Line/Bar/Column/Area/Combination chart
- Pie chart family: Pie/Funnel/Pyramid chart
- Scatter chart family: Scatter/Bubble chart
- Custom charts (with proper setup following this guide)
All other charts are not supported.
Notes
Cross filtering cannot work well with timestamps if your account does not use our new timezone mechanism.
Our cross filtering feature cannot work well with timestamps if your account does not use our new timezone mechanism. For more information, you can read our doc here.
Therefore, if you apply cross filtering by a timestamp fields, the result would show the error that "cannot find a match”.
There are some possible solutions for this case:
- Allow us to enable the new timezone feature on your end
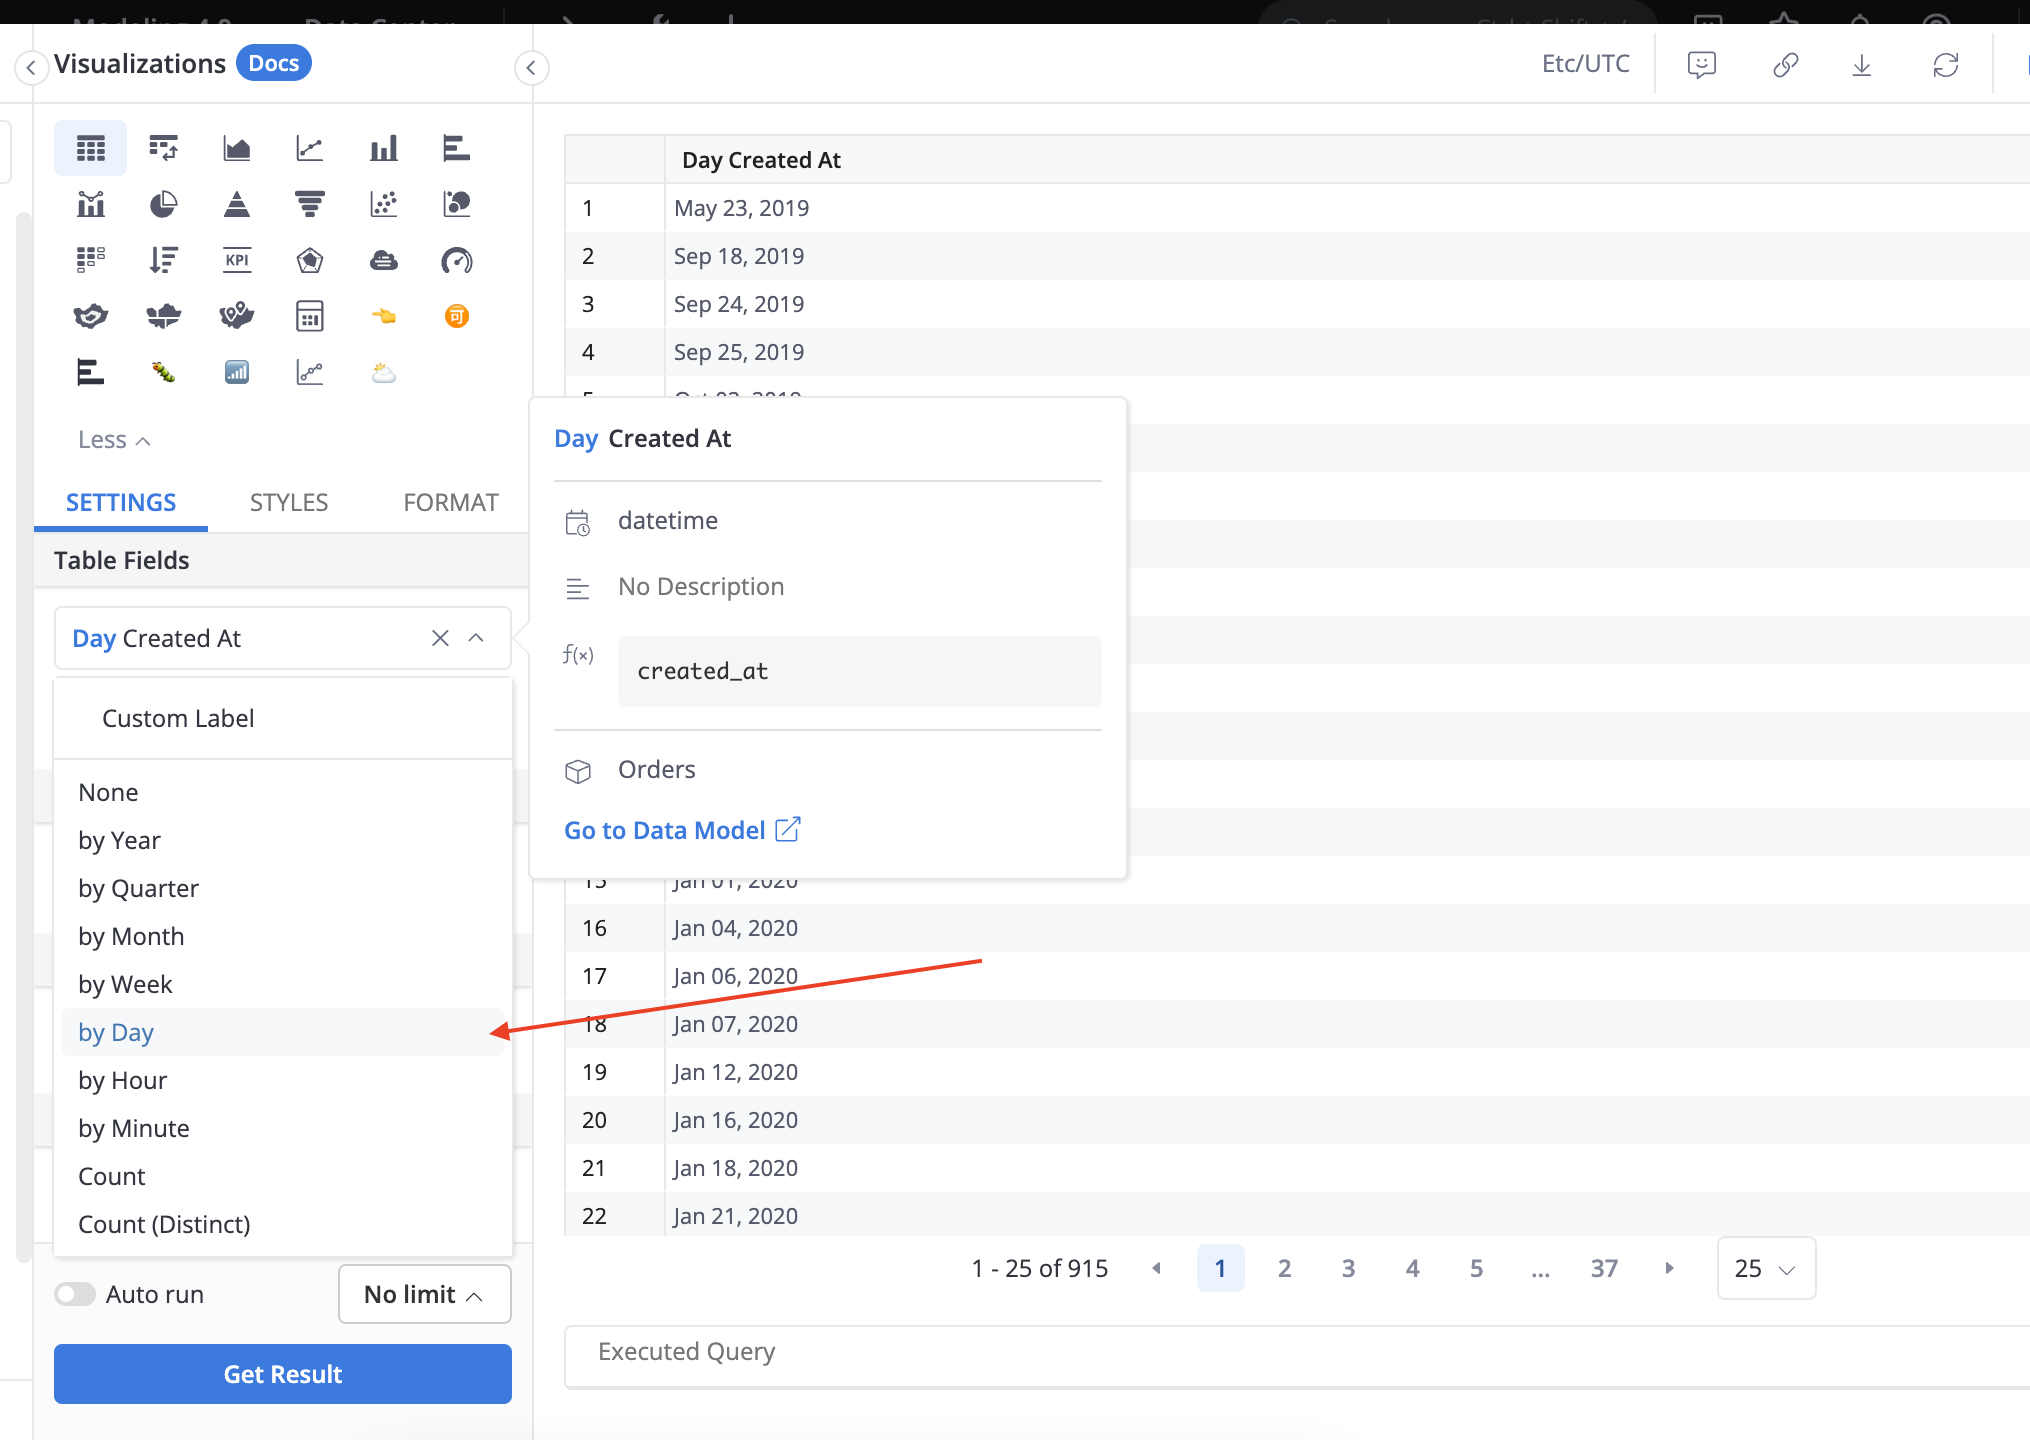
- Truncate the timestamp field to Date
In case you do not want to try our new timezone feature, you can truncate the created_at field to Date as follows:

Since this feature is in beta, you might experience some bugs and unexpected operations.
If you have any concern or feedback about the feature, please fill in the form below, and we'll reach out to you!