Data Alerts
Introduction
Data Alerts allow users to receive automatic notifications when the data meets certain conditions, so they can make timely and strategic decisions for their business. You can also send Data Alerts to a webhook endpoint, turning a dashboard condition into an event that triggers work in another system.
Choose Webhook as the alert destination when you want Holistics to push matched data into a CRM, marketing automation tool, support platform, or custom workflow. For example, you can monitor a segment such as members who have not visited in 90 days, then trigger a re-engagement campaign the moment the condition is met.
How Data Alert works
High level
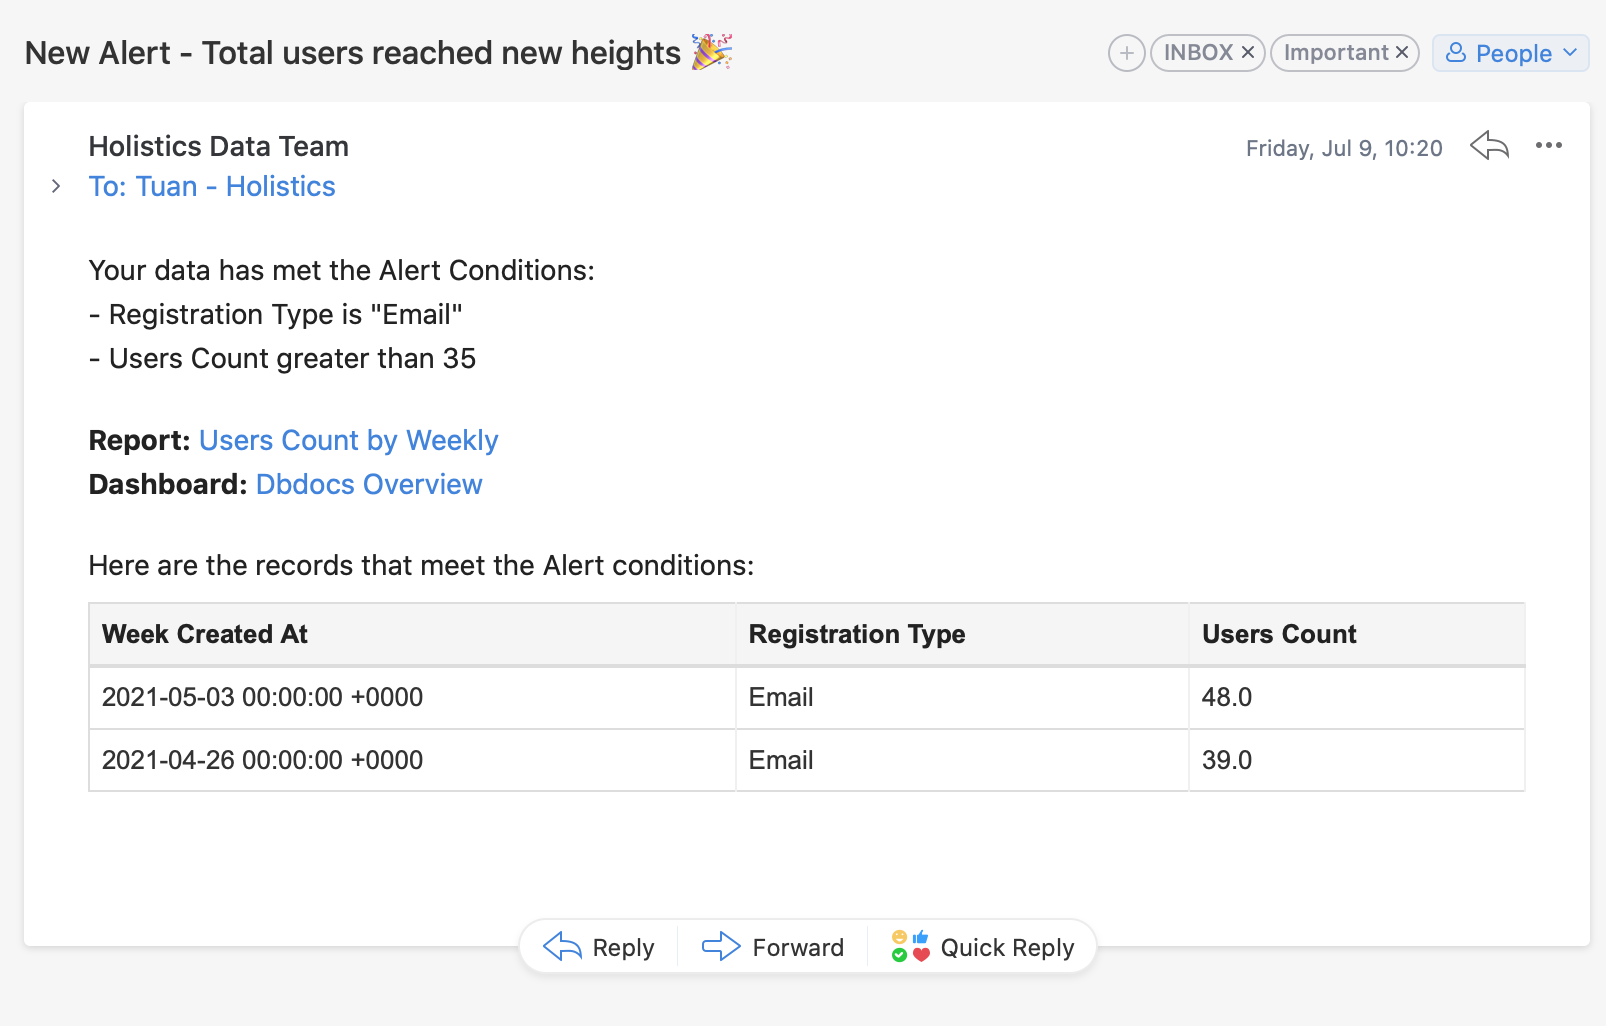
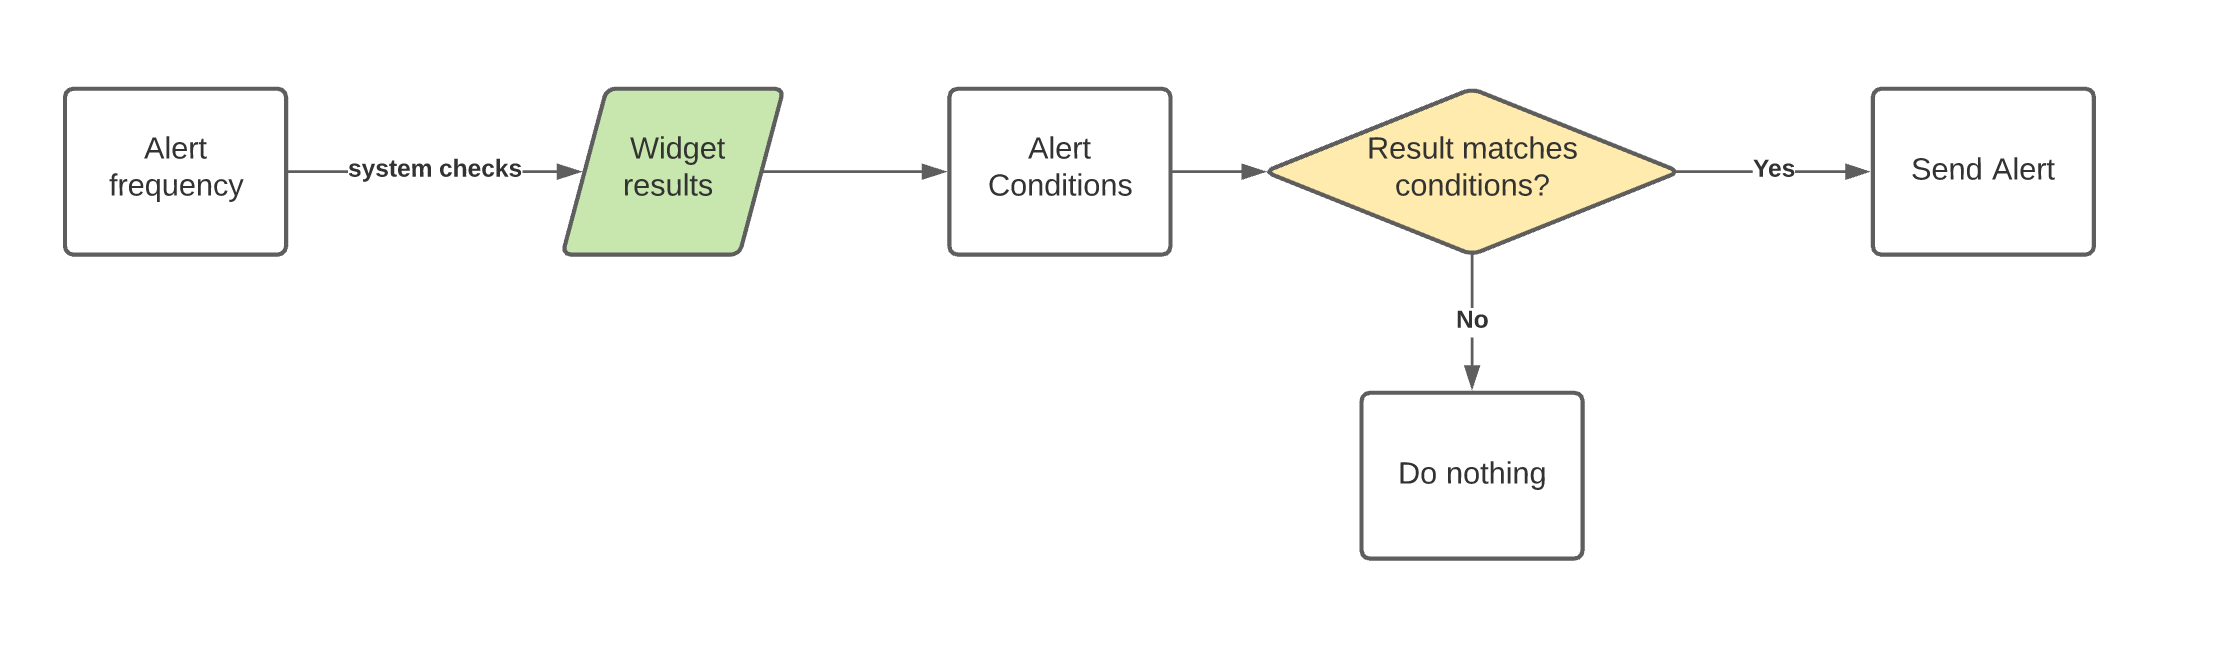
Holistics Data Alert will be applied on each widget. Holistics will check the widget results at a user-specified frequency. Then, if the results match a certain set of conditions, our system will send an alert to users via the selected channel.
Details
Holistics Data Alert comprises three main components:
1. Alert Conditions
Alert Conditions are the criteria that the data must meet in order for the alert to be triggered. It contains a field (including Business Calculations fields), an operator, and a value. The fields that you can select are limited to fields used in the widget's settings.
If a field is removed from the widget settings, it will also be removed from the Alert Condition and displayed as an "Invalid field". The alert will still run, but it will fail and will notify you via email.
Note: When the alert runs, it will scan the complete explore result, and then send an alert if any record in the result matches the conditions
2. Alert Frequency
Alert Frequency specifies how often Holistics checks if the widget results meet the Alert Conditions.
For example, you have a widget for "App's Daily Active Users". You want to be notified when the number of daily users passes 1000. If you set the Alert Frequency to be Daily at 8:00 AM, Holistics will start checking the data at 8:00 AM every day to see if it is over 1000 or not.
3. Alert Destination
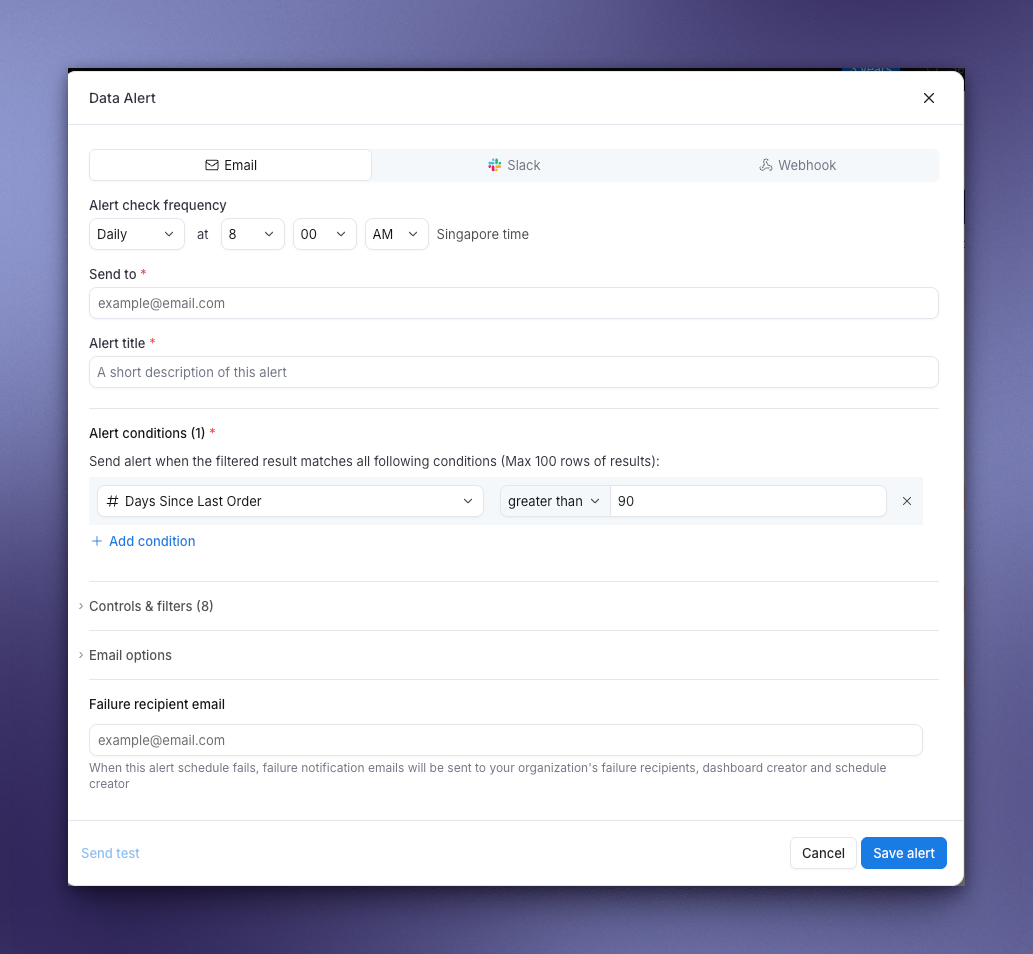
Alert Destination is the channel where you receive your alerts. When you create an alert, you pick the channel that fits how your team works. Holistics supports three delivery channels:
- Email: Send alerts to one or more email addresses.
- Slack: Post alerts to a Slack channel (pick it from the list, or enter the channel ID manually if it isn't shown).
- Webhook: Send alerts to a webhook endpoint so you can integrate with third-party applications and services. Use this when the alert should trigger an action outside Holistics, such as updating a CRM segment, sending leads to a marketing automation flow, opening a support ticket, or calling an internal API.
You choose the channel at the top of the Data Alert dialog, and the form swaps in the field that channel needs.
For more on configuring webhook endpoints, see the Webhook documentation.
Example: Trigger re-engagement from a data segment
Webhook alerts are useful when your data condition is the start of an operational workflow, not just something a person needs to read. Instead of exporting a list on a schedule, Holistics can evaluate the latest widget result and send the matching records to another system when the condition is met.
For example, a customer success or marketing team could create a report of members who have not visited in the last 90 days, then create a Data Alert with these settings:
- Set the alert condition to match members whose
days_since_last_visitis greater than or equal to90. - Select Webhook as the destination.
- Enter the webhook endpoint from your CRM, marketing automation platform, Zapier, Make, or your own integration service.
- Choose the check frequency that fits the campaign, such as daily at 8:00 AM.
When Holistics finds matching records, it sends the alert payload to the webhook endpoint. The downstream system can then add those members to a re-engagement audience, start an email journey, create a task for an account owner, or trigger any other workflow your team has configured.
Set up Data Alerts
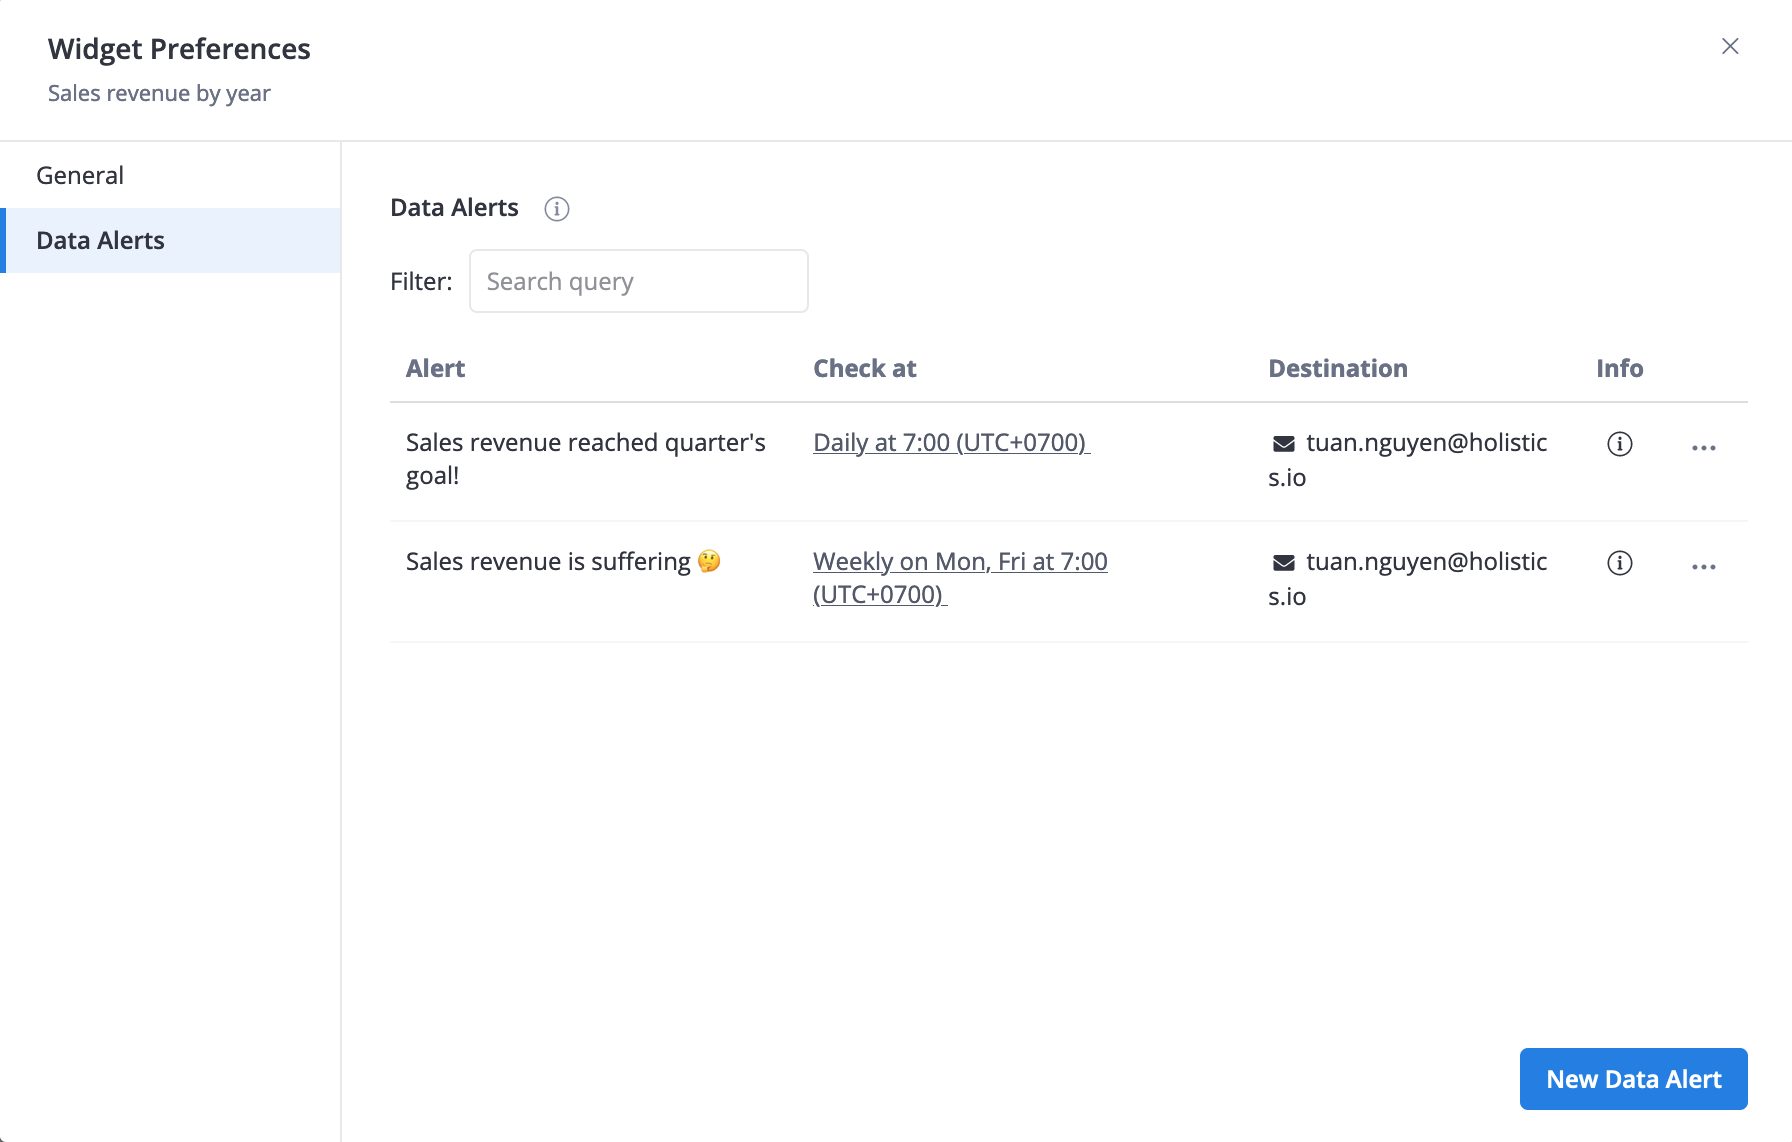
To start creating an alert, select Data Alert from the menu icon of the report > click Data Alert > Create new alert:
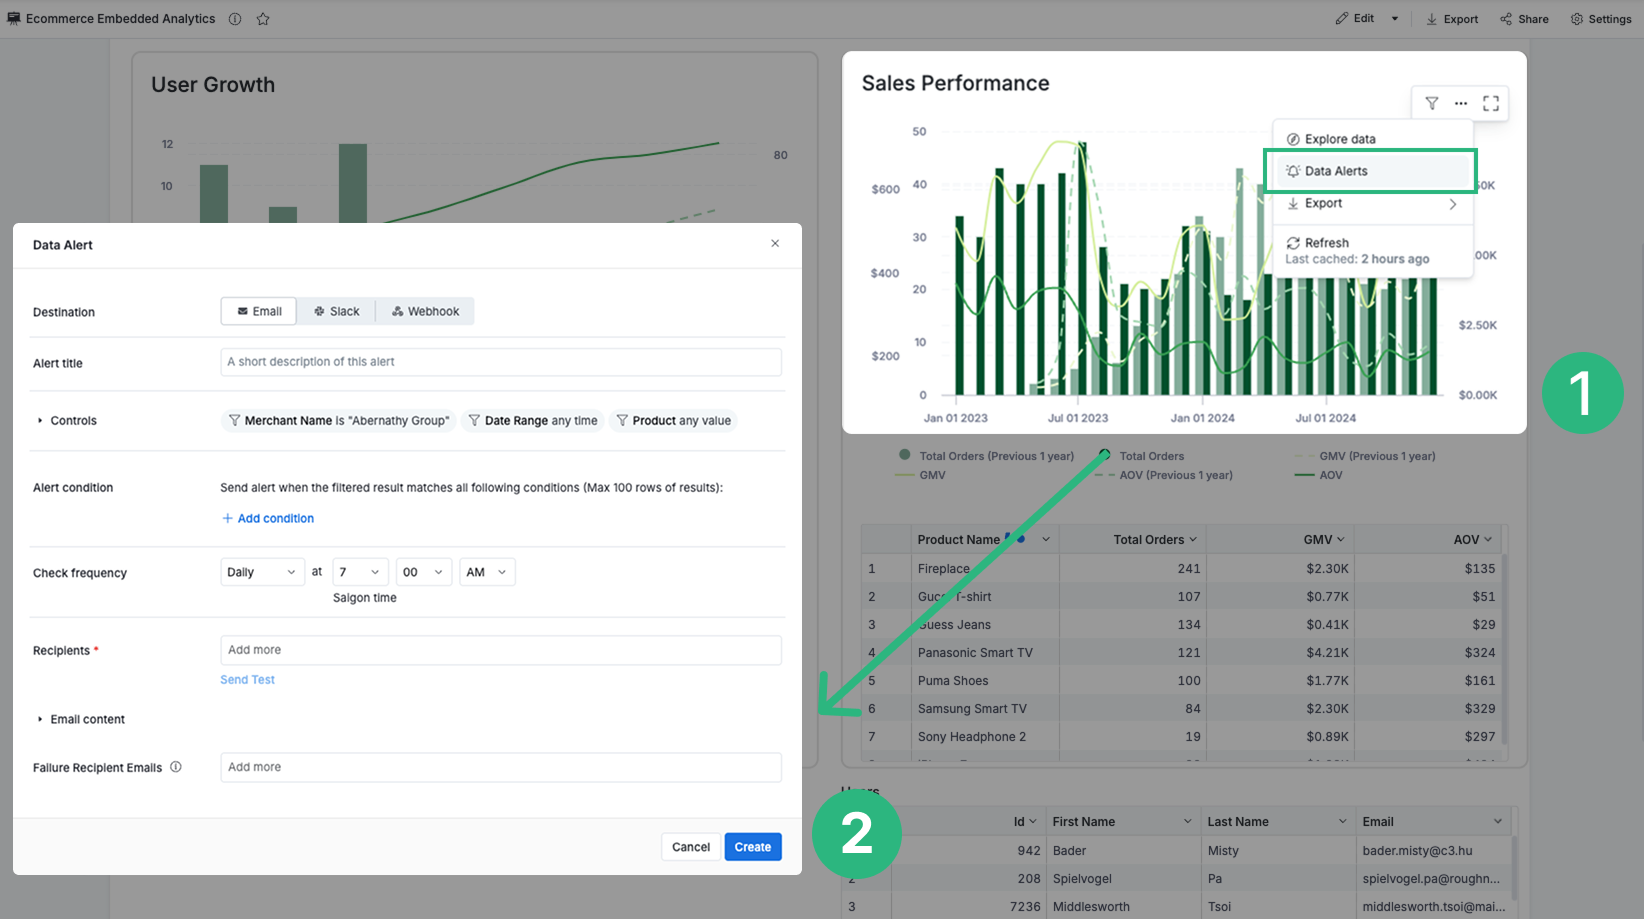
Then fill in the following sections:
- Title: Provide a name for your alert
- Destination: Select the channel you want to send the alert to (Email, Slack, or Webhook).
- Recipients / Webhook Endpoint: For Email, enter the email addresses who will receive the alert, separated by commas. For Webhook, enter the HTTPS endpoint that should receive the alert payload.
- Alert Conditions: Select the condition that you want your data to meet.
- Check Frequency: Specify how often you want Holistics to check if your data meets the condition set in Alert Conditions.
- Controls (optional): Customize dashboard controls before sending alerts. You can adjust Filters, Period Comparison, and Date Drill.
- Changes made here will not affect the main dashboard.
- You can only modify existing controls. New controls cannot be created.
- The selected controls will be applied to the widget result before Holistics checks whether it meets the Alert Conditions.
- Message: You can customize the alert message using HTML (for Email) or Slack markup (for Slack) and dynamic variables like
{{$dashboard_title}},{{$today}}, and more. See Dynamic Variable Support for details. - Failure Recipient Email (optional): A comma-separated list of email addresses to receive notifications when the alert fails to deliver, in addition to the alert creator and the dashboard/report creator. Learn more in Notify Delivery Failures.
Manage Data Alerts
There are two ways to manage the alerts you have created.
- To manage all the alerts of a report, click on the menu icon "..." in the top right of a report, and select Data Alert. At the Data Alert modal, you can view basic information about an alert: Title, Frequency, and Destination. Clicking on the menu icon "..." will give you 3 options: Edit, pause, or delete an alert.
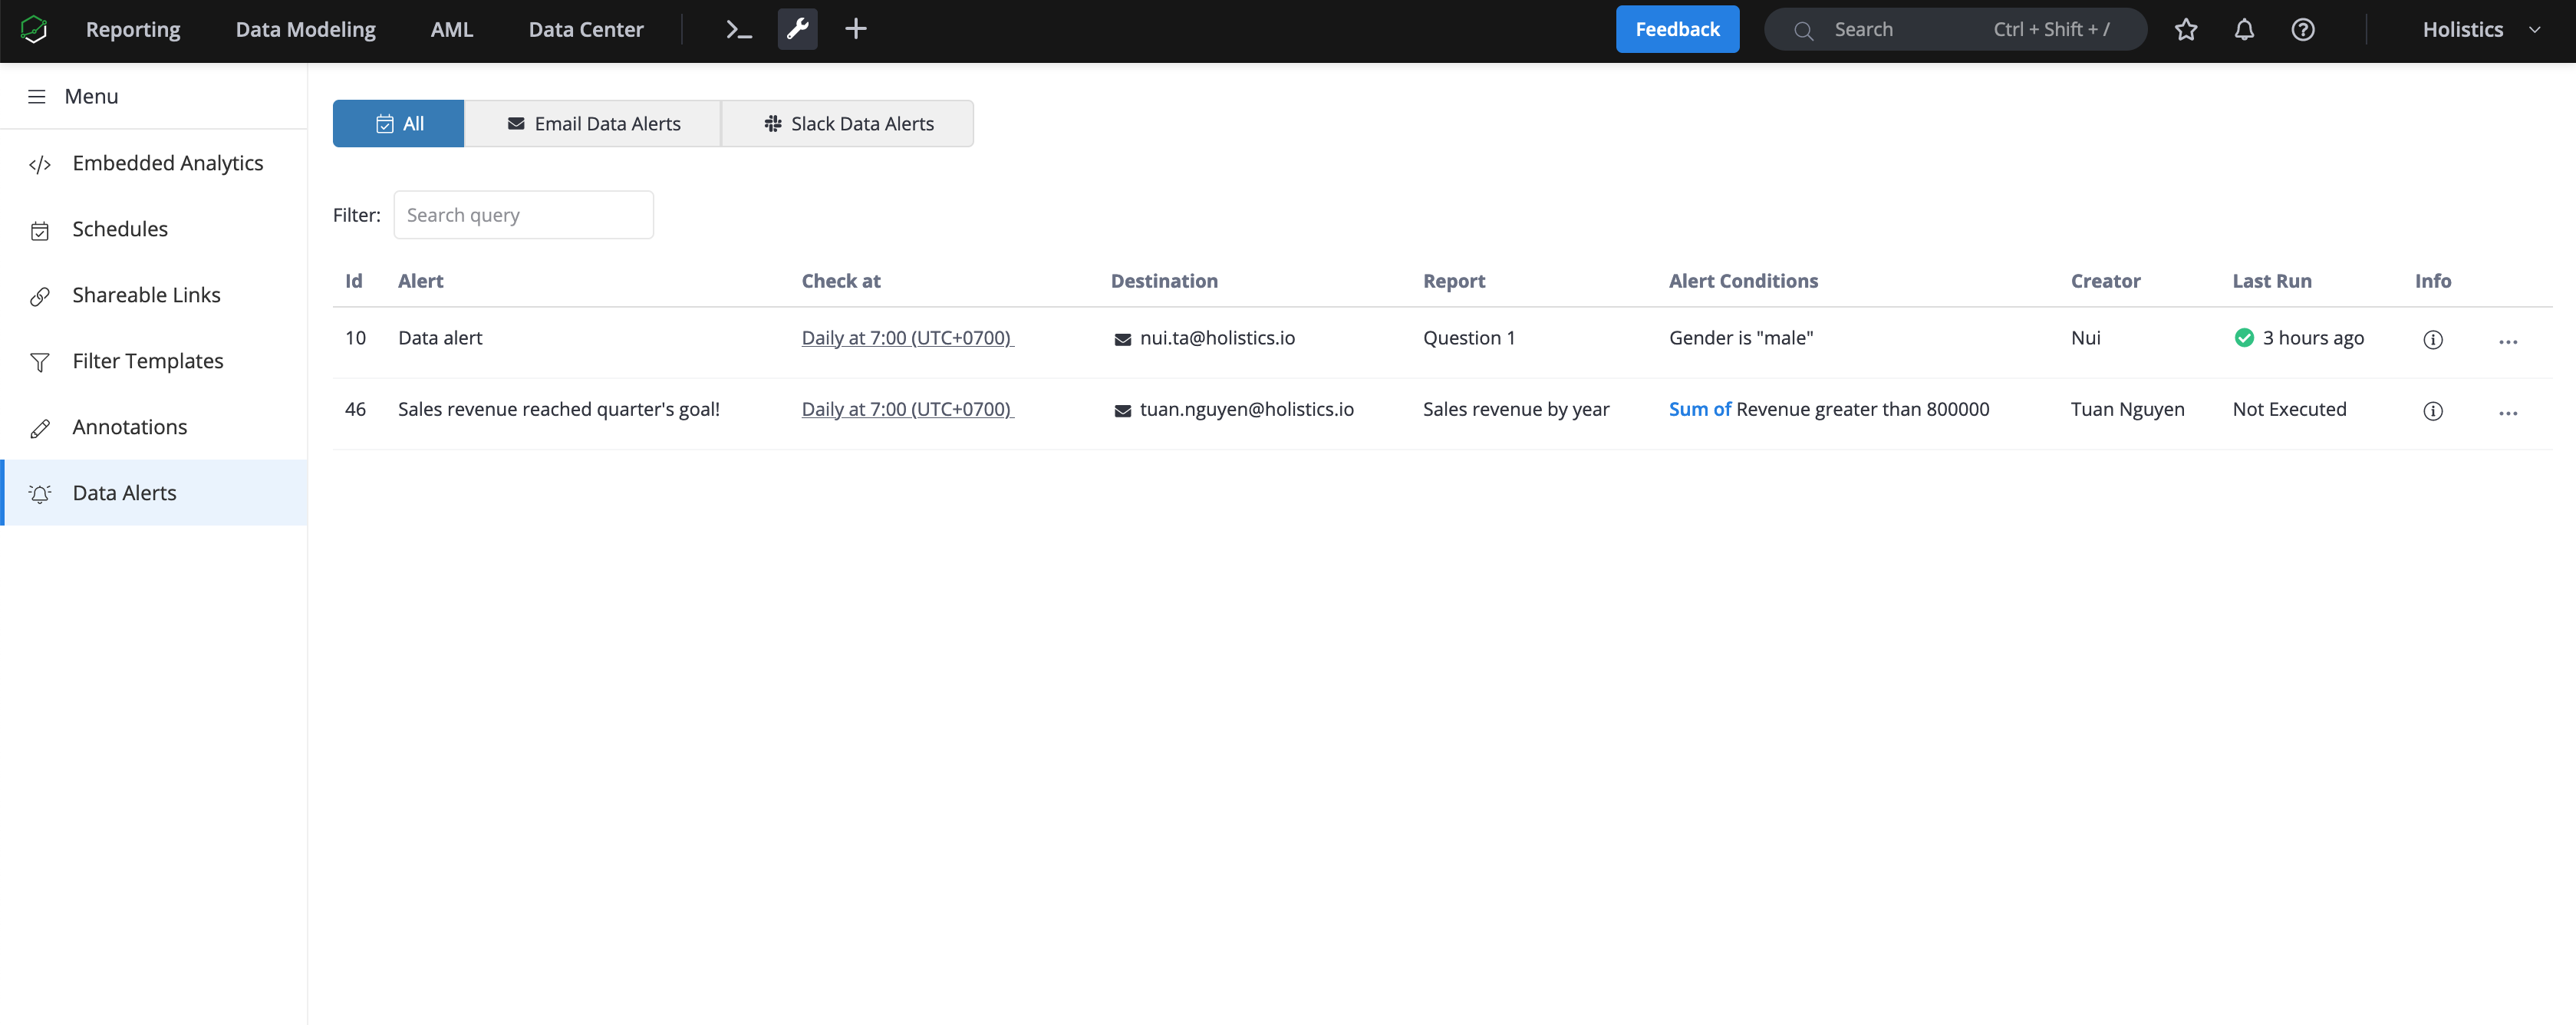
- To manage all the alerts you have created, click on Tools > Data Alert. Here, you can filter alerts by their channel: Email, Slack, or Webhook.
Data Alert: Dynamic Variable Support
You can use the following variables to personalize your Email and Slack alert messages:
| Variables | Description | Email Subject | Email Body | Slack |
|---|---|---|---|---|
{{$matched_conditions}} | List of alert conditions | ❌ Not available | ✅ | ✅ |
{{$matched_data}} | Table of met records | ❌ | ✅ | ❌ |
{{$dashboard_title}} | Insert the dashboard title | ✅ Available | ✅ | ✅ |
{{$dashboard_url}} | Include a link to the dashboard (accessible only to users with the right permissions) | ❌ | ✅ | ✅ |
{{$dashboard_controls}} | List the applied dashboard controls | ❌ | ✅ | ✅ |
{{$report_label}} | Insert the report/widget title | ✅ | ✅ | ✅ |
{{$report_url}} | Include a link to the widget (accessible only to users with the right permissions) | ❌ | ✅ | ✅ |
{{$today}} | Display the date the schedule is sent. Example: Sales report for {{$today}} → Sales report for 2024-02-18 Tue. | ✅ | ✅ | ✅ |
{{$yesterday}} | Display the previous day's date | ✅ | ✅ | ✅ |
{{$this_month}} | Display the current month | ✅ | ✅ | ✅ |
{{$last_month}} | Display the previous month | ✅ | ✅ | ✅ |
To be supported
Attachment files with format: PDF, PNG, CSV, Excel.
FAQ
1. Which role can add or edit a Data Alert?
Users with Admin and Analyst roles can add or edit any Data Alerts.
2. Can I edit/remove the Data Alert created by another person?
Yes, if your role in Holistics is Admin or Analyst, you can do that.
3. When to use Dashboard filters?
It's best to use Dashboard filters when you want to limit the widget results before Holistics checks if that result meets the Alert condition.
Also, you might consider using Dashboard filters as an alternative to Alert Conditions when the field you want to set as Alert Conditions does not exist in the widget settings.